I wanted to make sure I remembered all the steps in making these blocks as I really liked them and they were a bit tricky. This is the quilt using the hexagon log cabin blocks. I didn't notice until later but the first row was turned the wrong way. I was confused when I was in the class as for some reason I kept concentrating on only the top two rows. The blocks in the top row should each have been turned so that the light was pointed down, so that there are light blocks meeting the yellow in the center. The rest is right. I don't know whether she mentioned this in the class or not as I am not the greatest listener!!
What is interesting is that I couldn't find any other versions of this arrangement of hexagon log cabins on Pinterest
Anyway, onward to some details.
You start with a 2 1/2 inch hexagon made by using the hexagon ruler (not going to give all the details!! as you need to take the class to figure out how to use the ruler).
Here I have attached the first three lights. She did them one at a time but I found you didn't need to in this step before you trim to size. (You do in the next step though.)
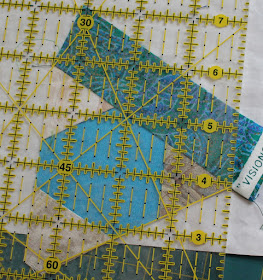
The 60 degree line on this ruler is between the 3 and 4 inch mark. You place this on one of the seam lines and make sure that the hexagon measurement from the edge across is 2 1/4 inches at this point. Then trim. You can trim both at the same time in this step (she didn't do it this way -- she did each strip individually before attaching the next one).
All three sides are trimmed and you can see they are kind of blunt on the end.
The first row of darks is started and you do need to trim each one individually for this step.
This is the first cut in the second row. The 60 degree line is along the bottom. You can see that the triangle measures 1 1/4 inches with the cutting line nice and straight.
The 60 degree line is along the seam line at the top and you can see again (although hard) that the triangle right next to the dark is again 1 1/4 inches high. You do each of the three individually -- very important for this one.
This is what it should look like after all of the first row of dark are added. It becomes easier from here!!
Here I have added the second row of lights. I have found it was easiest for me to put the 1 1/4 edge of the ruler over one of the dark strips and then kind of find the 60 degree line and adjust it there. Both measurements are important and if the fudging is to be done, make the strip a little narrower or wonkier to make sure you have the 60 degree line accurate. From here on out, it is the same as that first step where you trim two sides at one time.
This is what it looks like after trimmed. Keep adding strips three at a time ending with a dark row.
Here are the blocks I did yesterday. I am going to use a light yellow where the three lights meet and may go with a blue where the three darks meet -- different from her set. We shall see. I set up my FW and have the starts of a bunch more blocks. This was a perfect project for me as I love hexagons of all kinds, love scrap quilts and love log cabins -- bingo!
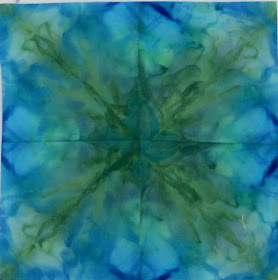
Today was spent getting ready for a class I have in about 10 days. Cutting strips while watching tv is very relaxing and I have a bag full of beige, yellow, blue, purple and green strips for a class on hexagon log cabins which looked like just fun. Playing with one of the mandalas folding and refolding gave me an idea of what to do with some I didn't care for as much as others.
I took this square and cut into quarters and then each section into quarters again resulting in the following:
The ones on the top row would have been vastly improved with insertions of other colors before sewing them back together but the two on the bottom row aren't bad.
I decided that these would be an excellent exercise to practice some quilting before I approached the bigger quilts. I decided this was a good sacrifice for the cause!! If you haven't figured it out, I basically had taken those sixteen squares I made cutting up the 22 inch block and matched each with the other three squares that were in the same position in the bigger block. I then trimmed down the blocks so they were 10 x 10 inches. I quickly backed this with batting and some random dyed fabric and played with some quilting.
I should comment here that I had decided not to try to follow the lines of the mandala for quilting but to quilt a pattern over the block.
My first step in quilting was to do straight lines following the fold lines, so corner to corner and then bisecting each side. At this point, I took out the pins as it was stabilized. I had looked at Pinterest for inspiration but did my own design. Pinterest gave me the ideas to just ignore the lines in the mandala though.
I chose a bright blue thread and you can see it pretty much just blends in unless you look very close. I haven't decided whether I will go with darker or lighter thread ultimately. I also have some nice blue/aqua variegated that I might use.
Here you can see the quilting more closely. I think I have the right idea. The quilting isn't going to show unless you get close, and then it will be a surprise which is what I like in quilts -- a different look when close or far away.
There was enough batting and backing hanging on the sides, that I could do a little border. Now to decide whether to just finish it off or combine it with other blocks.
Start to finish from cutting up the squares to having a finished quilted piece took about an hour altogether!!
Now to just get these finished tops basted and quilted!!
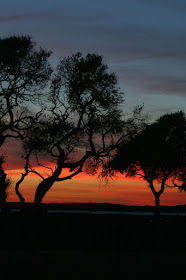
The sunset at Ft. Fisher a few days ago was about the best yet imho! A few of us were clicking away and just oohing and aahing it was so gorgeous. I will post just a few of the 150 photos I took over period of about 20 minutes as it was everchanging.
There is definitely going to be a quilt from one of these or a combination of some of them. the colors were so inspiring -- especially the dark blues and the bright oranges.
This was one of the best vertical views. No wonder we were so excited!
For three days I have been down to Ft. Fisher trying to catch sight of the Harlequin Ducks which have been reported down there. Nothing on the first day but several nice Black Scoters were there on day 2.
A real treat on that day was a Sun Dog appearing through the trees at almost dusk. These are rainbow like cloud formations caused by the reflection off ice crystals.
Another view where you can see the sun dog more clearly.
On Day 3, I finally saw a couple of the Harlequin Ducks. I took many many pictures but the birds were so far out, I was afraid none would be good enough to post at all. I was surprised that several were pretty good. This is a male with his very distinctive spots. You literally could barely tell what they were even through the telephoto lens! A nice man was there with a spotting scope so we could see where the birds were!
This is the juvenile Harlequin and is not so colorful.
Just realized I left this picture of the blog. It really shows the colors of the Harlequin Duck and certainly shows the colors of the male Bufflehead as well!!\
Finished with the "moment of nature" and back to quilts. This is the center of the new quilt using the mandalas. I feel the need to frame all of these.
All the intermediate mandalas on point are done here and in place.
Auditioning the background colors for both the star points and the ultimate background. I didn't have enough of the yellow, so dyed two yards with friends last week
The center of the quilt is all completed here nd just have to add the borders. It is already 72 x 72!! Looks like it will be a queen sized quilt..
It's now 84 x 84 and used up every scrap of the background yellow and the two greens. I think I am done with mandalas for a bit except for just making some simple framed ones. Now onto the machine quilting which I am feeling more confident about all the time. I did switch around the mandalas a bit so it would look more balanced to me.
I finally finished the second quilt in this series and am relatively pleased with it. I felt much better about it when I added the white around the outside Doing it again I would probably add some white around the large center mandala as well. So onward to the next iteration
Purple, orange and green is perhaps my favorite palette and this series of blocks was an attempt to get these in one dyed piece (not easy without getting a lot of mud!!). These blocks seemed to go together the best. First I thought I would just do all just as squares.
This quickly morphed to doing them all on point (aat least the little ones). I actually have been using a tablet to sketch these out (after the fact so I can do the geometric calculations).
This resulted in deciding that I would surround the center mandala with star points. This was just random at hand fabric just to see how this would play out. Again I went back to my tablet for some calculations and more drawing.
The tablet exercise convinced me that I should put the center ones on point nd leave the corners squared. So on to auditioning true star points and the framing of the mandalas. I feel compelled to surround them as they just look more finished to me that way.
I switched the purple and the orange in the borders and this feels calmer to me. I m going to surround each of the individual smaller blocks as well with these colors and then I am choosing (so far....) a very pale yellow/orange for the background of the smaller blocks. We shall see what develops! I will be busy the next couple of days with a Shop Hop and then a day of dyeing so it will be the weekend before more progress is made.
We have been having very un-winter like weather this year but yesterday was rainy and overcast I liked the look of the basin down at Ft. Fisher though. I am sure there are lots of birds hiding in those reeds.
I finally saw my first Horned Grebe but he was escaping fast when he saw my car. I think the increased traffic down there is keeping my usual birds to a minimum.
Well the real purpose of this blog is to share the progress on this new quilt which I decided to do on point. I really liked this series of blue/green fabrics that I did and there were several nice pieces. However, I decided not to use this format as it just looked too busy to me even though it was fine for the last quilt. My quilts don't let me have much say in how they want to end up -- they chatter at me until I get it right.
So I went with only four blocks in the corners. I surrounded each of these small blocks with a thin strip of the dark green.
I changed out one of the blocks then decided to set all the small blocks in white so here the inside of the quilt is finished and measures about 45 inches square.
Auditioning the outside fabrics and wanted to repeat the colors from the inside but decided that it was too much turquoise.
Decided that I was going to go with the side look which excludes the turquoise. There is a 1 1/2 inch green, 1/4 inch yellow green and then a 4 1/2 inch strip of other dyed fabric. I am a little uncertain about not repeating the turquoise but am hoping there is enough in the blocks. I will heavily quilt the white area. It will be about 63 x 63 when done. There was a lot of square of the hypotenuse calculations for this one.
After much fiddling, I decided on these blocks to fill the corners. Trying to find a block that didn't stick out too much and which incorporated most of the colors wasn't all that easy. Some had too few pieces and some too many. I had cut up most of the background brown so really had to scrimp to get four blocks out of it as I wanted it as the background for them. I had plenty of the other colors.
I finally finished all four of those corner blocks and decided I wanted it longer than wider and would use a darker brown that I had as a border. This was the first pass.
So I cut the fabrics and tested. The verdict from both me and my daughter was the same problem as before -- too much brown!! And not enough value difference.
Here I tried all the different fabric I was considering around the quilt. Hmmmm....
I finally decided on a smallish bit of the dark brown (and it actually looks darker with using just a small amount), then another strip of that gray and then whatever was left of the pretty purple that was in the center of the pieced blocks. After all the trials and tribulations of this very challenging quilt, I am quite pleased with the results and look forward to some quilting. I know I am going to do feathers in the wide brown and probably something simple in the purple I will use the blocks themselves to dictate the quilting there. I will use dark brown thread for most although toying with using a contrasting thread in the brown only. It will be called the "Day of Forgotten Dyes" as the blocks were all made on a day I forgot most of my dyes and therefore just angrily threw things together with the few colors I had! I was not careful at all where I applied the dyes!


