What is interesting is that I couldn't find any other versions of this arrangement of hexagon log cabins on Pinterest
Anyway, onward to some details.
You start with a 2 1/2 inch hexagon made by using the hexagon ruler (not going to give all the details!! as you need to take the class to figure out how to use the ruler).
Here I have attached the first three lights. She did them one at a time but I found you didn't need to in this step before you trim to size. (You do in the next step though.)
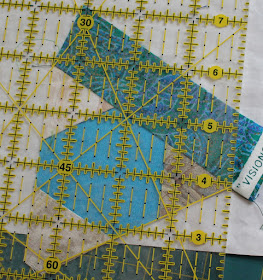
The 60 degree line on this ruler is between the 3 and 4 inch mark. You place this on one of the seam lines and make sure that the hexagon measurement from the edge across is 2 1/4 inches at this point. Then trim. You can trim both at the same time in this step (she didn't do it this way -- she did each strip individually before attaching the next one).
All three sides are trimmed and you can see they are kind of blunt on the end.
The first row of darks is started and you do need to trim each one individually for this step.
The 60 degree line is along the seam line at the top and you can see again (although hard) that the triangle right next to the dark is again 1 1/4 inches high. You do each of the three individually -- very important for this one.
This is what it should look like after all of the first row of dark are added. It becomes easier from here!!
Here I have added the second row of lights. I have found it was easiest for me to put the 1 1/4 edge of the ruler over one of the dark strips and then kind of find the 60 degree line and adjust it there. Both measurements are important and if the fudging is to be done, make the strip a little narrower or wonkier to make sure you have the 60 degree line accurate. From here on out, it is the same as that first step where you trim two sides at one time.
This is what it looks like after trimmed. Keep adding strips three at a time ending with a dark row.
Here are the blocks I did yesterday. I am going to use a light yellow where the three lights meet and may go with a blue where the three darks meet -- different from her set. We shall see. I set up my FW and have the starts of a bunch more blocks. This was a perfect project for me as I love hexagons of all kinds, love scrap quilts and love log cabins -- bingo!


No comments:
Post a Comment