skip to main |
skip to sidebar
Finally got the right borders on the mystery quilt which is really a good size. Now to find some batting and backing for it and get it basted. Whew...
The day we did all the dyeing, we basted five of my remaining quilts from this summer. I wanted to get this one quilted quickly because it is a Christmas gift. I finally got the quilting done today, the binding is on and almost all sewn down.
I did quite a bit of quilting on this quilt which is very hard to see unless your nose is 4 inches away. This is the block unit, which you can see is pretty simple.
I did loopy quilting in all the background fabrics, white on the white and black on the black.
Quilt is just sitting on my lap so took a pic of the binding as I am sewing it on (with some help from various cats, I might add).
Onward to doing the quilting on the four larger stack and whacks!! I finally got my Juki to act like it should. It used to make quite a bit of noise when free hand quilting. I adjusted the foot tension as low as it would go (instead of a little mark near the lowest which is what the booklet said) and noise disappeared! I had to change the needle as well which is always a pain for me. It sews so FAST though!! I have all sorts of tables set up to hold the quilts while I am working. My daughter got rid of a futon I had in my sewing room to give me some more space! Didn't take long to fill that up!!
Here are six of the seven Challenge Quilts from our meeting. Seems that only two of us interpreted the directions to only include one orange fabric!! Next time, I will just do what I like to do which is scrappy whatever the directions are!! At least I have a nice table runner now which matches the clock which hangs beyond the table.
The one on the far left in the above photo was the winner in all the categories! It was a lovely piece by Joyce Marks . I really liked the one on the far right as well and they were all really nice pieces and well thought out.
The picture on the right shows the seventh of the challenge quilts and again the winning quilt on the bottom.
These are just some of the 25 neonatal quilts that were turned in this month. This club is filled with high achievers for sure. There were some really nice quilts in this bunch. (I managed to turn in five from my quilting frenzy this summer.)
Becky did the next two quilts. This one was especially lovely!
An ode to Thanksgiving!
 This was a beautiful quilt inspired by a class.
Nancy entertained us with a very funny story of trying to get tiny dots of color out of this quilt. She ended up having to replace pieces after it was quilted and took her longer to do that than to finish the quilt in the first place. We have all had similar experiences I am sure!!
This and the next were wonderful rugs made with strips!
A lovely little landscape made by the same quilter who did the winning entry in the Challenge Quilts.
Great baskets. Love the colors!
Lovely art quilt!
This pillow cover and the quilt below were huge and made as a gift.
This will be taught at one as part of a fiber program at one of the local colleges.
This was a beautiful quilt inspired by a class.
Nancy entertained us with a very funny story of trying to get tiny dots of color out of this quilt. She ended up having to replace pieces after it was quilted and took her longer to do that than to finish the quilt in the first place. We have all had similar experiences I am sure!!
This and the next were wonderful rugs made with strips!
A lovely little landscape made by the same quilter who did the winning entry in the Challenge Quilts.
Great baskets. Love the colors!
Lovely art quilt!
This pillow cover and the quilt below were huge and made as a gift.
This will be taught at one as part of a fiber program at one of the local colleges.
Again, I apologize for not getting everyone's name. Maybe in the next few years I will be able to add more names to quilts.
QBTS periodically has challenges and I try to participate when I can. I have liked a couple I have done and not liked some of the others. This is one of those "some of the others". The challenge for me was a difficult one. You took one fabric (and only one as I read the instructions) that read as orange. Could be anything. You could only use a solid orange and white (or cream or a white with orange on it print) in addition to the main fabric. The piece has to measure between 48 inches around to 144 inches around. You could use embellishments as long as they were orange or white. You could also introduce no more than 2 sq inches of another fabric.
I chose a print that was very even and a very poor candidate for stack and whack. I had another print that was better but I would have had to do a lot of fussy cutting as I didn't have enough as it was in four fat quarters.
I did the stack and whacks and three came out with one look and four with another look. The three and four were almost identical (not quite). I decided to only use five of them and make a table runner. You can't believe how many times I undid these which is so unlike me. This was because I wanted to use just a tiny amount of the black between the blocks to give them an elongated Christmas bulb look I had seen on Pinterest. I stayed within the 2 square inch qualification as each black square is 1/2 in finished! I used some orange I had to finish off each end. I am thinking I will use more of the orange to do the binding.
Well, here it is finished! I followed the instructions. I would have preferred, due to my scrappy nature, to have used a bunch of oranges (which I had) but the directions said "an" orange print.
Well, Dianne and I planned to do one of our massive overdyes where you get 35 different fabrics in two dyeing sessions. However, when we got together, we decided that we would rather do some gradations and then maybe overdye. We planned to do this original plan in two days as we are both a bit gimpy these days. I ended up doing four gradations that first day -- strong orange, golden yellow (but starting with only a 3% concentration instead of my usual 6%), turquoise, and a mix of turquoise (2/3) and intense blue (1/3). The second day we overdyed. When you do these 8 step gradations, frequently there is little differentiation between those pieces sitting right next to each other.
My results were uneven! My turquoise and turquoise/intense blue gradations were almost identical and I couldn't tell the difference when laundered except on maybe one piece. I assumed that the ones that had a bit more mottled were the intense blue/turq mix but not sure as the color looked so much the same. When I did the second wash of the orange and yellow, I threw in the turquoise as well which was a mistake as just a hint of the color greyed the yellows and oranges just a bit in the lighter hues.
One of the real successes for me was when we made a mistake. Instead of adding plain water to the dry fabric before applying the color for the golden yellows, we used the soda ash solution by mistake. This resulted in nicely mottled yellows which you generally do not get with yellows as the color seems to spread more than some of the other colors. Turquoise is another color that tends to spread a lot and not get a mottled look.
Day 2 was overdyeing. I had dyed 35 yards the first day and overdyed 16 the second. So I took a bunch of the turquoise and overdyed with sun yellow to get the yummy lime greens which are always useful. I also overdyed several of the really light ones with neutral gray which is a very weak dye. I also overdyed some of the strong oranges that were weaker with fuchsia which as usual totally took over but was not as mottled as fuchsia usually is because of some color already on the cloth. I am going to take a couple of these fuchsias and overdye them with strong orange which in my experience gives the best reds ever!
I should also comment that we spray basted five of my somewhat large quilts. We were both totally exhausted at the end of those two days!! I am getting too old to be on my feet for hours at a time even with lots of sit downs!
My goal was to get a bunch of fabrics in lighter colors of which I have very little -- although I certainly have tons of dyed fabric!! I have already cut up one of the golden yellows as the first border on a quilt on my design wall -- the mystery quilt -- it is perfect!
I will open the post with my quilt top which I finished in about 4 1/2 hours and measures 39 x 50. Several people have asked about the pattern. I originally found it on Judy Simmon's blog where they were using it for charity quilts. It is quick and easy and fun to do.
Directions: Cut 2 inch strips of multiple bright fabrics -- fat quarters are great for this but even those 10 inch squares are good. Sew a lightish and darkish one together and then cut into 2 in segments. Make random 4-patches.
Meanwhile cut black and white fabric into 3 1/2 inch x 7 1/2 patches. Try to get half black on white and half white on black. Attach four patches to each of these black and white strips. Sew a row of dark four patch strips and then a row of light four patch strips. Each strip will finish 3 inches wide so make as wide as you want. Each four patch/black and white patch finishes to 10 inches long. Alternate a dark row and a light row, placing the four patch on the bottom on the lights and on the top on the darks. It goes together really easily. I don't ever put borders but do put a bright red or green binding on them.
Of course you could substitute light and dark valued fabrics for the black and whites but I would recommend then using the same color four patches throughout to kind of pull it together. I have seen them with black and white four patches. Four patches are just a great start to so many quilts I think.
These quilts were already done showing one of the kits available to make.
There were several people constructing tops and several who were quilting already completed tops.
I really liked this pattern and may do this one myself.
Another version of it.
Great colors!
Another one of the kits that was available finished!
These wild colors really worked together!
Finishing up the quilting on this top that was turned in! I really liked this one -- very muted colors.
My blog got left by the wayside for awhile as my old whiplash injury was bothering my neck and then I managed to complicate that with an annoying case of vertigo. I have suffered with this twice before -- once it was like this one and another time it was very transient. It is scary and I always check things to make sure it is not a stroke!
I am on the mend and catching up with chores and quilts. I finished binding 29 stack and whack quilts a couple of weeks ago. I am keeping five temporarily as I have a guild program back in Rochester in the spring about stack and whack quilts. 20 are being donated to the Sweet Charity group and 4 are being donated to the neo-natal group.
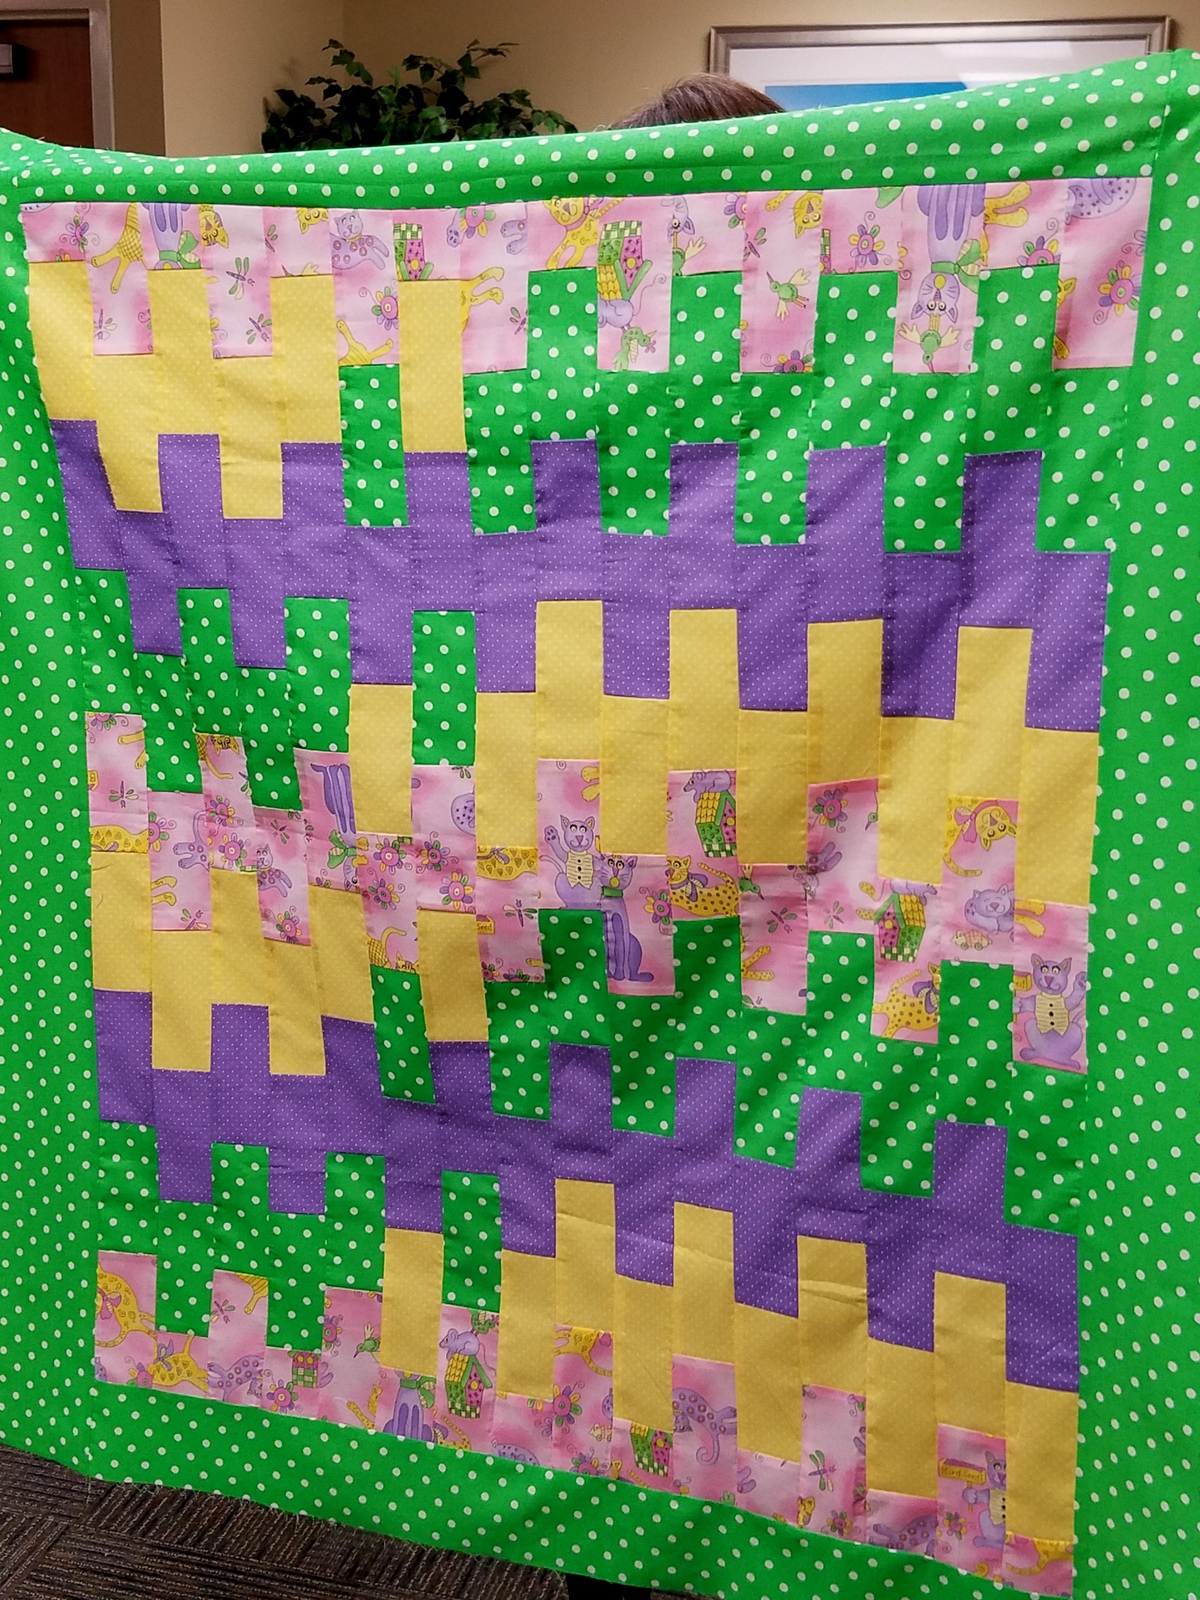
The above quilt top was a mystery quilt with the clues being given each month since May and finishing a few days ago. I really had no idea what the final product would look like. I had originally planned to include orange in this quilt but thought that orange would too quickly overwhelm everything if there was too much of it. I am very glad I made that decision now and am a little concerned about the amount of yellow as it takes a lot of purple to balance this much yellow. I will probably do purple quilting in the yellow blocks. Each of these blocks finishes to 24 inches so the top is currently 72 x 72. I will be adding borders to hopefully make it about 82 x 82. It is a little overpowering right now because of these large blocks!! I am very glad I went the scrappy route though. I will be doing lots of scrappy quilts this winter!!
I now have to get several of the larger stack and whacks basted and quilted -- I have all the parts, just need to get the together!
I was very late in getting back to my Wilmington quilt guild -- Quilters by the Sea. The first part of our show and tell is always a quick walk through of all the quilts made for the Neo-natal unit at the hospital. For a guild the size of this one, they do a tremendous number of quilts. Of course, because of the August heat and Hurricane Florence, there had not been a meeting since July so there were a lot of baby quilts . Don't you just love some of these!!
It is hard to get pictures of all the quilts but some people slowed down in front of me. For some reason, I really liked this quilt a lot!
The following quilts were all part of our Show and Tell. You can see that Christmas quilts are beginning to creep in!
Pat used the kit from the cancelled September class to make this wall hanging which is just wonderful!!
A very clever wreath.
A good sized tote made with Kaffe Fasett fabrics.
Michelle just got this quilt back from England where it has been for quite some time. Michelle teaches her techniques nationally and has been our program chair this last year and did a wonderful job!
Another quilt I just love -- scrappy of course!!
These next three quilts were made as part of the Sweet Charity group. This was the sample so we new what we were aiming for.
The following two were made in about 3 hours by about six of us. Four of us were sewing and two were ironing. It is a very efficient way to work and the results are always so nice and scrappy!!
I worked primarily on this one.
They were basically just triangles with log cabin style strips around the -- just one round though.