skip to main |
skip to sidebar
Some confusion on my part about what we were doing this day! We met at Debbie's wonderful house -- a perfect place for dyeing outside!! They had decided to mandala dyeing which I had assumed was using ice like I do it. However, they were following a more traditional method of making up liquid dyes from powders and using squeeze bottles to apply to tied cloth, the ties giving the separation of color. Here all the ladies are making up the dye solutions which were approximately a 6% solution (1 tbsp of dye per cup of water). They didn't have any urea but because of Debbie's nice soft water, they dissolved perfectly!
Barbara and Debbie tying their bundles. A good time was had by all!
All starting to tie their bundles. I had decided that I would stick with ice dyeing and a little show and tell about my process. Debbie luckily had a bag of ice in her freezer which she allowed me to use! I didn't do anywhere near as many pieces as I usually put on the grates and was a little too spontaneous with my colors!!
Debbie's first bundle ready to sit for several hours. This is a direct dyeing technique and requires pre-soaking with soda ash solution and then waiting a little extra time for the dyes to totally take to the fabric.
Anne Hope with her first bundle.
One of Debbie's pieces opened up and laid out to "cure" layered in plastic. Because we hadn't use urea when making up the dyes, have to be more careful keeping the pieces wet until they are cured. Urea acts to retain water in the pieces.
The next three pictures show the bundles with their ties. I don't know who had which grouping.
.Can't wait to see how these all turn out.
These are my three bins with the ice and dyes already applied. They melted incredibly fast and were all melted by the time I left!! I am so used to doing these in my coolish basement up north.
This was bin 1 with Basic Blue, Ultra-violet, and grass green . I had two drop cloths, about six of the small mandalas and a large mandala here.
This was about the same as the previous one
This only contained one drop cloth on top and four tightly twisted fat quarters folded accordion style and then twisted around so they took up very little space. I used strongest red, some yellow and basic blue in this one.
Tomorrow you will see the results of this dyeing.
Been back to more ice dyeing! Really like how this last batch came out. Think I have finally gotten the right amount of dye sprinkled on the ice. I also put most of the dyes into old spice and parmesan cheese shaker containers so it is more controlled. I put the sun yellow on first this time and like how they turned out. This last bunch were in smaller sizes and will be for sale at my art quilt group meeting (I just posted a picture on FB the other day and several people wanted to buy them even though I didn't really have them for sale!!).
This was the smallest size of the group - a medium as someone requested a smaller size. If she doesn't want it, I already have another person who wants it!! I have found that almost everyone likes the blue/green/yellow combination -- very Monet waterlilies!!
The remaining two t-shirts.
One of these t-shirts (and I can't identify which one even) started its life as a lime green t-shirt!! I had bought it in the wrong size so figured it would overdye nicely (and it obviously did!!).
These are several of the eight mandalas I did yesterday. I have discovered that the one closest to the ice (the top one) is the one that I had originally thought was the bottom one -- ie, the darker, more solid one is the one sitting on the "drop" cloth so the ice melting must be pushing the color down. I couldn't identify the partners in this bunch like I could in the last batch. Part of the reason is that this was literally a random bunch of fabrics that I found. I knew they were cotton but had no idea if they were pfd and mercerized, pfd only or non-pfd. They were random sizes as well and I didn't iron them before folding. I used some muslin that I found as the drop cloths. Wish I had more of that as it dyed beautifully but I have no idea what it was or where I got it.

This is one of the pieces that was on top. I had these random pieces of sateen -- didn't know whether they were the good or the non-pfd stuff I had. Guess they were the good one. All those lighter areas are where the ice melted obviously and pushed the color down. (The dyes go into the fabric before the ice is completely melted -- the kind of slide down as the ice is melting as you can see from my previous pictures.)
The colors I used were Sun Yellow, Grass Green, Leaf Green, Basic Blue and Intense Blue.
I have only washed one of the "drop cloths". This is about a yard long. I really like it and look forward to seeing how the other three turned out!!
You can see that I again stacked the mandalas as I really like the subtle differences and as I used less dye and some lighter values, they came out pretty good! I am sure now that the one on the left is the one on top and the one on the right is on the bottom. It was easy to sort them out last night as they were all so different. Note that these haven't been ironed yet!
The post today will be a relatively detailed description of how I do these. This is one of the tshirts lying across a relatively flat surface before I start "pleating".
Here I have almost finished the pleating process. I start at the lower left hand corner and just use my fingers to.gather up the garment on the diagonal. One is reversed as I did it inside out!!
All gathered up and now I spiral it.
Two spiraled t-shirts sitting on the drop cloth which is on grate suspended over a plastic box. I did four t-shirts altogether yesterday.
Here you can see four mandalas altogether. There are two in each half of this square (really looks more like a rectangle as I didn't cut as even as I could have!).
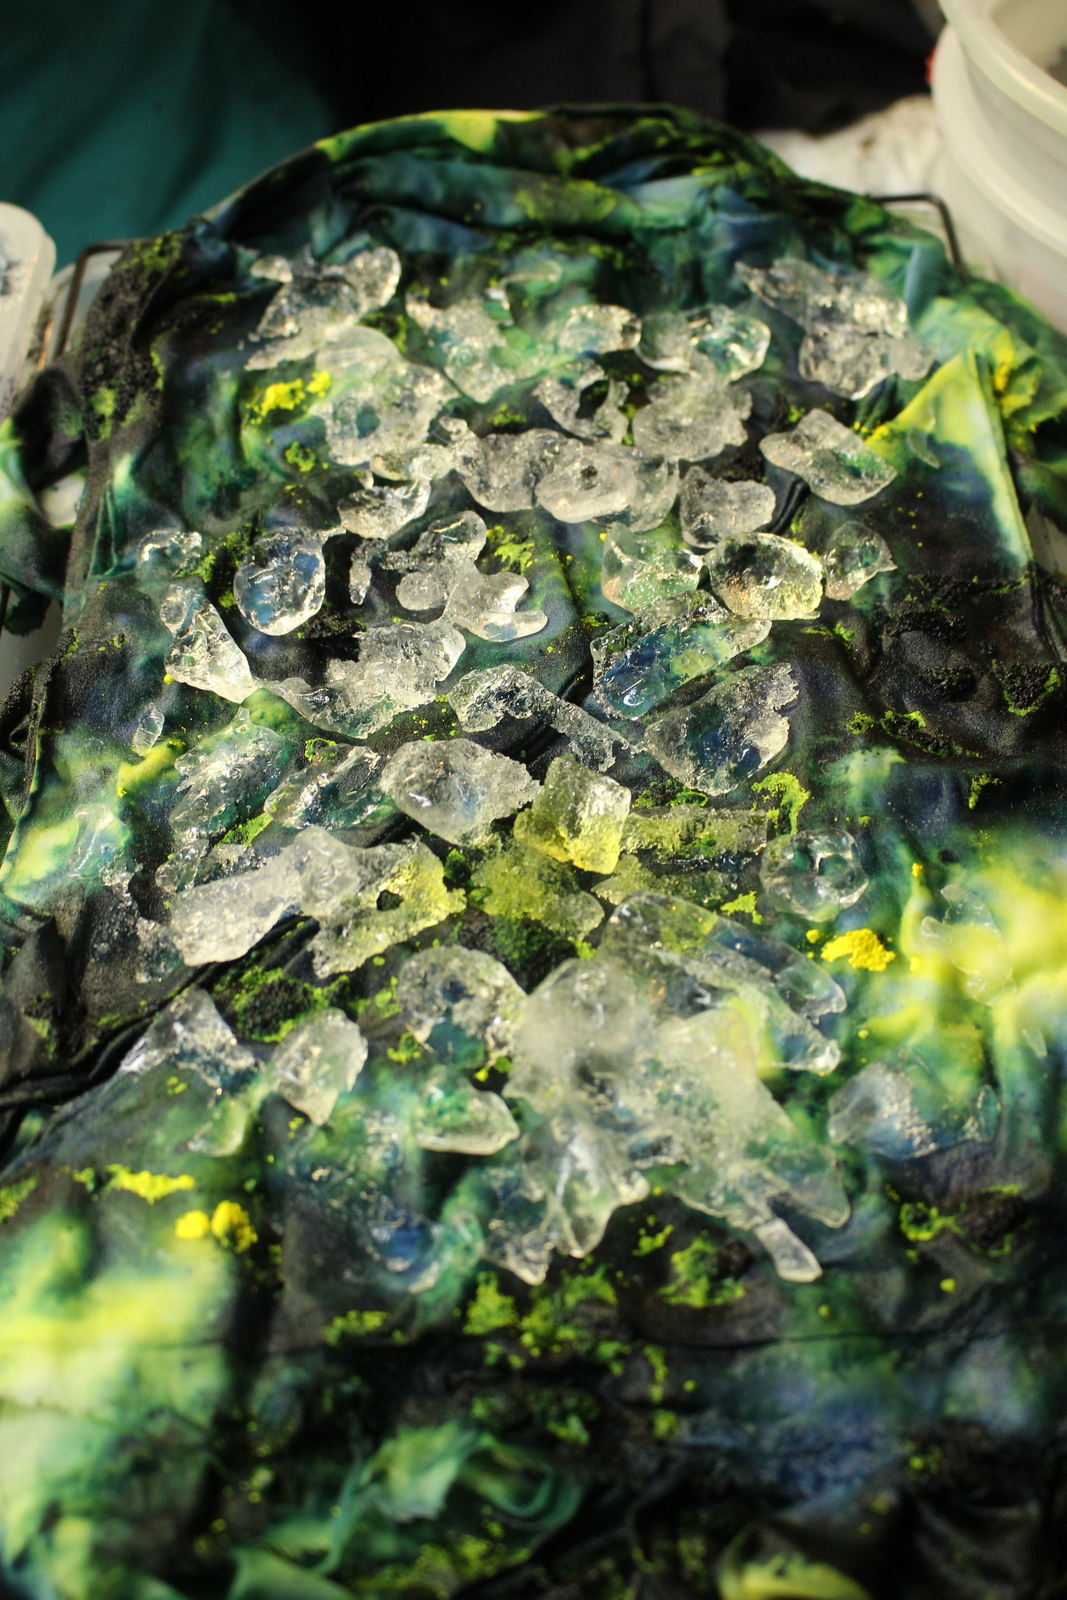
This is what the t-shirts look like after I have applied the ice and the dyes. Used here were sun yellow, grass green, leaf green and some dark green (which is very very dark I have discovered).
This is one set of mandalas covered with the ice and dye. Lots of yellow here.
This is mandalas after 2 1/2 hours.
These are the t-shirts after 2 1/2 hours.
These are the mandalas after five hours.
T-shirts at five hours. The ice is almost all melted. Note that a lot of the yellow is still in powdery form.
These are the mandalas right before I start washing -- this was about 7 hours later. I do these in my basement which is relatively cool.
These are the t-shirts before washing.
Before I do the washing, I nuke each of the t-shirts for about four minutes and do the same for the mandalas (although I group the mandalas and do 4 at a time). I do the same with the drop cloths. Just want to get them nice and warm to make sure the dye is set.
I then unfold and rinse in cold water getting a lot of the dye out and hopefully most of the soda ash. I then dunk them in quite warm water, swishing them around to get out as much dye as possible. (The water will look very dark.) I change up the two waters after two t-shirts. I then thrown them all into a bucket and cart them to the washing machine for final washing. I use the hottest water I can in my washer and add Synthrapol. I also make sure I am using the maximum load size. The rinse water is warm. After this wash, I remove them and get all the strings that have tied them all up off and look at them as this is probably what they will look like. I then repeat the wash/rinse process one more time. I always tell people to make sure they wash before using as well as they may have a hotter wash cycle and potentially could get some more dye out. The dye that is left is really a stain and no longer active though so generally if there is some staining, a little Synthrapol will get it right out.

These are the remaining mandalas displayed with their "partners".
And here are the t-shirts. The first two are Hanes x-large and the third one is a Basic Editions (K-Mart) 2x.
This is a 1x v-neck t-shirt.
Well, after several weeks away and catching up on all my travel blogs, I finally got into the basement, picked up a bit and set myself up to dye some tshirts and more mandalas using ice of course. I like the look you get with the ice so much better than just squirting dye onto the shirts like the old days. You get much crisper lines with ice dyeing and greater variation in value. I did three t-shirts and of course the underlying "drop" cloths that I use.
I have done this fanfold technique before on tshirts and really like the effect of doing the fold on the diagonal rather than straight up and down.
For these tshirts, I placed some fabric underneath each one (don't want those stripes occurring from the cookie racks) and then took the soda ashed soaked, fan folded tshirts and made a spiral with each one. They didn't even take up much room on the racks. I covered them with ice (just enough so no fabric is peaking through) and then sprinkled generously all my different greens and then a little navy blue and mixing blue just for the heck of it. I think I threw a little sun yellow in at the very end. I should note that a couple of the greens are very light greens and obviously have a lot of yellow in them but I also used a very dark green as well. I like a lot of value contrast! I let them sit until the ice was all melted and then nuked them each about 4 minutes -- just enough to get them nice and warm. They looked navy blue at this point. I rinsed in cold and then warm water and threw them into the washing machine and ran them through twice. I ran out of Synthrapol so used Dawn and it didn't suds too much and obviously got a lot of the color out!!

I also did the fan fold on this one although did it right to left this time. The biggest difference between this bunch and all the others is the size of the fan fold. Before I folded them about every three inches either across or diagonally and really like that look as well. Yesterday I decided to only do about an inch deep fold which makes for a lot more color in the shirts and little white space (none as a matter of a fact) while my others have a lot of white in them -- a look I also like. Now if I could just figure a way to get those fan folds to be more even with a soggy large t-shirt!
You can see how much color my "drop" cloths got as well!! This fabric was a drapery weight pfd sateen that I got many years ago. Before this, I had used it primarily for monoprinting as it has such a nice firm hand. It is about 54 inches wide and each of these pieces is about 3/4 yard. I think they will make some great looking tote bags!