Showing posts with label extreme dyeing. Show all posts

Monday, April 12, 2021

A Couple of Days of Extreme Overdyeing!

Well, this weekend was a marathon extreme overdyeing session with my friend Dianne.  We haven't done one of these massive dyeing sessions in quite some time. So we dyed 70 yards of fabrics over two days and resulting in 35 different colors.  I let her pick the palette this time and she picked mostly brights from my dye book.  We substituted a couple of colors so we would get something a little different.  I used some sateen I have had for probably 40 years -- not pfd but they used to give me pretty good results.  Dianne had Kona and hers were definitely darker in some colors.  This grouping is the colors we did the first day, They were (ProChem names) Boysenberry, Grape, very very dilute Strong Orange, Basic Blue and Leaf Green (which I don't think they make any more).  The Basic Blue was very light so I suspect is was getting over the hill.


The second day we overdyed each of the above colors with Fuchsia, Lemon Yellow, Golden Yellow, Turquoise and their new Navy (which I really like). 

This bunch is the above colors overdyed with fuchsia.  The differences are very subtle but they are there!

This is the Lemon Yellow overdyeing the first bunch of fabrics above with Lemon Yellow (top 6) and Golden Yellow (bottom).


This is the very first bunch overdyed with ProChem's new Navy (I think 420).  Again, the differences are subtle as it is pretty overpowering and there were some very light colors dyed the first day.
This is those first colors overdyed with Turquoise.  I think they are a little darker than it looks in the picture.


This is the whole pile of 35 different colors.  I was relatively pleased with the results even though some colors were a little closer than I normally get.  I can easily see a quilt made with those paler colors and some white! 

This is the chart that shows the dyes and results.  The one that is missing is still at Dianne's but I assume it will be a kind of deepish orange when I add it!


Saturday, January 7, 2017

Some Dyeing and Moving Ahead with City Lights


Well, in a few days I have finally made progress on City Lights.  Each day I think I have made enough four patches, only to still have empty spaces!!

I try to take pictures at the end of each day.  I only work for about 2 hours in the afternoon but if the weather is really bad, l may be found downstairs a bit more!

Almost done!!

Well, finally all the patches are done but far from being sewn together.  Let's hope for no big breezes!!  That is one jigsaw puzzle I don't want to put together!

I decided that I liked this orientation better and more in line with the title as it is more a landscape!

I got together with my dyeing buddies yesterday.  They did some extreme overdyeing while I just did some gradations.  This one is a gradation of Boysenberry with a 3% solution of Basic Blue added to each pot.  They are really a bit darker than this picture shows.


This was a gradation of Strong Orange with a 3% solution of Sun Yellow overdyeing it.  I really prefer to do it in one step but got lost in the process.  Again, think they are darker than the picture shows.  I wanted to do these as a sunset quilt is in my future.

Wednesday, April 13, 2016

A Last Day of Dyeing Before Heading Back North!!

My friend Dianne and I spent the day doing both a small overdyeing sequence and a couple of gradations.  The gradation dyeing which I have talked about in previous blogs is based upon low water immersion dyeing (Ann Johnston) and her books were my first "bibles" of dyeing. Ann uses tsps and tbsps for measuring dyes.   I was converted to measuring my dyes scientifically by Carol Soderlund in the class where she has you do sequenced overdyeing of three color palettes.  Carol didn't use low water immersion dyeing but did emphasize the measuring of the dyes by weighing rather than using tablespoons or teaspoons.  The reason to use more accurate measuring is that you can duplicate your results and the dyes weigh all different amounts if you keep the volume (a tablespoon or a teaspoon) constant.  So a tsp of yellow might weigh 7 gms but a tsp of blue would weight 5 gms.  Ann is extremely used to the dyes and how to  play with them using volume measures. I like the predictability of measuring by weight better although like all dyers, sometimes I just play!!

The dye houses express the colors you will get using their dyes in % OWG (of weight of goods) which means if one of the dyes (One of the yellow dyes from ProChem for example -you can click on this link) says that the color shown is 4% OWG, this means that it will take 4 gms of the dye to dye 100 gms of fabric or 8 gms  of dye to dye 200 gms of fabric.  I noticed that they are expressing how many tsps of dye you need per pound of fabric as well now.  If you are using one of the less expensive fabrics from Dharma (about 70 x 70 thread count), a yard of fabric will weigh about 100 gms.  So again, 4% will require 4 gms of dye per yard of fabric.  If your yard of fabric weighed 150 gms, it would take 6 gms of dye to get 4% OWG, etc.  6/150 = .04 or 4%.

In dyeing the most important ratio is the weight of the dye per weight of fabric.  The amount of water used really doesn't figure into the calculation of how dark a fabric will be (although with regular immersion dyeing,  if you  use a lot of water, you will need to add salt to achieve the same results or the dye will bond with the water).  With low water immersion dyeing, you need enough water to cover the fabric and allow it to move around.  From Ann Johnston, this amounts to about 2 cups of water per yard of fabric (with the appropriate grams of dyes dissolved in it) and 1 cup of soda ash solution after the fabric has sat in the dye for about an hour.  She does it somewhat differently soaking the fabric and then using a cup of dye solution while I prefer just using 2 cups of water per yard of fabric.

The above picture is the results of an "extreme overdyeing" session.  Instead of using first five colors and then overdyeing with different five colors (which result in 35 different colors), we only did 3 overdyed with 3.  The first three were a gradation of Navy Blue.  The concentrations were 6%, 2% and .66%.  In each pot were four pieces of fabric from each of us.  We rinsed these out and then prepared 3% solutions of Sun Yellow,Golden Yellow and Mixing Red.  We resorted the fabrics so that from each of the first set of pots, we saved out one piece, place one in the Sun Yellow, one in the Golden and one in the Mixing Red.  We did this with each of the fabrics from the first dyeing.  The results of this overdyeing are what is pictured -- you get 15 different colors.  


We also did some gradations -- both of us chose different gradations.  This first one is a gradation of Intense blue (the first pot had an intensity of 10% and is halved as you get lighter.  Into each pot, 3 gms of Leaf Geen were added.  

If you look closely, you will see a damask like pattern in the fabrics.  This fabric is called Bazin and is used extensively in Africa.  Dianne introduced it to me as she lived in the Cameroons while in the Foreign Service.  She sold me some of her precious stock but I did find it online as well and bought 10 yards (it is on both Amazon and ebay very surprisingly).  I wanted to make sure that the fabric I bought from Amazon was the same as what I got from Dianne as it dyes beautifully and adds some pattern to the fabric,.  It is 48 inches wide and about the same weight as a better commercial cotton with almost a sateen finish.  It is not cheap however.  (It was very cheap when Dianne bought it in Africa though.)  It comes in 10 yard lengths and is heavily waxed and perfumed (although I suspect the wax is more like some kind of starch as it washes out easily.)  The experiment was a success and I may buy more at some point.  It is slightly cheaper on ebay -- no shipping charge but it comes directly from China so does take a little time (but not a lot.)


This was my second gradation.  It was a gradation of New Black with Strongest Red added in an equal amount to each pot (3 gms/yard).  Dianne pointed out that Navy Blue is about the strongest of the dyes we have used and I think she is right!!  If you look at the first picture, you can see how dark those fabrics on the bottom row are.

I did like the darkest of this gradation as it was a really rich dark brown.  This Strongest Red might not be too strong anymore as it is quite old and I have found that the reds exhausts faster than the other colors.

Another blog I also talk about this technique is - Blog on dyeing.

As an aside, this is blog number 998 so 2 more and I will have done 1000 entries in the last eight years.  Whew -- and I hated writing through school and college!!


Friday, February 5, 2016

Dyeing Day and a New Quilt Start

Shortly after returning from Florida, Dianne and I met for a day of dyeing -- extreme overdyeing which results in 35 colors using 10 dye baths.  It is very labor intensive though but Dianne and I have gotten it down to a fine art and a predictable time schedule.  She always lets me pick the colors and I noticed we hadn't done any reds -- well, I think we overachieved.  There were some strange things happening which I think resulted from old dyes -- red seems to be the most sensitive.

The first set of dyes were Sun Yellow, Golden Yellow, a mix of half Strong Orange and half Rust Orange, Basic Brown and the Neutral Gray.  The overdyes were Mixing Red, Fuchsia, Strongest Red, Fire Red (Dharma),Scarlet (Dharma) and then Deep Navy.  I think the Fuchsia and Scarlet were weak -- the scarlet being the weakest as it dyed orange.  They were all 3% concentrations.  I overdye a couple of those red/oranges that look alike -- maybe with some black, brown or navy.

Just another view of the same fabrics.  I think it shows a little more variation this way.  I do like the effect of the gray, brown and navy.

This is the beginning of another quilt.  I bought a rhombus ruler after seeing a quilt made with it at my local quilt show in Rochester.  I already  have a name for it and a different direction -- it will be called Ode to Albers.  The reason for this can be seen in the chartreuse in the two blocks - they look like two different colors as they are affected by their surroundings -- this is what Albers did a lot of studies on and a principle I often emphasized when teaching a color class.  I have cut up a lot of those center rhombuses from scraps and was doing the same for the strips.  I will be cutting the strips of real yardage so I can do more strip piecing.  There is a lot of trimming with this block.  A rhombus is just a fat diamond.  


 No  blog would be complete without a few birds.  This was an Ibis wandering with a few friends down at Ft. Fisher.


 A large flock of Lesser Scaups has returned to Carolina Beach Lake.  I hadn't seen any last year but they were frequent visitors before.  This is one of the males.  They are diving ducks and they almost seem to dive as a group -- first one and then a bunch more follow.


Here is a group of four of the males.  

There are mostly Gadwalls now at the Aquarium pond.  Here is a male and his female friend.  There were also Buffleheads and Pied-billed Grebes and a beautiful Great Blue Heron.


Thursday, December 31, 2015

Happy New Year!

Our Christmas cactus actually bloomed brilliantly right on time this year -- only the second time in the 20 years we have had this plant!  It has been so warm down here that the blossoms are dying off faster than they would have if the temps had been a little cooler outside.  We have broken high temp records for 5 out of the last 7 days and we have had our air conditioning on for a week -- this is North Carolina not Florida!!  Last February was the coldest on record and this December was the warmest on record!  Even the water temp was 65 today!  Crazy.....

Tuesday I spent the day with my friend Dianne dyeing and she spotted a lump in her mulch.  Underneath was this sweet potato which was about the size of a soccer ball!  I liked all the nooks and crannies and had to have a picture.  Don't think they will be eating this.  Daffodils and azaleas are blooming down here, very confused about the season.

We did a session of extreme overdyeing at Dianne's.  The colors we used for the first baths were top to bottom, Grape, Fuchsia, Leaf Green, Golden Yellow and Sun Yellow.  The overdye (columns) are Neutral Gray, Turquoise, Basic Brown, New Black and then Deep Navy.  They were each 3% solutions (WOG).  We used low water immersion with 11 yards in each bucket.  Some interesting results  I thought.  The grey is very weak as an overdye and changed the color very subtlely.  It is a blue/gray.  My favorites were the Basic Brown overdye (not much difference between the overdye on the Sun Yellow and Golden Yellow which surprised me.  I like the colors I got overdyeing with the New Black.  Also, surprisingly was that the Navy did the darkest overdye.  I don't know whether the scale was just off or whether it is that much stronger than the other colors.  It is a very nice clean color,

This is just another look at the colors.  I think this gives a much prettier view of all the colors. and gives you a better idea of how they will behave in a quilt pattern.  Some of the darks will make awesome background fabrics.

Just taking some pictures on  a nice day at Greenfield Lake a week ago.  Only Cormorants and Pied-billed Grebes were in residence.

First time I have seen the Redhead female out of the water.  The Canvasback has left but the three Redhead females are still hanging out with the Coots.

Yesterday I saw my first Common Loon of the season.  I have seen several Red-throated Loons at the beach but this Loon was down by the boat dock hanging out with the Horned Grebes -- quite a few of them.

This is the Loon from the front.

This was one of the Horned Grebes and I liked the background and his bright red eye!

This is a juvenile Herring Gull with an illegally sized Flounder that he was trying to figure out how to eat!  The state officials would have fined him if they saw him!!  They recently changed the size limit on what fisherman could take in the Southern Flounder.


Monday, April 27, 2015

A Dyeing Day with Dianne and My Sister

My sister decided she wanted to learn how to dye while she was visiting with a friend from Florida so dye we did!!  I did my usual first step for new dyers which is a gradation.  She chose this blue (with my help as I knew she would love this blue) which is Pro Chem's Basic Blue.  I haven't had time or inclination to iron any of the fabric we did but it was a full day!!

I also did the gradation of the Basic Blue as it is my favorite of the blues.  While my sister did a gradation of Golden Yellow (the only yellow that really shows some variation in a gradation), I did a gradation of Pro Chem's Dark Green to which I added about a 2% solution of Sun Yellow to each shade.  It made for a nice gradation!

The ladies were game to do some sequenced overdyeing.  This time instead of the five pots in each of two steps, we used three.  The first three colors were sun yellow, golden yellow and mixing red.  These were then overdyed with intense blue, basic blue and turquoise.

We took the leftover dyes and just played by soaking in soda ash and then packing pretty tightly in a tray and poured dyes over them.  The ladies were very happy with their results!!

Friday, February 27, 2015

A Dyeing Day

Yesterday was a fun day of dyeing with my friend Dianne.  We each did half yard pieces and used the overdyeing technique where you get 35 different colors with 10 dye baths.  I have posted about this before and it is listed under my "Popular Posts".  I call it Extreme Overdyeing.  

The colors we used left to right were (ProChem names) Sun Yellow, Golden Yellow, Strong Orange, Mixing Red and Fuchsia.  All were about a 3% solution (I don't have a scale so used a tbsp of dye per pot which contained 6 yards of fabric which probably weighed around 600 gms give or take!!).  Fuchsia was only 1 tsp per the 6 yards which was roughly a 1% solution as it is such a disobedient and strong color.  The overdye colors top to bottom were Basic Blue (a red blue -- the only one of the pure blues that is), Mixing Blue, Intense Blue, Blue/Violet (a mixed color) and New Black (also a mix and a 1% solution).  The rest are all "pure" colors, ie., not made up of more than one color.  

Dianne prefers a more mottled look while I like solids looking fabrics and this was kind of a compromise!  I used dry fabrics the first time through (the warm colors) while Dianne used pre-wetted fabric.  Because of time constraints, we didn't dry the fabrics after we washed them after the first baths so I got a lot of mottling of the second color.  We didn't squish them around very much either which increases the mottling substantially!  

We are back to more typical weather here and are expecting 70s this week so that will be nice.  I did get down to Ft. Fisher to see how my birds are doing.  There weren't many and there were several people with the same idea!!


 I did like this Great Blue Heron posing for me in the shallows.


The Pelicans down here are not as prone to posing as they are in Florida where they seem to be a bit friendlier.  This fellow had his eye on me though.  He is beginning to get his pretty gold head here.


And there was one Royal Tern among all the Laughing Gulls and Ring-billed Gulls.


Wednesday, December 3, 2014

Dyeing Day with Dianne

Not a lot of pictures with this blog as I managed to leave my camera at home!

However, Dianne decided she wanted to do one of my "extreme overdyeing" sessions (Extreme Overdyeing Technique).  We decided to do 1/2 yard pieces of fabric for each color.

The technique uses 10 dye pots to achieve 35 different colors.  You start with six pieces of whatever size you want in each of the pots, all with numbers A-0 through E-5 and an additional 01 -05.  First time around you put all the A's in one color, all the B's etc.  The second time you sort them by number and place in the colors leaving out the 0s from the first batch.

We used for the rows here, Dharma Wisteria (very very light lavender), Dharma Chinese Red (an orangey red), ProChem Mixing Red (a bluish red), ProChem Strong Orange (very strong orange and a pure color) and ProChem Sun Yellow (a nice bright yellow).  The columns were ProChem Basic Brown, ProChem New Black, ProChem Intense Blue, ProChem Deep Navy (pure color) and Dharma Turquoise.  I didn't have a scale and kept very poor track of how much was dumped into each pot but tried to approximate a tbsp for 5 1/2 yards of fabric which is roughly a 3% solution but I was VERY inacccurate!  In my bunch you can see one very un-pfd fabric the second from the right on the bottom row which should have been a nice deep green -- really obvious here!!

Unlike my usual process of putting the fabric in the pots dry, we wet them first so that we would get more patterning and color separation as water acts somewhat as a resist.  You can get even more patterning by soaking the fabric in soda ash first as well.  

Getting ready for a visit from my sister and her husband!!  Should be fun and hopefully they won't be too grossed out by the house!!  

Wednesday, July 3, 2013

Extreme Overdyeing Again....

Well, as usual I am overachieving with my dyeing!  I usually do 35 yards at a time with my extreme dyeing technique but figured since Marcia and I used to do it together and make 70 yards at a time, I could just double my yardage!!  I have been trying to make some semblance of order in my basement and had literally two boxes filled with what I thought looked like prewashed pfd fabric (the only fabric I would prewash!).  I just grabbed it all, cut two yard lengths or gathered up a bunch of scraps to make up two yards.  After using it all up, I grabbed a couple of bolts of my Egyptian cotton and cut that into 2 yard lengths as well. 

I decided I really needed some true reds and can always use greens.  I wanted to see how the fuchsia, mixing red and burnt orange interacted as well.

I actually had forgotten some of my process for doing this so will document it here for future reference!!

Steps are:

(1) Plan how much and colors
(2) Make up the dyes
(3) Mark the fabrics
(4) Set up the "pots" with the right amount of water and dye and put in fabric
(5) Make up soda ash solution and add to pots
(6)  Wait
(7) Rinse
(8) Dry
(9) Sort by second set of dyes
(10) Repeat steps 4-8

First step is to plan how much fabric of each color you want (I am  using one yard per color for this example) and then what colors and depth of color you want to play with (five base colors and five overdyes).  I generally use "pure" dyes in primary colors as a starting point as I don't want too many browns.  I usually do one yard of about 100 gm/yd fabric for this.  Important to know the weight of the fiber you are dyeing though as it is the weight of the dye with respect to the weight of the fabric that determines the depth of shade.  Most MX dyes reach maximum depth of shade at 3 or 4 percent (3 gms of dye/yard of 100 gm fabric).  Some will go darker though.

Next step is to make up the dyes. There will be six  yards of fabric in each "pot".   As my water is not super soft, I use urea water to make up the dyes (2 1/3 cups urea to 1 gal of  warm water).  I make up a few gallons.  I  use metric measures for making up the dyes and make up a 10% solution (10 gms of dye to 100 mls of water).So if I am doing those six yards per pot and I want the concentration to be 2% (I frequently use this), I need 6 x 2 gms (or 12 grams again assuming the fabric weighs 100 gms/yd which is pfd print cloth weight).  I use about a cup of urea water and dissolve the dye in it.  To do this, put a little water in the bottom of a measuring cup larger than a cup and then put in all the dye and mix it up like a paste.  Then  add the remainder of the cup of water.

The next step is to mark all your fabric so you know what colors caused what results.  I use tyvek labels with permanent markers and safety pins.  As my extreme dyeing is a 5 x 5 matrix, my numbering is A0-5, B0-5 through E5, and then 01-05.  That is 35 different colors.  the AO-EO are examples of the plain color as are the 01-06.  The latter don't get added until the second batch of dyes.  Most of the time I use a yard for each.

I set up my "pots" even though I am essentially doing low water immersion.  Each of these "pots" (kitty litter boxes, 5 gallon buckets) will hold 6 yards of fabric in the one yard of each color example (first pot will be all the A's, second all the B's etc.) I put my pots on an old coffee table so that I don't have to raise my arms up in the air to do the smushing.  It's a little bending but is actually easier on the body I find for at least this kind of dyeing (and shibori as well).  I add eleven cups of room temp water to each pot and the one cup of dye to each pot.  This is 2 cups of liquid for each yard of fabric and I always use dry fabric as I want the dye to be as even as you can get with low water immersion dyeing.  If you want it wet, decrease the water accordingly.  

I add the fabrics to each pot making sure they are smushed up.  I then do a lot of pressing of the fabric and manipulating of it. I move onto the next pot and do the same through all five.  Then I start from the beginning again and smush and manipulate the fabric  making sure there are no dry spots.  I repeat this a few times while I am preparing my next step.

Time to make the soda ash solution.  There will be six cups of soda ash solution per each "pot".     This is 6 x 5 cups or just short of 2 gals of soda ash solution (30 cups = 7 1/2 qts and 4 qts = gal).  I use slightly warm water for this as my basement tends to be a little chilly and I want the dye solution to be a bit warmer (but not hot).

After the fabrics have been sitting in the dye solution for 15-30 minutes, I then pot by pot pull out the fabric, add six cups of soda ash solution and then put the fabric back in and smush -- very important to get the soda ash solution to hit all the fabric or you will get faded ugly spots. After I have finished this, I go back to the beginning and smush some more.  After doing this a couple of times, I weight down the fabric by putting plastic  containers with some water in them so that fabric is above the water.  I let it sit for at least an hour.

Next is rinse out.  I am lazy and use the washing machine after the first rinse which gets rid of most of the soda ash.  I wash the fabrics in warm water and Synthrapol  and double rinse in warm water for these once dyed fabrics.  I do dry them as well and make sure all the labels are still   I wash them in separate loads if there are greatly disparate colors (like yellows together, blues  together and reds together).

After they are dried, I pile them all up and separate and sort according to the second digit so that all the ones go together ( A1- E1), then 2s etc.  You are finished with A0 and the other 0s. 

You then put the new piles in the new pots and repeat the first bunch.  

 After you have finished the overdyeing, the first washout in the same.  After you have done that washing and rinsing though, you do the serious washing!  Serious washing is Synthrapol with the hottest water your washing machine can do.  I also make sure I wash for at least 30 min (I turn the dial around so that it does the time twice).  I do two rinses and then do the whole process again.  Make sure that no one is taking any showers for awhile as this will probably use up most of the water in your water heater!!


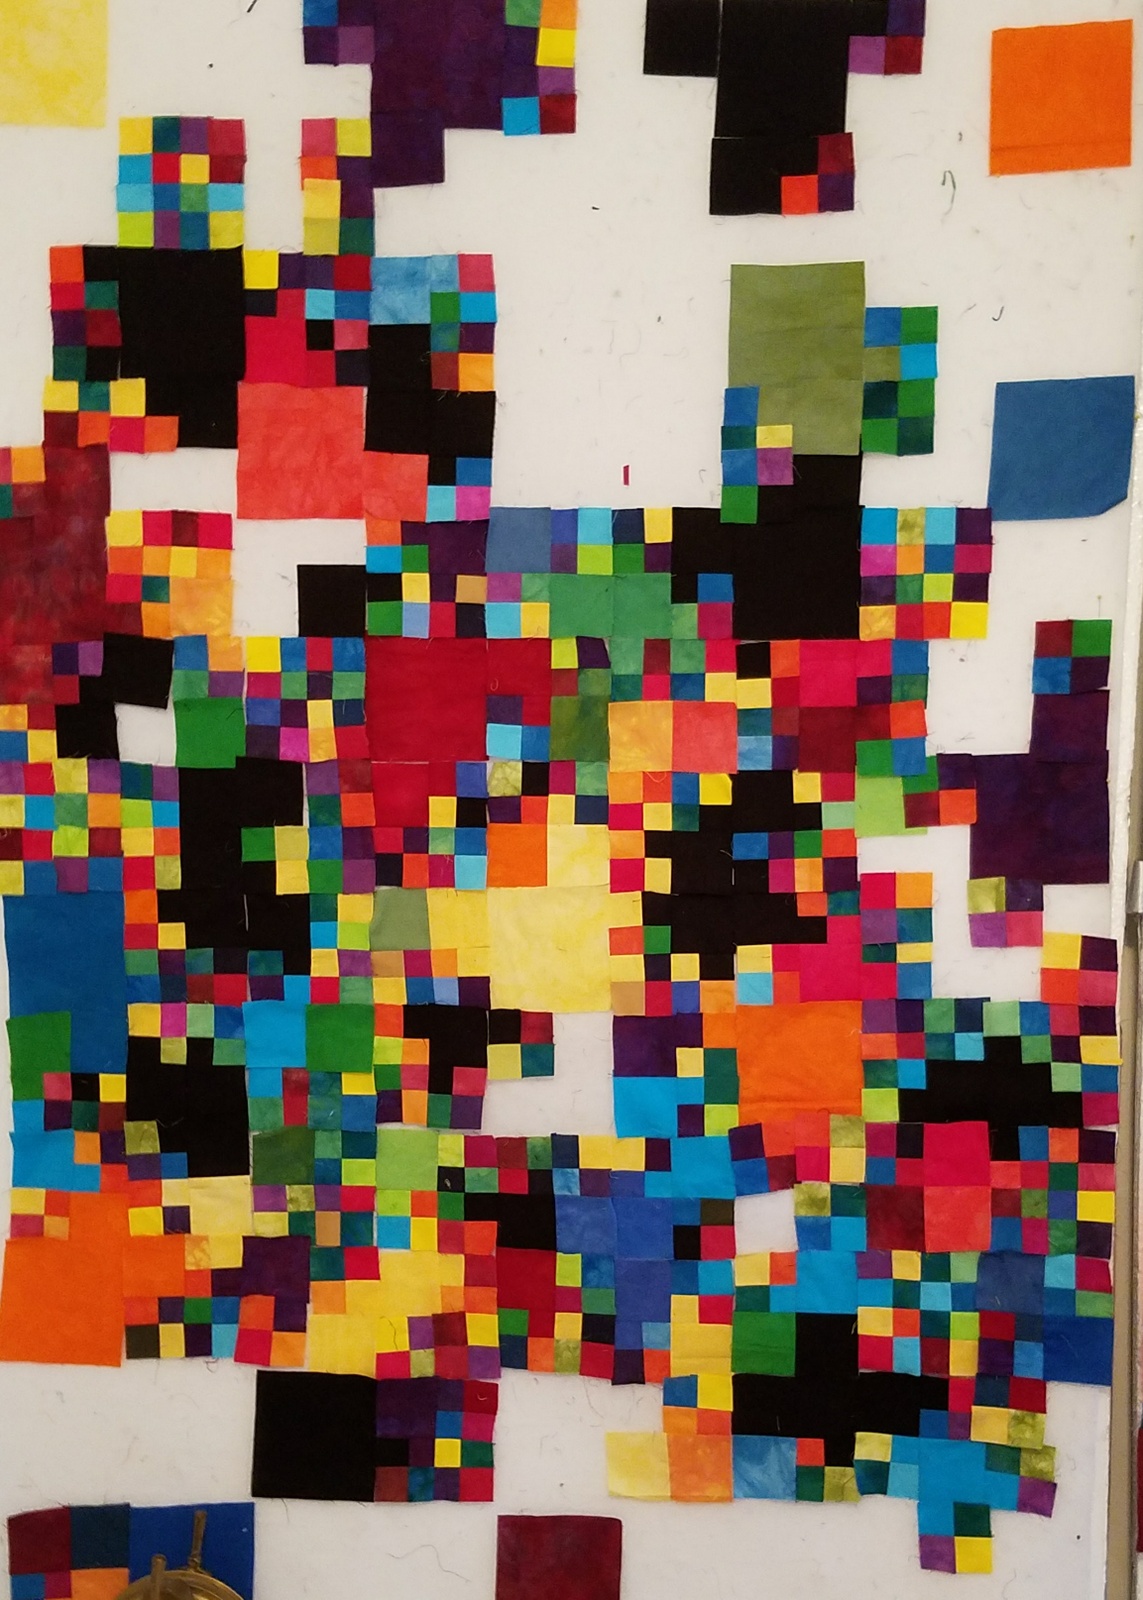
This is the pile of 70 yards that I ended up with and actually managed to not cripple my back with the water and fabric hauling!  I liked them all except for three which I will overdye with navy probably to make them browner.  I got some great reds and some nice greens as well.  Never can have too much green or too many colors of green!


Here are all the colors!  Looks like burnt orange should be between the tangerine and strong orange.  I do love strong orange and the new pure navy blues that come from Pro Chem.  When added together they make awesome browns and blacks (1:1 for brown and 2:1 navy to str or for black).  My first set of pots were the sun yellow through burnt orange overdyed with the blues and reds.  All the names I used are ProChem names as those are the MX dyes I use.


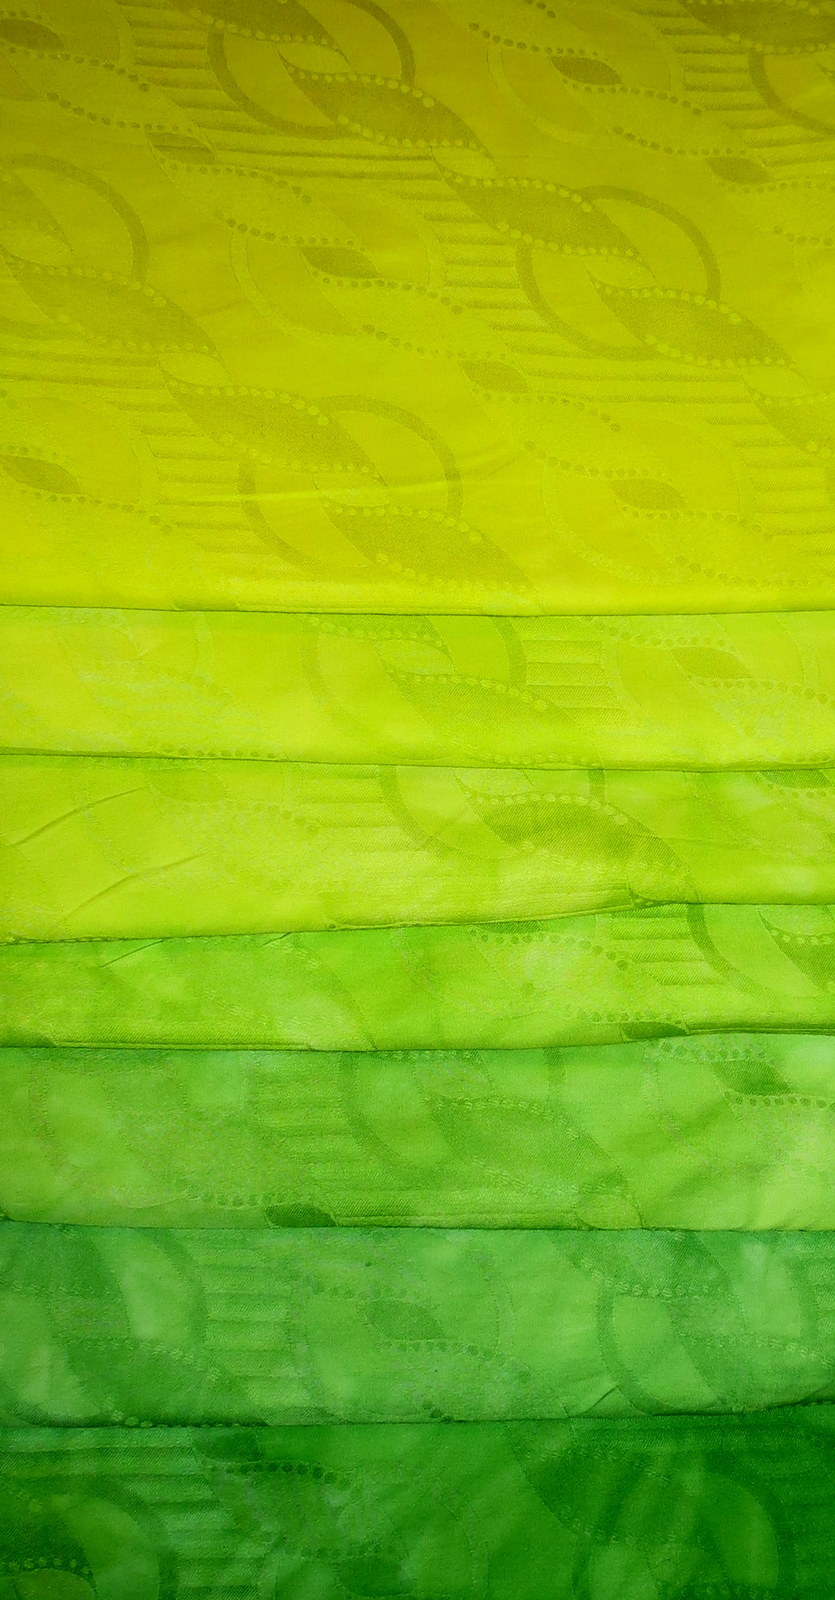
I decided I wanted some more lighter greens that were a bit more like lime so used some 10:1 sun yellow to turquoise and basic blue.  I liked the basic blue ones better (the top ones) but may try a 20:1 sun yellow to turquoise to see what color I get.  It is amazing how little you need of some dyes to shift the color quite a bit.  Same is true of shifting fuchsia to bright red.  I was amazed at how even the color was on the fuchsia pieces.  I must have really done a lot of mushing!!!  I also have found that I need to add a little more water to the darker colors.  Altogether, I dyed 90 yards with the overdyeing and the greens.  Another 40 yards are being washed out now!  If I can get 500 yards done this summer, I will be happy.  I have all sorts of non-cotton fabrics, yarns and other fibers to play with as well.  I think I will get a large bag of ice and try my hand at some ice dyeing using the colors I have been working with.  And then there are the t-shirts.....


Amid all of this dyeing, we have been picking, pitting and preserving sour cherries from our tree.  We covered it with netting to keep away the birds and squirrels and managed to get almost 2 pecks (16 quarts) this year!!!  We left the netting off after we picked the last big amount and by the next morning all the remaining cherries were gone!!!  Shows how well the netting works!!


Tuesday, August 14, 2012

50 Shades of Red

Well, maybe not quite fifty, but a lot anyway (33).  I decided that I needed to increase my stash of reds so set up one of my extreme overdyeing sessions with a plan to use my reds and then some of the mixed up reds (mixing different reds together like I did with the blues last month) and then overdyeing.  Well, it looked great on paper.  Biggest problem was that one of the chosen reds was probably 8  years old and didn't have any red left in it and was basically what I would call orange.  Of course I didn't know that until I had washed out the first time.  So I re-planned and did some things differently on the overdye.  I am relatively pleased.  The colors on my computer are pretty true to what I got (maybe a mite more orange).  I actually got some nice Christmas reds in here.

I have now thrown out several containers of dye that were 13 years old!!  If I haven't used them in this long.....  A lot of them had reds in them which seems to be the dyes that have the shortest shelf life (they are the most reactive of the MX dyes so this does make sense!)


This is the sheet so you can see basically what I did for each "cell".  My change of plans was to add Fuchsia to three of the overdye baths (1, 4 and 5).  The three reds I used as my base are Pro Chem's Fuchsia, Mixing Red and Strongest Red (this was the very weak one that red as orange).  I then mixed the Fuchsia and Mixing Red with the Strongest Red for the fourth and fifth columns.  The first row and the first column are the basic colors (no overdyeing).  I overdyed with different concentrations of Pro Chem's Basic Brown, New Black (hadn't used this before and it is a very blue black), and Burnt Orange (this is one of Pro Chem's "pure" dyes).  As I have gotten good rich reds with mixing Strong Orange with Fuchsia before, thought I would try the Burnt Orange this time.    I also used a  mixture of Turquoise and Basic Blue to overdye as well.  The differences in the reds is most noticeable here as the orangey reds definitely looked browner while Fuchsia and Mixing Red looked purpley. 

So now to re-assess and see what else I should dye before heading south!

My  husband and I have our 40th  wedding  anniversary is this week and in celebration our oldest daughter surprised us with  a wonderful surprise trip in September!!  She booked us for two nights in an Edwardian suite at the Plaza Hotel in New York City (complete with butler).  We also will be going to High Tea as well!  Since we  usually stay one step above a hostel when we go to NY, this is a very big treat for sure!!  Looks like I will have some place to wear my new jackets after all!  

Monday, October 1, 2007

Back to the Dye Pots - Brown or Bust!


Well, have finally gotten back to the dye pots and used up some of my week old leftover dyes to dye socks which I haven't done for awhile. I also grabbed some of my yellows that I had dyed some time ago and overdyed some of those as well as some other random fabrics that I had lying around. I like to see what happens! I got some really pretty green fabrics in this bunch. So I also have some nice blue and green socks to match the jacket fabric I made at Marcia's!! Two pairs are a little light so I may just overdye them. These socks are from Dharma and take the dye quite well although you can see the elastic a little with the darker colors. I think I bought 2 or 3 dozen the last time I ordered! They last pretty well although I have managed to wear a hole in the big toe on a couple of pairs -- too much walking! Each pair is 56 grams so doesn't take a lot of dye to color them up nicely!

I want to get started on my next Yellowstone pieces so wanted to dye up some browns and greys. I used the natural colored fabric which was probably not a good idea for the greys which are definitely on the warm side now. I may do another batch with bleached white fabric. The natural colored fabric is fine for the darker colors but as it does have a slight hue to it, doesn't do as well with the lights. I at least have a good idea of how light I want to go though (very light). I decided to try to do a gradation of browns using my leftover mixing blue and a 2% solution of strong orange. They aren't out of the dryer yet but I am loving what I have seen so far. It goes from a dark ocre to a deep brown that is almost black -- just what I was going for.

I have found that I like to do gradations where I basically use two different dyes. I keep one constant throughout the whole gradation and I make one variable. Because the low end of the gradation has such light colors, it looks like you are moving from one color to another many times. You have to be careful what colors you choose and what concentrations to use.

Laziness has overcome me in the washout process now. I now rinse in warm, cold, and cold and then move to hot wash with Synthrapol and then two more warm rinses. If I am selling the fabric, I will put it through one more hot wash and one more rinse to make sure there is no more color.

Tomorrow I am going to do some yellow overdyed with blue/violet to get some more browns. The blue/violet/yellow mix gives some very interesting browns. I am then going to do a sequenced overdye with probably the darker blues and orange in different concentrations -- I really want to get some fairly light ones so may have to play a bit more.

This is the group that was the randomly dyed fabrics, just pulling out some already dyed pieces that were either yellow or poorly dyed the first time. There is one commercial fabric in there as well which I overdyed blue and another piece yellow.


The below groups are the ones that were dyed with mixing grey (left) and then the orange/mixing blue on the right. The colors of the browns are better in person than they show on the computer. Can't seem to adjust them to the right colors on my monitor at least!