Showing posts with label tumbling block. Show all posts

Friday, July 1, 2022

Finishing Up the Fat Quarters!

Well, finally finished the three tops except for the borders which I will put on after I baste and machine quilt.  It makes life easier to do it this way.  This was my second attempt at making this quilt with these strips!!  My first attempt used the 57 degree ruler and I ended up using the diamonds in the third quilt in this post which turned out to be my favorite!  I really didn't care for the fabrics but I had pulled out some of the ones that really didn't match and think it worked out okay and certainly better than I thought it would.


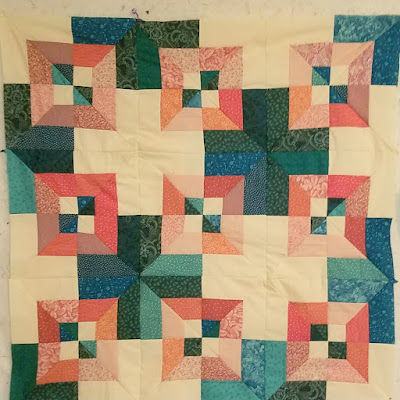
I have made this pattern before and it uses three strips sewn together and then cut on the diagonal, half with the squares vertical and half horizontal.  I do have to add borders to this one.


These are the triangles that were supposed to be for the tumbling blocks quilt.  It is a good thing I always make a test block first as I only had to rip out two small seams as it was obvious something was very wrong!!  This is the only one of the three that I am even a little hesitant to immediately give away as I do like it.


Friday, July 2, 2021

Moving Forward Still!

Got another of the big rosettes completed and relatively pleased.


This is the Passacaglia design wall as it now stands.  I am working on the fourth large rosette as well as several of the rosettes that have 8 stars around them.


After messing up the order of the hexagons a couple of times, I finally put them  into piles in the order that they are to be sewn.  This made life one heck off a lot easier!  I start by sewing the upper two on the right and add the bottom right; then i sew the two upper left together and add the bottom left.  You leave the two sides of the hexagons separate as they are sewed up in rows.


I have made it much scrappier than any other version I have seen.  I calmed it down a bit by moving some of the "sides" around so that the yellows came together as well as the beiges.  This helps the eye to rest a bit I think.  I like the optical illusion of big blocks and little blocks.


I turned it upside down and you get a bit of a different optical illusion but you have to look at the light areas more intently to get it to work.


It has been driving me a little crazy the past few days trying to figure out how to make this a little different and give your eye a bit more of a rest without making it boring.  I finally decided what to do this afternoon.  I will be taking out (maybe these blocks but who knows) a couple or few blocks and replace them with another hexagonal block.  You will have to come back to see what that is!  I also have decided yet how large to make the quilt.  I will probably trade out a couple more sides so that there are a few lights with peach on both sides.  I think keeping the same color (although not the same fabric) will help.  If I had the patience, I would probably also do this with the darks and medium but that will have to be the next quilt!  Trying to also decide whether this would be a decent baby quilt or not as it is blocks!

Finally finished and added the big blocks so your eye would have some place to rest.  Used less random placement in the following ones so didn't need this!


Monday, June 28, 2021

A Brief Update!

Well, this is the beginning of this new quilt which I was determined to make a little scrappier.  I must say that it was easier said than done!!  For this block to be successful, you really have to have a firm delineation of light, medium and dark.  Normally when doing a scrap quilt I play around with relativity and will use a medium as a dark or a light.  It just doesn't work with this block.  I used my phone to determine whether the cut strips were dark, medium or light by converting the colors to black and grays and whites.  Even doing that, I had to take apart two blocks as the contrast was not enough and fabrics picked as lights really worked better as mediums  Sewing them together in the right order requires me staring at the blocks on the wall to make sure I do them in the right order.  


You only sew three of the hexagons together as you eventually put them together in rows so there are no Y seams.  I am imagining other interpretations and mixing these hexagons with some stack and whacks.  We shall see.  I think I just like hexagons in any form!


I have updated two of the rosettes so still making progress on the Passacaglia!  Currently my approach is the same as I do with many scrap quilts.  I make a whole lot of individual pieces, finishing about 3/4 of the top, put them together on the design wall and then more carefully select what the remainder shhould be so that things look balanced.  It drives me crazy if there isn't some rhyme or reason to a top!  I can't imagine hand quilting this monster so will carefully machine quilt it if I ever get it done!!

I am still forcing myself to de-stash and am daily finding some surprises like large pieces of leather and suede I found today.  What was i thinking?  Also found a piece of 50 year old Marimekko fabric which is quite stunning. 


Thursday, June 24, 2021

Inspiration!

This is the box of fabrics that I am currently pulling from for the Passacaglia quilt.  I think I have the whole rainbow there!  Making progress but nothing new to put on the wall for awhile as I am doing the cutting, ironing, glueing steps right now!


This top is almost done.  I just need to add a yellow border and then a green/purple flower fabric border.  It will be about 40 x 90 when done, enough for a cot.  I didn't bother to try to find a specific arrangement or attempt to put colors next to each other but did twist the blocks around so they weren't all going in the same direction.  Just too lazy!!


I saw a quilt on Scrap Quilter Enthusiasts on Facebook and loved the look of it. It is a variation of the Tumbling Blocks quilt -- Ill call it a box in a box  It looked like she cut the individual pieces but looking at it, I decided you could do it in 2 color strips.  I grabbed a piece of paper and decided how each 60 degree triangle was made and saw that you could do three strips sets and then cut the triangles using a 60 degree ruler.

The hexagon triangles were:

1. medium/light,

 2. dark/light,

 3.dark/medium,

 4.light/medium,

 5. light/dark and

 6.medium dark

You could make these combinations with three sets of strips: 1 + 4, 2 + 5 and 3 + 6.  


These are the three strips:  dark/medium, light/medium and dark light.


These are the resultant triangles cut with a 60 degree ruler.

I used 2 1/2 inch strips which should result in blocks about nine inches across.  I have literally tons of 2 1/2 inch strips already cut at my other home and will for sure make some of these quilts as they are super easy to put together and have a stunning look I think!  

I spend at least an hour every day working or cleaning out my stash before I allow myself any playing with blocks or cutting the pieces for the Passacaglia quilt.

I want this quilt to look more scrappy so will use shorter strip sets -- 22  inches wide instead of the full width of the fabric as I do like variety and much prefer a scrappy look!

Like many, I look at Pinterest and Scrap Quilters on Facebook for inspiration and then I try to find an easy way to construct the quilts.  I have been collecting a lot of 4-patch designs and recently half square triangle designs.  So many make complicated looking blocks when they are easy.  I play around with Electric Quilt to figure out the block and piece sizes and occasionally a color arrangement.  The temptation is always to just figure I am finished when I get a decent design using the software!