Showing posts with label colin firth quilt. Show all posts

Friday, May 24, 2013

My Baltimore Album Style Quilt is Finally Done After a Mere Thirty Years!


Well, it is finally done!  If I get truly inspired, I may add some more ruched roses in the border but don't hold your breath!!  It is 90 inches x 90 inches but may never find its way to a bed!  It was hard to find a place to even take a picture!!  My fingers are still chewed up from all the hand quilting.  However, that whole cloth quilt top that has been sitting in my closet for years might be the project of the year for next year's trip south as I do like having a quilt to hand quilt.  All my early quilts were hand quilted but the past few years that has changed -- mostly because the type of quilts I do has changed a lot!!  

This is a closeup of one corner where  you can see the ruched flowers and the hand quilting.  Note to self:  don't add applique after your whole quilt is finished including the hand quilting!

When I started quilting almost 40 years ago now, I thought I would be doing hand and machine applique and took my first quilting class just because I thought I couldn't call myself a quilter unless I knew the basics of piecing!!!  I always tell people to try anything as they never ever know what they will like.  It was advice I gave my kids when they went off to college as well encouraging them to try a bit of everything.  My first dyeing class was taken just because I had to choose three classes to enable me to get into an Elly Sienkievicz class taught at a local venue 30 years ago!!  

 Here are the remaining four quilts that will be in the Genesee Valley Quilt Show next weekend.  You can see how eclectic my quilting is.  This uses fused applique and machine quilting techniques and contains my hand dyed fabrics.  Called Colin Deconstructed.


 This is one of my many Serendipity quilts called Snowflakes.  It is machine pieced and machine quilted.
This of course is my Serengeti Lions drafted from a picture my daughter took in Africa her last trip.  It is totally machine pieced and machine quilted and contains my hand dyed fabrics.  Pictoral quilts are really my favorites so maybe I am not as far from my origins as you might think!


Another of the Serendipity quilts from Sara Nephew's books.  This one is called Calypso because of the colors.

 The snowy winter was wonderful for our azaleas which were more colorful than I have ever seen them!

 Dear Husband planted this fragrant lilac in our yard this spring!


 He has also been purchasing more and more hibiscus which we cart down to NC each winter.  I think the van will only have space for plants this next trip.... I do like this white one though!

Our neighbors have planted these beautiful tree peonies and I got some pictures just as they unfurled!


 Another of the new hibiscus plants.  


Friday, March 30, 2012

Colin is Completely Finished -- Okay, No Label Yet But....

Finally, Colin is all done.  He is still a little damp in the upper right hand corner from my spraying and blocking!  So now, my quandary -- I would really like to somehow get this raffled off somewhere with the proceeds going to Oxfamamerica which is one of the causes that Colin and his wife support (and with which I wholeheartedly agree ).  Just my name on this just isn't going to do it -- it needs some kind of publicity.  And here is my problem.  I used a photo I found on the internet initially.  As some of you may remember, I had hoped to get a picture of my own for this project but none were good enough.  I managed to track down the photographer and the organization that may own the copyright.  Two notes to the photographer have met with no answer.  His name is Jason Redmond.  I have now sent a note to Reuters (the photo attribution said it was taken for Reuters) and hopefully they will answer me although I am not holding my breath here.  Very frustrating!  I won't enter it into any larger shows without that permission even though I could probably use the photo under Fair Use in the copyright laws.  I certainly never want to make a cent personally on it.  So if any of you have any brilliant ideas, know Jason or have a friend at Reuters, let me know!!  Otherwise, I may just enter it into local shows and then send it off to his publicist in England.  I obviously adore Colin but for some reason feel no great attachment to this quilt even though it is autographed.  It is one of my favorite pictures of him though.


This is a closeup of the background quilting which I varied in each block.  I wanted the quilting to not really detract from the images so I chose thread the same color.  You can see the quilting very well closeup, but Colin's face almost disappears when  you view it close up so that makes me happy.  I like quilts that give you surprises when you look at them close up which you don't see at a distance.  


Well, am ready to start on some more of the Serendipity quilts and have been playing a great deal with EQ6 to do this.  Here was a composite of some of the colorations and different blocks I may use.  Kind of got the illusion of the background hexagons.  I will obviously use this merely as a guideline to give me some ideas.  I have done as many as 15 colorations of each of these blocks, just to see which ones I liked the best.  I thought this was kind of an  unusual set as well.


I will be heading to my daughter's in Charlotte in a couple of weeks and will need projects to do down there -- such a compulsive doer.  


Of course, doing a quilt of all my ducks is also rattling around in my head and may make it down onto paper before too long as well.  Trying to come to grips with the fact that I would like different "poses" for the ducks!


Took a walk around the block today as it is supposed to snow tonight which should put a damper on all the spring flowers.  The forsythia are almost gone and our magnolia seems to be the only one in the neighborhood that didn't have its blooms frozen by a very cold night earlier this week.


The aforementioned magnolia.

Friday, March 16, 2012

I Think I Need a Serendipity Intervention....

This is most of the latest Serendipity quilt put together -- still very very busy.  Hmmm....


I have spent the better part of the past week trying to shovel through my sewing room and make enough room so that I can enjoy walking around it (couldn't walk through it when I started).  Basically I hadn't done a major clean up since coming back from NC LAST year.  So the boxes with the fabric for the lions as well as the disarray caused by quickly getting projects and fabric ready for this year were all over.  


I have two totes filled with fabric to give away as well as a large bag to sell.  Hopefully, our quilt club will want the large box of 6 inch squares I have to give them -- after making 30 comfort quilts last year, I couldn't face anymore disappearing nine-patches and disappearing four patches!! 


One of the things I have done differently this time is to make up projects into those 2 1/2 gallon Ziploc bags as I go along so that all I will have to do is grab some bags and I will be good to go anywhere!!  However, this has led to the Serendipity "problem".  I love making these quilts and in my cleaning efforts, I came upon several half finished (and even one finished) "stack and whack" quilt tops.  Coincidentally, they were the right size to make these Serendipity quilts (without having to do a whole new set of calculations).  I took one finished quilt top completely apart and the finished blocks of another apart!!!  I had gotten bored with the plain stars or hexagons.  This is the first of the newly found blocks -- these were hexagon stars but didn't even have their background pieces.  I "unsewed" them and then cut the diamonds into two triangles and then made diagonal pieces 1/4 inch smaller.


These were my very favorites and they were hexagon stars all sewn up completely into a quilt top -- I took the whole thing apart!!  It started life as two small tops which I redid into one top last year.  So this year, I took it apart again, cut the diamonds into triangles and then trimmed down the remaining diamonds into the right size!!  So this one will be green, blue, white and a touch of green and navy blue.  I can't believe I did this as my solution to these problems when younger was to just get rid of it so I wouldn't have to look at it anymore!!


This is a closeup showing the brown sides that I have added to the large quilt.  I wish there were some way to separate the blocks even more -- this is awfully busy but it is fun!!


Well, if you look closely at this block, you will see that I finally decided that I would use a small satin stitch to tack down all of the appliqued pieces and I am relatively pleased with how it looks.  Now just to get it basted and quilted.  Will probably follow the face outlines within the face and use an overall design in each of the backgrounds.  I may vary each of the backgrounds -- haven't decided yet as I want the background interesting, but not too interesting!!  This is the  final block in the top and the one with Colin's signature.  The quilt top was derived from a photo taken by Jason Redmond for Reuters in 2009 when Colin was doing an interview about A  Single Man.  It took me forever to find the attribution of the photo and I have tried to get permission from the photographer through his website and through Twitter but he hasn't answered my inquiries.  I really would like to use this top to raise money for Oxfam (in honor of Colin) but would like to have it shown in some regional or national shows. If anyone knows this fellow (he lives in LA), please help me!!


This is my granddaughter Amelia with a pin cushion.  My daughter tells me she is very much a girly girl and loved the dresses I made for her at Christmas so some more are in the works for summer!  Hopefully, she will be starting sewing early!!  She is here in "repurposed" tutu from her mom!

Tuesday, December 13, 2011

Project Progress...

Well, I did finish two dresses for my 33 month old granddaughter!  I am hoping that they are not too bright.  I also ordered long sleeved tshirts to put underneath them so that they can be worn in the winter as well.  They do look a bit long for an almost three year old but she can grow into them!


This is dress number 2.  These were fun to make and ended up with entirely different fabric than what I had originally intended and packed!!  They are called scrap bag dresses as they take small amounts of a variety of fabrics.  I used three fat quarters of the flower print and one fat quarter for each of the other two ruffles.  The lining was also a fat quarter.


Okay, so now is decision time.  This is version 1 of Colin Deconstructed.  He starts whole in the upper left and then gets deconstructed.


This is version 2 where he is finished in the bottom right and gets deconstructed up to the upper left.  Aesthetically, I seem to favor this version and it will allow me to add two more blocks with color in them.  I think your eye automatically for almost everything starts in the upper left so it needs something to draw it away from that corner.  The full Colin is the focal point (and color will be if I add it) so it gives you motivation to move your eyes down and cover the whole thing.  Am I just imagining things or do you all agree?  


I am relatively pleased with how things turned out as I think  he is identifiable even in the one where there is only 5 pieces of fabric.  

Friday, December 2, 2011

An Ode to My Sewing Machine...

No poetry from me but glances at the latest two quilts that I have machine quilted on my new Juki which I love. I can't remember which book this quilt came from but it is just two different values of 2 1/2 x 4 1/2 inch rectangles.
You can see the stitching here which was just loopy-loops as it was bright and cheerful.  It has a great fish print on the back in blues and oranges like the front.  You can also see the block here which is the two light colored rectangles in the middle, then blue rectangles added at either end and then two sets of dark and light rectangles are sewn together and attached at the sides.  Each square has 8 rectangles.


This is the last of the one block wonders that I did using an absolutely hideous print.  I am not sure this final product is a lot better and is my least favorite of the three I have quilted down here.  I just did overall stipple quilting with light colored thread.  The back is red as is the binding.  Guess it will be a Christmas quilt.


This is the final iteration of the Colin block.  I have found I have enough fabric (whew) down here to do a variation of the quilt that  I accidentally created when doing the collage of progress several blogs ago! It will be called (I think) Deconstructing Colin.  This is the block with Colin Firth's  autograph.


And this is the Juki TL-2010Q which I have used exclusively to do the machine quilting on the 9 quilts I brought down here with me.  It has an intelligent needle down (goes up when you use the automatic thread cutter -- banging the foot petal) and stays down the rest of the time (although you can adjust it up if  you want).  It also has the knee lift like the Bernina.  The tension is perfect for both machine quilting and for putting on binding.  The only thing I haven't succeeded at is the automatic threader which I haven't successfully engaged yet!  The speed of stitching is very very easy to control.  So just a satisfied customer.  I had to buy mine online (from Texas) as there were no local dealers but it worked out just fine -- it got here in about two days and has a five year warranty from the dealer.  It came with several accessories -- two quilting feet and an even feed foot.  You can tell I really like this machine and sadly it will probably replace my Featherweight for piecing!  I am still pretty much overall a Bernina fan though and love my old mechanical 830 and my newer 170.

Tuesday, November 15, 2011

The Complete Wilmington Experience and -- Meeting Colin Again...

Well, if you look closely above Colin's shoulder, you will see that I succeeded in getting his signature for his quilt!!!


I have my friend Debi to thank for this, in fact two Debi's as that is his assistant's name as well. I had read in the paper this morning that they were filming yesterday in downtown Wilmington for both One Tree Hill's final episode of the series and Arthur Newman, Golf Pro.  I figured there was a chance that one or the other would still be filming and I could show Debi a bit of the process.  


Now you have to understand that my friend Debi is the most outgoing gutsy person  you will ever meet.  We saw film crews but didn't know what they were filming.  Debi opened her window and found out which and then we hunted for a parking place.  She found another crew member and asked where specifically we might find them filming and they told us.  We found a parking place literally almost in front of the place.  Unfortunately, they were only filming inside today. 


 I spotted Colin's assistant sitting in the SUV that he gets carted around in but told Debi I wasn't going to approach her for fear she would think I was a stalker.  I did have my quilt block in my hand though as I had put it in the car several days ago, just in case...  Well, Debi just says nonsense and marches over to the car and tells Debbie (Colin's assistant) that her very shy friend didn't want to bother her again.  His assistant waved to me and we talked a bit  and she remembered me (I knew she would).  Well, I couldn't believe it but she got out of the car and went into the building where Colin and Emily were filming and as he came out, she motioned him over (he was in costume of pjs and the ugliest bathrobe you  have ever seen).  He was obviously in a huge hurry to get to the next set but he graciously signed my block!!!  So Debi and I both got to be up close and personal again with Colin and saw Emily from about three feet away!  Can you believe it!!  This all happened in about a five minutes I might add.  We then ate lunch outside in a nice little restaurant and were instant celebrities with the staff because of the autograph!!  What utter fun...


Earlier in the day, Debi wanted to go fishing in Kure Beach so Warren finally got out his rod and set us up on the pier and then deserted us!!  This was Debi's first fish -- a Blue fish which she threw back.  She had about three different men helping her with the reel, one even crawling on the pier to get her hooks when they got stuck under the pier.  I told her she would never be a widow for long as she is definitely an old guy magnet!!


This is Debi's second fish -- a Pin fish.  This became bait for one of Debi's new male friends.
Several of our fishing helpers.  The Grackles were relentless also, grabbing the bait right out of the bag (shrimp).


This was an unusual place for our friendly neighborhood ibis -- atop the electric pole next to the house.  We  have three that visit almost every day in the yard.


A sunset last night looking back toward the forever wild area two blocks behind the house. It was actually quite warm and humid today but has cooled down already.  Tomorrow is Debi's last day here and I will be very sad to see her leave for home.

Sunday, November 13, 2011

Despite Two Cats, Colin is Moving Along


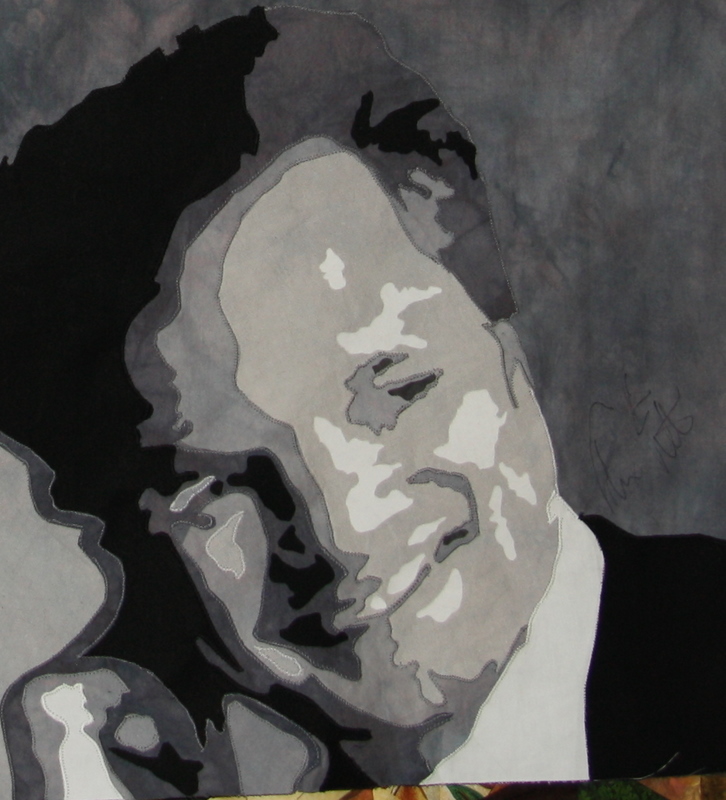
Well, the above is the progress on the Colin block.  I am using my own hand dyed fabrics for this.  You can see the five different values.  I think it is beginning to look like him.  George and Chener both kept climbing up in the middle of the piece -- I think they love the plastic.  I am truly amazed that the fusing is going so well as the greys I am using (my hand dyeds) are really on a print cloth instead of a firmer fabric (like Melody Johnson recommends).  I haven't had good luck with the looser weave before but this time, it is working like a charm and the Wonder Under is doing its job with no problem!!  I am beginning to think this collage of the stages might make an interesting quilt in itself!! Hmmmm.... maybe I will change the plan....  Now I know Colin is leaving the area soon, but wouldn't it be nice to get this autographed? 

This and the picture below are of the latest of the one block wonders that I have finished down here.  I am working on the last one right now and then have two smaller tops to finish.  One will be perfect as a lap robe for the cooler evenings we  have been having -- hate to turn on the heat just yet as I had ac on yesterday!


Well, can't get the text to go next to the pictures for some reason!  I was pretty sure this was a starling when I took its picture this afternoon but he was all by himself.  I think the winter plumage is actually pretty!
The first bluebird (a female) I have seen.  Seems the birds come to visit when a cold front comes in!


Thursday, November 10, 2011

The Colin Block - The Process

Warren has headed to Lisa's for a few days so I thought I would take this time to move forward on the Colin quilt -- seemed quite fitting somehow.  George, of course, has different ideas and climbs on whatever table I choose for working.  Even if I wait until he is asleep, he hears that paper crinkling and he bounds for the the middle of my project.  Next step is locking him out of the room!!


Anyway, I thought I would share my process here. 


1.   My first steps are choosing the photo, converting it to black and white (to see if there is enough contrast for interest) and then posterizing it (most photo programs will do this).  I chose five levels of value for the Colin block.  You can see it peeking out from under George.


2.   My next step is to blow up the picture to the final size that I want.  I use free poster software to do this or take it to Staples if it is small enough.


3.    I then outline by tracing over all the different areas using a piece of clear plastic (tablecloth thickness).


4.    I then number all of the different sections.  These last two steps are done with black permanent marker.


5.    After I have numbers assigned to all the sections, I take a piece of paper and make columns of the number.  This will provide a map for three things -- a.  whether I have traced it onto the fusible or not, b.  is it a background or foreground (ie do I have to leave extra bit around the edge if a background piece) and c.  what value is the piece (1 - 5).


6.    Turn your piece of plastic with its numbers upside down and trace onto the paper side of fusible all the separate pieces, leaving space between each one.


7.   Rough cut around each of the fusible pieces, leaving extra for those called background but also leave a little on the foreground pieces.


8.    Group all the pieces for each value with its corresponding piece of fabric and fuse the fusible onto the fabric.  Then trim all the foreground pieces to the tracing line.  Leave 1/8 to 1/4 inch around the background pieces.


9.    Apply the fabric pieces to a  piece of background fabric.  Use your plastic outline as the template for where the pieces will go.  Easiest to do this by pinning the plastic to the top of the background fabric (right side up again), lifting up the plastic as you place the pieces.  Apply the pieces back to front, ie, place the background pieces down first and keep layering, ironing as you need to as you go along. 


10.   After you have the pieces all fused, then use matching thread and satin stitch each piece down using thread that closely matches the piece you are applying.  Some of the background pieces won't require any thread as there will be foreground pieces covering all the edges.


Now if George will just leave me alone long enough to get this map done and the tracing onto the fusible completed.  Once I have it set  up, the rest is easy.  As I plan to make several of these blocks using different fabrics, I will get a lot of repeat use out of this.  


George has been ever present since Warren has been gone.  Above he is "relaxing" on the porch.  Here he is helping me straighten up the latest quilt I have machine quilted.  I literally pick him up and put him down several times and finally just have to close the door with him outside!!