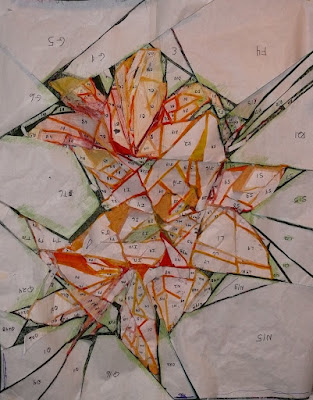
This is the back of the top with all the freezer paper templates still in place (almost). (Notice just as I like to confuse myself that I numbered them all upside down!)
The top is done and will be readying itself for quilting later today! It was clearly a learning experience in a number of ways! So now to go through 10,000 of my photographs on the computer to decide what else I want to convert into wall hangings (or maybe one of Lisa's photos). I still have one converted picture in the works -- a Great Blue Heron. It has been traced, converted to templates but will need some significant interference before it starts moving along -- the lines in it don't make a lot of sense in some places.
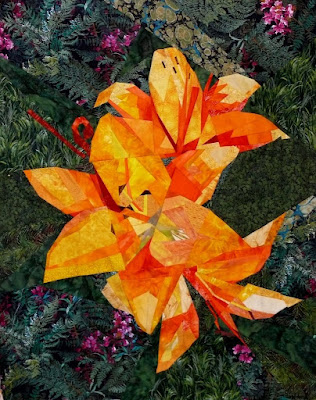
This is the top where it sits now but at the bottom of this note you will see what a little Photoshop will do and what I will probably try to do with the quilt top to make the middle flower stand out more.
However, I digress...
Things I have learned:
1. Focal point, focal point, focal point -- make sure that the area where you are drawing attention makes sense visually. Not sure I entirely did this on this piece. I think the focal point is the middle of the biggest flower.
2. Value is far more important than color -- I knew this but it was emphasized in this piece because yellow/orange was my main color family and there isn't a lot of value shift in these high value colors!
3. Fix your photograph eliminating extraneous stuff BEFORE you finish the quilt top (ask me how I know). That is why one takes 12 weeks of Photoshop class after all!
4. Forget the colors in the photograph - use the photo to set up where you want your lines and forms and use value to emphasize this -- again it has to make sense visually.
5. Don't try to copy the photo as you will only end up frustrated.
6. Try to ascertain where the light is coming from so you can make your decisions logically. Not sure I was successful here either.
7. Keep a roll of freezer paper next to you so that when you change the templates, you can easily create new ones.
8. After you have traced the templates onto the freezer paper from the tracing paper, back the tracing paper with freezer paper to stabilize it. This tracing paper image is where you will audition your fabrics.
9. Make at least two more copies of the whole template image . One is for working small sections at your sewing machine and one (which doesn't have to be full sized) is for general placement (so you don't have to keep unpinning your piece from the full sized image).
10. Avoid solid colored fabrics unless you really want to emphasize an area (if foreground).
I am sure there are a lot more lessons that I learned but those are just the ones that came quickly to me. Amazingly, I was not frustrated at all with this piece but really looked at it as a step forward and a challenge to make right.
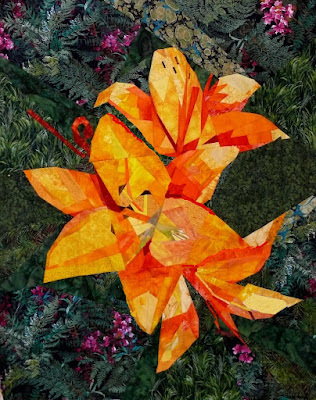
I just loosely played with Photoshop a little and added a little darker coloring around a couple of the middle petals and eliminated some background petals (one above the top petal on the middle flower and one on left hand side of the bottom petal). I filled in with background. I also darkened one of the yellows in the bottom flower.
Now to decide whether I unpiece or whether I applique on the revisions....


 Coming up the street today, I could see that our front yard was ablaze with color from the crocus (croci?)! Warren tries to plant more each year and has since we moved in. Unfortunately a skunk ate most of last year's crop, but I am sure he will be at it again late summer. As the temps are supposed to be in the 80's this weekend, I know these will all be gone by Monday but they are at their peak of color today.
 These are amongst my favorites as I love purple and orange together. Has to be a quilt in there somewhere.
 And finally the beginnings of the Great Blue Heron!! Usually I piece the background first but decided to go for the bird first this time. Because the background looks kind of plain in the original photo, I have decided to do some piecing in those areas to make that negative space a little more interesting. I am calling this one something like "From a Fish's Perspective" as I am kind of looking up at him and there is some foreshortening of the neck because of this. He was sitting on a post in the original photo but will be in the water in the quilt -- ah, artistic license! I am using a lot of blues in this even though they read as grey or black as he is called the Great Blue Heron (even though he looks grey to me...).
 This is the back of the top with all the freezer paper templates still in place (almost). (Notice just as I like to confuse myself that I numbered them all upside down!)
 This is the top where it sits now but at the bottom of this note you will see what a little Photoshop will do and what I will probably try to do with the quilt top to make the middle flower stand out more.
 I just loosely played with Photoshop a little and added a little darker coloring around a couple of the middle petals and eliminated some background petals (one above the top petal on the middle flower and one on left hand side of the bottom petal). I filled in with background. I also darkened one of the yellows in the bottom flower.
 This is the famous kitchen jungle. Warren has now built a frame 4' x 6' where all the hibiscus and assorted house plants spend the winter months. This year he is going to put in an automatic watering system as well. These hibiscus were cut down quite a bit before he brought them inside but are still over five feet!
 The Mola Challenge quilt is done which is why there hasn't been any posts as we can't let the other participants who might see my blog know what I have done. It was fun but I question why I take the long road and piece things rather than just fusing away which would have been easier probably in the short run (except that I am a terrible fuser and would have had to do more machine work probably). It is okay although technically, it could have been a whole lot better. When I get near the end of a project like this, I just want to be done, done, done. This was my inspirational mola which I got from Priscilla. It comes from Panama and she purchases them directly from the makers and many times still on the blouses. You can see the hint of my quilt in the background.
 Ah, but the current project is a lot more fun for me -- it is another pieced nature inspired wall quilt taken from one of my photos at QBL two or three years ago. They had the most gorgeous day lilies everywhere that year and I took lots of pictures knowing they would end up in a quilt some day. Of course I am using the Ruth McD techniques and am getting more of a handle on it with each quilt.
  Of course, the trick is to be able to abstract the image so that it can be pieced. Taking those drawings and making them just the "right" level of abstraction is the trick -- too abstract and they look like cartoons, too detailed and they look like photos!
 The background has almost all been placed and a few of the lily petals are starting to take shape. I actually managed to get two corners sewn together.
  It is always good to see Priscilla again and hear her travelling stories! She just returned from a wonderful trip to Las Vegas and then down to Phoenix. After this trip, she was off again to teach in Chicago and a whirlwind schedule which she writes all about in her blog! She definitely has been converted to a quilter though for 2009! This is an art quilt that Priscilla has made with leftovers from previous projects. I especially liked the small checkerboards that are spread throughout.
 We had a wonderful day at Marcia's as usual in her very well lit and wonderful studio! The weather even cooperated! I got to show off my newest snow dyes and work on my next Ruth McDowell piece which is working out better than my last drawing by far. It is beginning to be more intuitive. Working in smaller sections really helped turn the corner for me so we shall see what happens.


