Thursday, February 15, 2018

A Baby Quilt for a Daughter's Friend

This is the beginning of yet another baby quilt but this one with a specific "baby to be" in mind.  My daughter picked out the main fabrics for the front and back - the beachie fish and crabs and a really cute fabric for the back which also features even more beach creatures -- very apropos  for coming from where we live!  I found this pattern on Pinterest of course but am probably making the blocks bigger than the original.  If I hadn't made them larger, then the focus fabric wouldn't have shown up at all.  As it was, I "fussy cut" all the 6 1/2 inch squares to maximize the images.  The squares were each 3 1/2 inches square.  I did 7 across and 8 down so it would be a decent sized quilt.  Initially I had some other fabrics as well in the focal fabric spots but they just didn't work.  I incorporated one of them in the back putting a 8 inch strip down the middle which then made the fabric wide enough for backing instead of just being a clever design idea!!


The top is done here.  I had to audition several fabrics for the border and decided on the pink as the baby is a girl!  


Here the quilting is done.  I quilted in the ditch every three inches both horizontally and vertically.  I then added the hearts in the white pieces.  I made them pretty uniform by cutting out a piece of interfacing that was a little tacky and outlining the outside of the heart with a Sharpie so you could see the edge against the white.  I then just put one pin to hold it while I free hand quilted around it.  After circling it the first time, I removed the heart and then went around two more times, not trying to be exact.  


Here it is all done with lavender binding which I added using the machine method rather than hand sewing it down.  I am getting so I actually prefer that and will always use it for baby quilts.


The art quilt group down here met to do beaded bracelets on Saturday, something I have never done before and I didn't have many beads down here.  What I hadn't realized was that they were going to use a Japanese "loom" (Kumihimo loom) which I also have at home!!  These are two examples of what the bracelets look l like done.


Here is my bracelet which I won't blow up as there are lots of threads showing but it looks pretty good from about a foot away so nobody had better kiss my hand!  I used mostly darkish beads (the only ones I had) and a gold bead every fifth bead (this was how I kept count of how many beads I had threaded!!).  We used these cool needles which were basically just a very thin piece of wire which was a loop.  I used nylon onto which I threaded the beads.  It does look better in person than in this picture.  

Anyway, we started by cutting 4 45 inch pieces of cording, stringing about 80 beads on each using a large bead knotted at the ends to hold the beads on.  Then we tied on a plastic bag full of pennies in the middle of the 4 strings which we pulled through the middle of the loom and then untangled the strings, added the small plastic spools and placed two each next to each other in the N/S/E/W positions on the loom.  You did the weaving by taking the upper right string and placing it next to the lower right hand string.  Then take the lower left hand string and move it next to the upper left hand string.  Then turn once counterclockwise so that the next set of strings is in front of you.  Repeat until the bracelet is the size you want and then knot it off as close to the beads as you can get.  Apply drop of special glue and stuff into the closures and hold tightly for a minute.  Now to just get some findings and maybe try this when I get home!  There are tons of online directions like this - Kumihimo round braid

Tuesday, February 13, 2018

Visit to Mattamuskeet, Bodie Island NWR, Pea Island NWR and Pocosin - Lots and Lots of Birds!!

This is the Bodie Island Lighthouse at dawn on the second day of our trip up to northern North Carolina to see our winter visitors!

This is an American Kestrel which is a truly beautiful bird in the falcon family.  He was quite a distance away and the light is always bad at the one end of Mattamuskeet when the sun is brightly shining.  Hopeffully you can see his pretty plumage here.

We also saw a juvenile Bald Eagle, a Cooper's Hawk, a Northern Harrier and a Turkey Vulture at Mattamuskeet.  You can always tell when an eagle is around as all the birds fly up off the marsh!  We didn't see the eagles at the nest like we did in December though.  It was a day for raptors although not a good day for pictures -- we were hoping for more overcast conditions!  

We did see a lot of Northern Pintails when we went on the backside trail at Mattamuskeet.  There were also a couple of Black Ducks in with them (the duck in the foreground).  

 This is the beautiful male Northern Pintail.


 Here is a pair of the Northern Pintails.


I loved this shot from behind that shows this tail and the wing patterns from behind.  There were a LOT of Pintails as you can see and the light was good on the back side of the trail!

We headed over to the Outer Banks that afternoon and went to Bodie Island Lighthouse.  Last year there were 1000's of Redheads -- this year none!!  This was a group of Lesser Yellowlegs that flew by.  

A closeup of one of the Yellowlegs.

I did manage to get a picture of Green-winged Teals despite the rather poor light.  There is a broad green stripe on the head of the male.

At the crack of dawn we headed back to Bodie Island and found quite a few Avocets feeding in the low water.

A close-up of one of the Avocets.

This was a picture of two of the Lesser Yellowlegs who were also feeding in the shallow water.  Loved seeing their reflections in the still water.  I should note that there is a boardwalk that takes you to the observation tower and it was covered with frozen dew.  My dear daughter held onto me the whole way so that I didn't take a tumble on this very slippery walk.  Luckily there was no wind (like the day before when we froze to death) so even though chilly, it was tolerable.


A close-up of one of the Yellowlegs.

Next we headed down to Pea Island National Wildlife Refuge and got there just as a nature walk was beginning.  There were ducks of almost every variety there that day.  I found out later that the local  camera club (Cape Fear where I live) was up there for pictures -  no wonder we saw so many expensive lens!!  This picture has a male Redhead in the foreground as well as an American Coot (always plenty of those).  In the background is a female Canvasback.

I must say that in my many visits to this area, I had only seen one female Canvasback and no males before this trip (did see one male down here locally) but this time, there were lots of them at Pea Island.  This male posed for me as I was heading back to the car.

More Canvasbacks.  There were a lot more females than males.  


This is a Wigeonl, another pretty duck.

This is a Ruddy Duck.  We saw some of these at Mattamuskeet as well.  There were also Northern Shovelers, Lesser Scaups and a Pied-billed Grebe in the mix.  Black Ducks were off in the distance and of course a lot of Tundra Swans -- probably more than I had seen there before.  We didn't spot any White Pelicans though.  A couple of days later, a Snowy Owl was also spotted at Oregon Inlet (nearby this refuge).  There is incredible construction going on at the inlet so really impossible to stop although I had wanted to as there is also a Great Horned Owl nest there I wanted to see.  They are building a HUGE new bridge that is about four times as high as the current one.  

We stopped at Pocosin on the way home and were really surprised to see a field filled with 1000's of Tundra Swans.  We had seen other fields filled with white birds on our way to the Outer Banks which I had assumed were Snow Geese.  Now I am wondering....  I didn't realize that Tundra Swans grouped like the Snow Geese.  The water was high at Pongo Lake so we didn't see a lot of the shore birds you sometimes see -- just lots and lots of Tundra Swans.


Wednesday, February 7, 2018

The Last of the Strips Finally

I finished the quilt top I started the other day and here is the beginning of placing the strips.  I cut the long rows of strips 40 inches long by 4 1/2 inches wide.  The turquoise strips are 1 1/2 inches wide.  The four patches are on point and of course are made up of the 1 1/2 inch left over strips.  The amazing thing is that I just used the leftover sections from cutting out the triangles out of the four strips sections and I still have some more left!  The white triangles are quarter square triangles cut from a 4 1/4 inch square.  I kind of rounded up the math to get that size which worked out beautifully as there was only a little trimming and I would rather have oversized triangles than those just the perfect size.

All the strips are finally made and up on the design wall.

And here it is all finished!!  I have enough of the long strips to make one more like this and then one where I substitute some solid strips for a couple of the columns.  I kind of like this one!  I liked the last two as well.  After that, any remaining strips will go in the scrap pile to be given away!  I do get tired of the same fabric all the time.  Good thing I had a 25 yard bolt of white from Joanns that I bought back when you could get it for $1.50/yard with your 50% off coupon!!  I am down to about 10 yards after all the quilts I have been doing!

Now I am working on a baby quilt for my daughter to give to friends who have designated her as a god parent.  I am not completely happy with it but I like the backing and it has beachy stuff in it.  I ended up "fussy cutting" the central motifs which aren't as bright as the squares accompanying.  Pictures will follow after a short trip to northern North Carolina and the Outer Banks to get my last winter look at the Tundra Swans and wintering ducks.

Saturday, February 3, 2018

Birds of Pleasure Island -- Another Entry!

Kure Beach where I spend my winters is on an island  It is only an island because the Army Corps of Engineers made a canal between the Atlantic Ocean and the Cape Fear River back in the 1930s.  The island is called Pleasure Island which always sounds like a bad porno movie title to me so I rarely mention it.  It is a great place to live as there is Carolina Beach State Park at one end and Ft. Fisher and wildlife refuge at the other end so lots of opportunity for wildlife pictures.  Our house is a block from the beach so I can watch dolphins from my third floor porch -- tough life I know.

The picture is of an Osprey carrying away a fish he has just caught in his talons.  Most of the rest of the pictures are of this Osprey who entertained me for a good fifteen minutes diving multiple times and coming up with good sized fish.  I think he only managed to hold onto one though and a sea gull was trying to get it away from him.  I had never seen an Osprey at Carolina Beach Lake before although they are quite common down here in the warmer weather.

I liked this picture as it shows the really ferocious looking talons he uses to catch the fish.

 Just a couple of nice side views of the Osprey.

His eyes were consistently looking downward trying to find that next fish

Here  he is in full dive mode!!  (I should mention that I took 500 pictures in 15 minutes this day with only about 50 worth keeping.  I was challenging myself with these action pictures of this Osprey.)

Another with his fish.

This was also a very handsome pair of Northern Shovelers that came closer than before (only about 75 feet away instead of three times that amount).  Here is the male.

Here is the pair with the female taking the lead.  This may become a small quilt at some point.

There were a lot of Dunlins down by the pier south of the  Ft Fisher Ferry.   

There were also a couple of Short-billed Dowagers in the group.  They were all far away in not great light so there may have been other species as well.  I suspect one was a Lesser Yellowlegs which I haven't seen at that particular location before.


Friday, February 2, 2018

Getting to the Bottom of Those Leftover Strips Maybe!

Well, it is done.  If you haven't figured it out, it is just 1 1/2 inch strips sewn together (dark and white) and then cut into 2 1/2 inch segments.  I then sewed them into groups of 4.  This got old and boring fast, so I set them on point and put quarter square triangles to finish off the rows.  

As I had barely scratched the surface of the box with all the leftover 1 1/2 inch strips, I went to my Pinterest file of "someday maybe I will do simple baby quilts".  I found this pattern on it and I should really explain how I ended up doing it as it was not as obvious as it seems!!  The first stripey square that I did, I joined 8 strips together alternating the dark and light and then cut out a square on the diagonal.  This was really impossible and used up a lot of fabric.  Then I decided that I would just sew the strips into groups of 4 and cut 45/45/90 degree triangles out.  This was very easy.  I then sewed the two triangles together to make the squares.  The Pinterest pattern just had a 5 by 5 arrangement which didn't appeal to my need for symmetry!  So I added an additional column of the blue.

It wasn't quite large enough for the neonatal quilts so I then added some borders.

So here it is finished!

I enjoyed this quilt so I still had lots of the pairs sewn and started a new one.  I am now getting to the point where my fabric hoard down here has no blues left!!  The strip box is certainly a bit leaner as well with only small bits left.

Here is the second one finished.  The fabric around the outside is one of my favorites and I used to have about six yards but think I am down to about three yards now.  It is one of the few that I still enjoy using.  

Years ago, I took lots and lots of half yards and quarter yards of 

fabric I had had for years and just started cutting it into random strip sizes (although I had bags of strips left over from other projects as well).  I then just sewed these together making "fabric".  I used this fabric to make two king sized bed quilts.

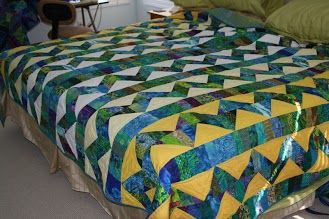
This was the first I made.  I started by cutting large squares out of the manufactured fabric and then cutting them into quarter square triangles.  This is what I did with the first set of triangles (the top and bottom of the square).

And this is what I did with the side by side squares and of course strips from the fabric.  I used hand dyed gradations of yellow to finish this off.  It was originally going to be two twin sized quilts but I needed king sized quilts more for the beach house

I still had a 64 x 45 piece of this fabric left over (of course) and that is the genesis of this next quilt.  Another Pinterest quilt caught my attention so I have adapted it to my use and think I have just enough for two small quilts (baby, neonatal, comfort or lap robe) of 42 x 42.  I cut 4 1/2 inch strips from the fabric and will edge it with a one inch wide border around each strip and then fill in the center with the four patches set on point.  Hopefully that will be the end of my 1 1/2 inch strips -- although I have a feeling the answer will be no.

So here is the newest beginning of another of these quilts with just the strips cut and laid out at this point.

Sunday, January 28, 2018

QBTS -- A Day of Making Neonatal Quilts

Saturday was a perfect day for working on baby quilts at the New Hanover Orthopedic Hospital where we get to use one of the conference rooms once a month.  There was quite a good sized group on Saturday and lots of quilt tops were finished.

People are busily working.  The really neat part was that almost everyone did a different variation of the quilt using the same blocks!  I got pictures of a lot of them but not all.  This is a creative group!


This last one was the one I was working on.  I just chain pieced like crazy and ended up making just about enough blocks to complete the quilt in an "on point" arrangement ( 59 out of the 61 I needed).  I had all these scraps left over from the Augusta Cole class last year.  It doesn't look like my scrap pile has decreased at all though.  I have seen a couple of other quilts on Pinterest that might be a little less fussy (although this was easy) and may use some of the strips for one of these.