skip to main |
skip to sidebar
If you have followed my blog, you will remember that the last couple of summers I have felt compelled to experiment with folding fabrics, applying ice and then dyes trying to see how many layers the color will go through to get a repeating pattern. Inspired by fellow dyer Kay Koeper Sorensen, I decided to try to do mandalas this summer. These were my first attempts and this was my favorite of the three I did. My process for this one was (1) to cut a piece of fabric 45 inches long by 45 inches wide. ( 2) I then ironed it well and started folding, first in half, then quarters, then eighths and then sixteenths, ironing in the folds. (3) I then refolded as much as I could so that I was getting more of a fan fold rather than just one thick side. (4) I then soaked it in a soda ash solution making sure that the piece was saturated and making sure the folds stayed in place. (5) Then I placed it on a rack and smushed it up some as I was running out of room because I had laid out another piece flat. The folds in this piece were not as precise as the other two I did at the same time. This was my favorite. (6) I used grape, blue violet, dark green and basic blue dyes pretty thickly applied over the ice with which I had covered the pieces.

This is the other piece that shared the rack with the above piece. Instead of scrunching this piece, I aid it flat on the rack. If you look closely you can see that on top of the piece, you can clearly see the rack markings! The third piece I did had this even more evident. My conclusion was that I liked the effect of the crinkled up fabric much better. With the scrunching, you get hills and valleys so that the dyes actually run down the fabric and give a much more organic feel to it. So onward with more experimenting using different colors, concentrations and using a hexagon fold the next time so that I will have a six-repeat pattern instead of an 8. I love kalaidoscopic images and of course have carried on a love affair with hexagonal repeats for a number of years now doing far far too many stack and whack, one block wonder and serendipity quilts!!
This is far too much fun!!
My neighbor's bird feeder is a source of many bird sightings. Although the picture is a bit fuzzy, you can see the usual male Goldfinch, a couple of House Finches (females) and a male and female Purple Finch. I see lots of House Finches in NC, but never the Purple Finches and had to look a couple of times to make sure that was what I was seeing. The main difference is the extent of the crimson coloring and the lack of striping on the males which identifies a Purple Finch instead of the House Finch who has a red head but lots of brown striping on his body. The female Purple Finch has the broad white streak across her face (right under the Goldfinch in the picture).
Here is a male and female Goldfinch in their summer colors. The male is on the left with his black forehead!
Just a closer view of the male Goldfinch just hanging out.
This is a closer view of the Purple Finch male.
I believe this is either a female or juvenile Cowbird which was sitting in the front yard and partaking of the bird bath water. I haven't seen one of these for years (since leaving a more rural environment).
The weather has been beautiful since I got back here to upstate NY. Here is the Purple Trillium that grows out back.
There is also a lot of the White Trillium whose flowers are quite a bit more showy than the purple but which will darken to pink as they begin to wilt.
Our Star Magnolia bushes are covered with blooms as is our Saucer Magnolia below! Spring is coming with a vengence even if a little late!
When I first saw three squirrels off in the woods, I assumed they were grey squirrels with something white in their mouths. However, they are Fox Squirrels which I figured out even before blowing up the pictures They are really too cute for words with those little mouse-like faces. I have seen them several times now.
I had headed out to these woods at Carolina Beach State Park in search of a Great Horned Owl as I had seen some pictures on FB from birding friends. I guessed it would be in the same place it had been reported a couple of years ago and headed to the path. Sure enough, in only a slightly different place this very large owlet was sitting on a branch but no mom was nearby. They are hard to miss as they are so large!! They are 22 inches tall according to my bird book.
I went back the next day to hopefully show my sister and her friend March and sure enough, he was about in the same place with the sun shining on him
Just another angle but you can see his bright yellow eyes staring down at me -- he is turned here. This was the first time I have seen a large owl in the wild.
the only other owls I have seen in the wild were the Burrowing Owls down in Florida. Next year I will search for a Barred Owl!
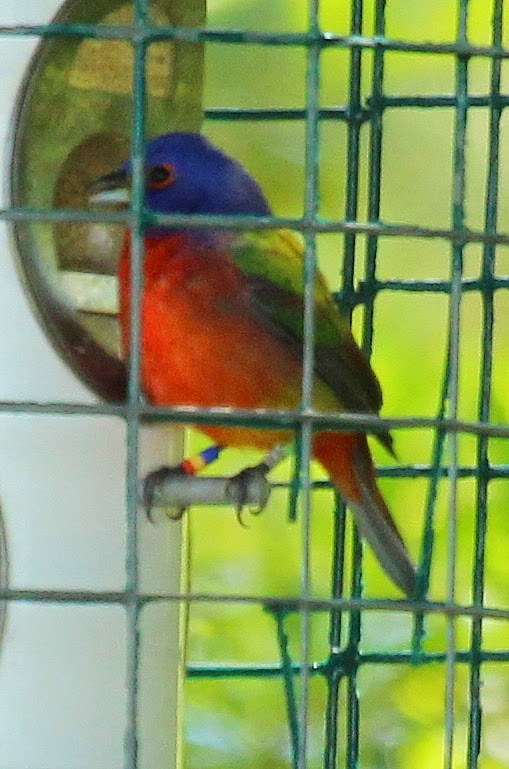
I have also diligently for quite some time now been searching for Painted Buntings which I know are down here. They decided to come out the day I took my sister over so we were all thrilled with this sighting as well!
Even though he is at the feeder in the park, you can see all his colors here which
are spectacular -- like seeing a tropical bird.
I went back the next day and the male was at the feeder with a juvenile (I think). What a thrill!
My sister decided she wanted to learn how to dye while she was visiting with a friend from Florida so dye we did!! I did my usual first step for new dyers which is a gradation. She chose this blue (with my help as I knew she would love this blue) which is Pro Chem's Basic Blue. I haven't had time or inclination to iron any of the fabric we did but it was a full day!!
I also did the gradation of the Basic Blue as it is my favorite of the blues. While my sister did a gradation of Golden Yellow (the only yellow that really shows some variation in a gradation), I did a gradation of Pro Chem's Dark Green to which I added about a 2% solution of Sun Yellow to each shade. It made for a nice gradation!
The ladies were game to do some sequenced overdyeing. This time instead of the five pots in each of two steps, we used three. The first three colors were sun yellow, golden yellow and mixing red. These were then overdyed with intense blue, basic blue and turquoise.
We took the leftover dyes and just played by soaking in soda ash and then packing pretty tightly in a tray and poured dyes over them. The ladies were very happy with their results!!
Definitely making progress but have no idea how you would do this quilt without a design wall. You just couldn't do it. I have started doing the outside leaf blocks and decided on adding star blocks in each corner using the fuchsia from the middle. I tried various and sundry ways to "end" those corner blocks (continuing the green up to the fuchsia, extending the fuchsia to meet the green) but didn't like any of the alternatives so went with this and a white background even in the setting triangles. It definitely needs a border treatment which is my next challenge with my limited fabric choices down here!
I finished all the outside pieces and started sewing the rows together and here I have joined four rows on the diagonal. Always difficult to keep track of things on the diagonal, especially which setting triangles go where.
The middle of the top is all finished in this photo and I have finished the newest season of Midsomer Murders at the same time!! I love this English mystery series and own dvds of all 25 seasons!
So now I am testing borders. I am definitely going to do a yellow border next to the white although it doesn't show up much there so will make it wider than I usually do. I am trying various shades of purple around the outside and thought I might do orange.
Here I have tried a darker purple but definitely have rejected that -- too dark. I do have a piece of more bluish purple that I like the best so far (no picture).
I thought I would like some orange but don't think I like that either although I may put some in the corners -- to be determined. Lots of auditioning and cleanup tomorrow as currently the room where I sew looks like a tornado hit it as I have been pawing through boxes trying to find the best matches!
I do have to get some cleaning done as I have guests arriving on Tuesday and more on Saturday and then I head north not too long after that.
Still making progress on this quilt. This step shows more "petals" being added to each of the large outside pieces. You can see that I haven't sewn the stars together yet.
The large flowers are all all completed although not sewn together. So they join the stars which are also not sewn together. I will not be opening any windows any time soon or putting on the fan!!
Here I have added the dark green petals on the outside. I now have three different dark greens in the quilt!!! I only had a quarter yard of the last piece and literally just enough to make these blocks! Looks like I didn't run out of the pale blue either which was a relief as I was cutting it close on this one as well!
I did want to repeat the fuchsia in the middle somewhere around the outside as it needs to be repeated and I have very little of it. So I have decided to replace some of the leaf blocks (like those ones surrounding the center block) with star blocks using the fuchsia for the star points. I will use these in the four outside corners. I will repeat the yellow with a thin border strip (maybe 1/4 inch to 1/2 inch). There are setting triangles outside the leaf blocks that surround all this. I have decided to repeat the orange there as there is a lot of green and purple and I do like a green, purple and orange palette a lot -- my favorite colors together. I reserve the right to change my mind on this if it is too much. The other alternative is a darker sky blue. We shall see!

Okay, so I went back and looked at the pattern and it does say "Easy". Well, Each block is really really easy to construct and they come out perfectly. However, that is the only easy part!! If I had used just the colors on the pattern and had just the right amount of each fabric, it might have been easier, but there are so many abbreviations and charts, I am not sure that would have been the case. Anyway, I didn't want to use her colors and I didn't have enough of any fabric as I challenge myself to only use the fabric I bring down with me and this year I chose to bring a lot of fat quarters and half yard pieces. The challenge now is to find enough of each fabric that it looks like it was supposed to be different colors or shades of colors. So far, so good!! I have chosen white as the background "color" as I do have some of that and it gives a nice clean look to the quilt and I have found I like doing quilting in the white areas. Here you can see that I have completed the center block and the eight leaves blocks that surround it.

Well, here I have added the "petals" to the big flowers. They look blue in the picture but they are really two different violet/blue fabrics, one a hand dye and one a fabric that I had three fat quarters of. The dark greens are different from the green in the middle as well. I am using orange around the outside flowers as I wanted something a little calmer than the bright yellow in the middle. I do need to repeat that bright yellow again but you have to be awfully careful with yellow so I will probably just add a very thin yellow border as well as a little wider fuchsia border as I don't plan on using the fuchsia again anywhere and don't have much of it anyway! I do have quite a bit of the yellow which is one of my hand dyes. You can see here I have decided on a pale blue for the stars between the larger flowers. I have just enough of that to complete the stars (I hope). It is a batik that I found in my stash for down here.

Ah, here you see the difference between the purples on the four corners and the ones on the inside. Making progress.
This is as far as I have gotten this week. I haven't sewn the stars together yet so hopefully no big winds will take them off my design wall while I visit my daughter in Charlotte. Of course, my first day here she managed to break her big toe on a Friday night and we had to go off to the Emergency Room!! I told her not to move that big tv.....
I was auditioning fabrics as background for the leaf blocks around the outside and have decided to go with more of the white although I toyed with just using a slightly darker shade of blue but blue can get really overwhelming and for some reason, even though blue is one of my favorite colors, I hate working with it. Blue and white quilts I have made are torture to finish and I have given many away so I don't have to look at them anymore!




 Posts
Posts


