Saturday, June 17, 2023

Two Down and the Start of Another

The first one is finally done except for the borders which I will add after quilting.  I do like the way it turned out and think it was a good use of the fabrics.


This is the second one which I have since finished but neglected to take a picture.  It is a little shorter and has different ending triangles on the side.  

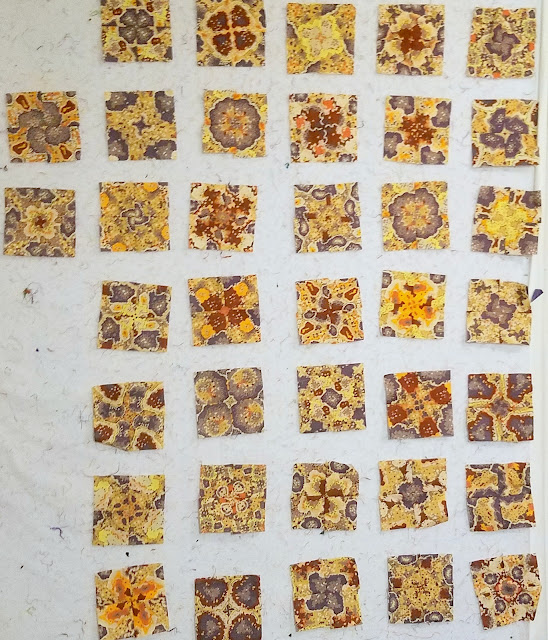
This is one of the fabrics I used in the above tops.  I had two different colorways of this fabric and this was my least favorite so I decided to see how it would look as a "posie" stack and whack.  It had a 12 inch repeat so each square was 2 3/4 in maximizing the repeat which after trimming was only 11 1/2 inches.  I ended up with 54 squares which will finish to 4 1/2 inches each.
Here are the first 37 completed.  They are pretty tame and I am not yet sure whether I want to cut up the other fabric  but probably will as thre is enough variety.  

My technique is to rip the fabric into its sections and then to sit in bed watching tv and pin along all four sides to insure I get perfect repeats.  

The next day I cut all the packets of squares and then sit in bed the next night auditioning the positioning as you can make so many with these 4 patches!  I put a pin in the corner which means that is where the center will be.  

I then carefully place them on piece of batting so that I can accurately pick up the pieces.  

I will most likely frame each of these squares with a variety of matching colors - greys, tans, browns and golds.  


Friday, June 9, 2023

A New Project


I have seen versions of this quilt on Pinterest and have wanted to construct one for a while.  It looks pretty easy but I didn't think it was!!  Maybe faster the next time.  Anyway, I found this pile of Kaffe Fassett fabrics all in browns which I had left behind up here in Rochester (I took all the brightly colored ones south and don't really work in browns anymore).  I cut up 4 1/2 inch squares and then made the half square triangles using the "8 at a time method" I documented before.  It uses 10 in squares of black and white.  Three ten inch squares gave me enough for the top.


I found a small piece of the beige fabric to use to finish off the sides.  I had a terrible time figuring out how many to do across and down and screwed up a number of times on my design wall (not sewing thankfully).  I started with a 7 across by 8 down set but ended up doing 6 across and 10 down so that the corners would be the same.  This also allows for borders without having to buy double fabric.  It will be a "comfort quilt" to be donated either here or NC.  I started sewing the top left corner just to see how it tooks and I am pleased.


I finally sewed all the rows and have them on my design wall awaiting my putting them all together.  My back decided to give me fits at the end of this day of sewing so I am resting a bit before completion.  I think I will attempt putting it together here in Rochester as I sewed a bunch of batting together the other day so should have a piece big enough.

I am pretty sure I will do more of this design as I really like it and it is a good use of all those bags of 5 in squares I have.  Trimming them to 4 1/2 inches is easy!

If I do baby quilts, I will make them 6 x 8 and use a softer color instead of the black.

Friday, June 2, 2023

Farmer's Wife 20s Blocks and Some Fun

Because I had more blocks for this quilt than the 30s blocks, I decided to go with a 11 x 9 orientation which with the sashing will yield a top that is 80 x 100 inches approximately.  I decided to add sashing as I felt the eye needed some place to rest and some dark to counteract all the light.  I haven't quite decided to do about borders yet but they won't be wide!  I actually used every square inch of the purple fabric that I had in the sashing.  I was two 9 in strips shy so found another piece that was close.  I had roughly calculated before I started using the fabric.  This is the first far left section.


This is the middle section.  Those outside strips are not attached but will be added when I do the "quilt as you go" combining the sections.


This is the third and last section.


In RAFA (Rochester Area Fiber Artists) group yesterday, Joyce showed us something called momigami (hope that's spelled right) which is the crumpling of paper over and over to give you a fabric-like look.  We took small pieces of brown paper bags and crumpled and re-crumpled and even added a little oil to our hands.  I took it one step further and took a photo of the result which is to the left.  I then played around just using Picasa  (not Photoshop which would yield even more interesting results).  I printed this on an 8 1/2 x 11 sheet of paper (thus enlarging it by about four).  I am thinking I will print it on some cloth as well as it looks like rocks to me and could be used in an art quilt.  Some of the fiddling around with Picasa is below!