Friday, July 22, 2022

Back to the Passacaglia and of Course a New Stack and Whack


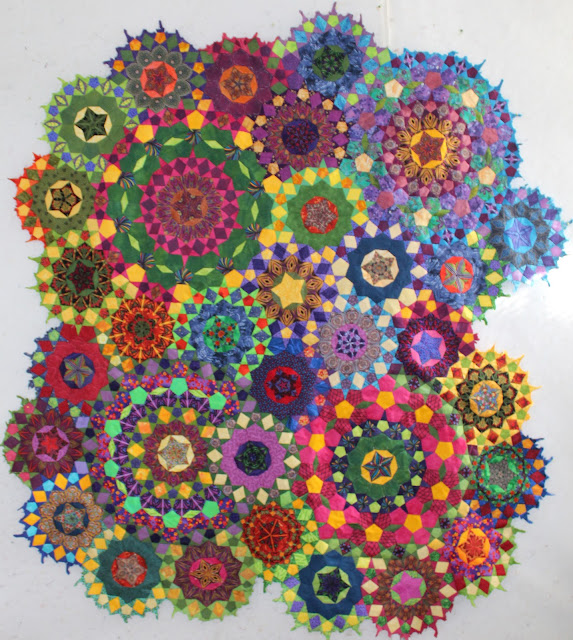
Well, I finally got back to the final bits of the Passacaglia sewing in the few pieces around the outside filling in areas that needed a bit more.  Then came the chore I was not at all looking forward to and had put off as long as possible.  Because I couldn't believe the pattern would have you cut off large areas that you had painstakingly pieced, I am appliquing the piece down on a dark green background which will take forever I am afraid.  But FIRST, I needed to get rid of all the paper on all of those tiny pieces that the of which the quilt is made!  I am sure they amount to 1000's.

My first step was to soak the whole thing in warm water in my bathtub.  This was particularly scary as I used a lot of dark hand dyes and sometimes I am  not as good about washing enough times as I should be and I was afraid of some serious bleeding.  I tried taking the paper pieces out kneeling by the tub but only lasted about 5 minutes.  I then grabbed a fairly large plastic box and wrung out the top as best I could and put it into the box and returned to my sewing room where I proceeded to take out the pieces.  The good news is that the glue that I used  which was Roxanne's Baste-it  worked very well.  I had used some other glue earlier and luckily had only used it on a few pieces as it did not work.  The freezer paper that I had ironed down released immediately so that was also good.  Also the dissolvable thread I had used initially also dissolved completely.  

I have probably spent a good 10 hours so far taking out paper!!  The first couple of days I did it with the wet top.  After I got out all the larger pieces,  I decided to throw the quilt into the dryer with the tiny tiny star points still mostly unpulled as they were super difficult to get out.  I was surprised that even fairly wet, it dried without too much trouble and didn't leave a bunch of paper in the dryer (which is why I didn't use the washing machine}.  I then sat in front of the tv and started trying to get the papers out of those tiny pieces (3/4 of an inch by about 3/8 inch}.  There are 100s and 100s of these pieces and I have spent at least four hours so far pulling out the papers.  I have discovered it is much much easier to pull out the dry pieces of paper and would definitely somehow dry the top if I were ever foolish enough to do this kind of quilt again.  Tweezers also help getting into those tiny areas and it is not a bad way to spend time in front of the television as it doesn't take a lot of concentration, just searching the top for the papers.  As the pieces are so small the seam allowances cover up the papers so you have to go by feel!

I found four small panels left over from a quilt  made a few years ago and decided it was time to do something with it and since I have been on a stack and whack kick, here are the blocks.


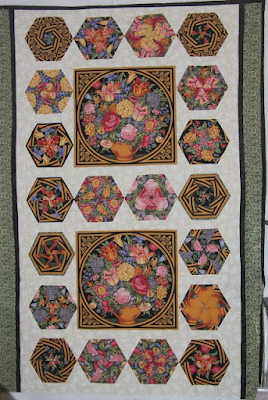
 Here is the original quilt using the panels which faced in  opposite directions!                                 

 It was a little unusual as there were only three repeats so I alternated on the hexie blocks!  For some reason I had 4 leftover panels that were all facing in the same direction which is what I used for the blocks above.  Good thing I keep my quilts on Pinterest as I couldn't find the blog entry with this quilt on it!

I had originally planned to only use the reddish orange, green and yellow but for some balance, decided to add the purple.  This was my first iteration which was okay.

For the final version, I did switch things up a bit so it is very balanced!  Because it is only 33 inches square, I will need to add some borders to make it a baby quilt.


At first, was only going to add the green and purple which was okay.


I finally decided to go with a thin strip of yellow -- I always seem to do this!


Isn't it truly amazing how different this quilt is from the original quilt using these blocks from the same panel!!


Saturday, July 16, 2022

Junior Stack and Whack Complete!

All the blocks are done and bordered.  I had to search quite a bit to find fabrics compatible with the print.  I usually just slap them together fairly randomly not worrying too much about what is next to what.  However, I found I didn't like the tan/pink blocks next to the red so had to make sure they were surrounded by green or black.  I had just randomly bordered these trying to keep an equal amount of each color and not worrying about placement.

I had to rethink this a bit and ended up leaving out three blocks and ripping the borders off of three blocks so they would not be quite so random when sewn together.  I had literally just enough of that slightly off-white fabric left to fill in the triangles, especially after I mis-cut the first square, making it a 10 inch square instead of the 12 inch one I needed!


Here is the top finished.  It currently measures 41 x 73 inches.  It is almost symmetic but not quite!


Here is a closeup showing a little more detail of the blocks themselves.  I was selective in deciding which borders would go on which blocks so a mostly green block would not have a green border but probably a red border!

Now to decide what to do next!


Monday, July 11, 2022

Stack and Whack Senior and Junior!

This is the senior version of 20 blocks that now measure 10 1/2 square.  My first thought about sashing is shown in the second row but it didn't do it for me so I had to come up with something and decided to fashion cornerstones that measured 2 in square finished as I didn't want just a solid color.  The main sashing color is just a little bit off white which looks much better than the stark white of my design wall.


I decided to go with a a one inch square surrounded by 1/2 inch wide border.  I then decided to alternate the green in the center with the red/orange in the center.


I got most of it completed this afternoon.  I still have to put a border made up of the sashing fabric around the whole quilt.  It currently is 48 x 58 and will be 52 x 62 when I add the border.  I am toying with using some of the extra fabric (there isn't much) in additional borders on top and bottom but have to think about how I want to do that.


This is about half of the smaller 5 1/2 in square blocks I made with half of the fabric.  I made a total of 50 blocks which should made two baby sized quilts with a 5 x 5 setting or one larger quilt for another charity.  I have searched through my stash of hand dyes to come up with four different borders for the blocks which will boost them up to 8 inches finished.  It has been difficult to match that lighter color.


The second half of these is pictured below (although some are the same blocks but 20 are new).


Wednesday, July 6, 2022

Another Top Done and Another One Started


I decided to go with the blue sashing after trying out the brighter colors.  This is a pretty boring top but will be large enough for one of the charity groups.  I will just add some more of the blue for borders after I finish the machine quilting.


Well, the top is completed.  I decided on light blue cornerstones which helped the overall look a bit I think.  Not my favrorite by far.


I still have this rather large pile left of strip sets I did several years ago and trying to decide what I will do with it.  I think I will go with a few of my "old faithful" patterns I have done in the past for charity quilts.  Might do something a little different with the lighter set.


I was down in my basement looking for some lighter colors and came upon a whole bunch of fabrics I obviously bought years ago to do stack and whacks and couldn't help myself with this one.  It was a old Hoffman print and had a 24 inch repeat which is unusual for a floral like this.  I cut half of it into 4 1/2 strips and made these 20 blocks.  I am trying to decide what to do with the other half.  I am going to do a little bit of an unusual set with these inspired by some quilts I have seen.  I will first border each of these with 1 1/2 in strips and the sashing will be white plus...


This is the fabric used for this stack and whack.  I am trying to use all these large pieces as backings but I do get inspired by some I know will make graphic radial symmetry.


Saturday, July 2, 2022

More Finds!

Amazing what you find when trying to de-stash a bit!!  One of my finds was a pretty large pile of strips sewn together.  They ended up being about 42 x almost 100 in a couple of cases.  Most of these strip sets were in this blue/purple combination.  I know I did these many years ago and of course thought I had used them all up in quilts I had made but it didn't happen!  I know I have made at least 3 or 4 quilts from these strip sets and at least 2 of them were  queen sized!  I took one of these strip sets and cut it into 10 1/2 inch squares which I then cut along both diagonals and sewed back together.  It might be a little random even for me!!  I decided I needed sashing to kind of pull it together and decided yellow or gold would be good.


This was my first attempt, using the yellow to define a "square" and then the gold as real sashing between squares.  I didn't like it at all!!


I decided that this was much more in keeping with the rest of the quilt.  It will be narrower than shown here as it is not sewn together yet.  I will see if cornerstones will add anything this afternoon!


Next time I do this (and I have a lot of fabric that I can cut up), I think I will make a light colored side and a dark colored side.  I have a very large piece that is made up of mostly fabrics with a lot of white in them.  I will also probably cut it into 4 1/2 wide strips and make one of my "go to" baby quilt patterns with on point four patches alternating with the strips.  


Friday, July 1, 2022

Finishing Up the Fat Quarters!

Well, finally finished the three tops except for the borders which I will put on after I baste and machine quilt.  It makes life easier to do it this way.  This was my second attempt at making this quilt with these strips!!  My first attempt used the 57 degree ruler and I ended up using the diamonds in the third quilt in this post which turned out to be my favorite!  I really didn't care for the fabrics but I had pulled out some of the ones that really didn't match and think it worked out okay and certainly better than I thought it would.


I have made this pattern before and it uses three strips sewn together and then cut on the diagonal, half with the squares vertical and half horizontal.  I do have to add borders to this one.


These are the triangles that were supposed to be for the tumbling blocks quilt.  It is a good thing I always make a test block first as I only had to rip out two small seams as it was obvious something was very wrong!!  This is the only one of the three that I am even a little hesitant to immediately give away as I do like it.