Monday, September 27, 2021

A Day at Huntington Beach State Park!

 Well I had the whole blog almost completed and managed to delete the whole thing with one misstep!  I will try again!!

We headed to a different outlook than we normally do and were greeted with a trio of Roseate Spoonbills.  We hadn't seen one on our last trips.  Two of them were asleep most of the time but this one finally woke up to eat!


I liked this one as it shows his bill so well!


Lisa spotted this dull brown bird off in the distance behind a Great Blue Heron.  I am pretty sure it is a Clapper Rail.  He was darting in and out of the reeds.


This is the aforementioned Great Blue Heron taking off

I saw this Anhinga which surprised me as I have only seen them in fresh water areas.


Spreading his wings!


Just for comparison, this is a not very good picture of two Cormorants.  You can easily see the difference in the beaks here.

We saw lots and lots of both Great Egrets like this one and Snowy Egrets.


There were actually more Snowy Egrets than the Great Egrets which was a change!


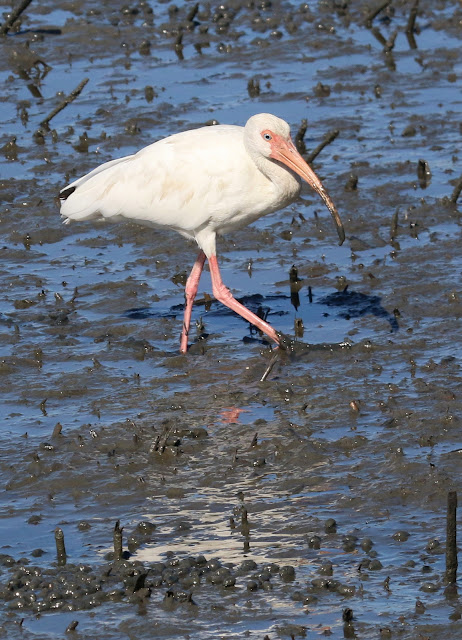
There were even a few Ibis foraging on the shore.  They are like pigeons down here after a heavy rain and frequent visitors in the winter.

I believe this is a Semi-palmated Sandpiper.


I believe this is a Western Sandpiper.  He and his friend were very small.


I believe this is a Willet, which are common along the beach down here.

There was a huge flock of Wood Storks way off in the distance.  This is a very cropped picture.


This is still cropped but not as much


All in all, it was a great day at the park!

Saturday, August 28, 2021

It's Been a While!

It certainly has been a month since I  posted!!  A  lot of that time was consumed with having a garage sale and then the aches and pains suffered as a result of a very uncomfortable chair I sat in for the sale!

My oldest daughter did take me to the Montezuma Wildlife Refuge for my birthday but it was definitely a bust!  Taking a picture of a starling just to have more than one bird picture!  Every day I see these great posts on FB from other photographers of eagles, Sand Hill Cranes, Roseate Spoonbills, minks etc.!  Well, there is always next year..


With all the rain we had earlier, our Japanese Cherry tree was spectacular this year.  The branches were just loaded with blossoms


It's been unbearably humid lately so haven't gotten to sit outside to see any of the more spectacular butterflies that visit our neighbor's butterfly bush but there is always a Monarch or 2!

I  have been hard at work  on the Passacaglia quilt and have almost all the rosettes either done or in process.  I will try to get a picture of the progress soon.  I am trying to get all the fabric used that I need to finish so that I won't have to drag it down south with me.  I have enough to take down there!!  Then will be the chore of getting it together!  I also have to decide what fabric to applique it to as I refuse to cut it off like she does in the book!  Why would you do all that work and then eliminate it?

I am truly getting really tired of the pandemic and the need to isolate so much and I am trying to stay as upbeat as I can but it is difficult if not impossible.  


Thursday, July 22, 2021

The End of the Boxes!!

After completing three of the Box in a Box quilts, I am calling it quits on this type until I get back to North Carolina and an unlimited supply of already cut strips!  This picture is of the second one I did which is a bit ore controlled than the first one and thus, I didn't feel the need to insert blocks to give your eyes a place to rest.  My approach here was to only use dark browns and navies for the darks and beiges and yellows for the lights.  I also lined up the yellows, beiges, blues and browns with each other as much as possible.  I used random colors for the mediums but also tried to line up colors (like reds next to reds and greens next to greens).  It gives the eye a bit more of a place to rest than totally random scrappy.  I think overall I am a controlled scrappy quilter.  I used the reverse side of a fabric for the border on this one after trying out both the right side and the wrrong side, finding the wrong side a little cheerier!  It's not quite done here.

Here it is completed!


Here is the beginning of the newest and last of the Box in a Box or Box on a Box quilts.

This is my favorite so far.  This is a blue salt painted fabric I made some time ago.  


Here is the design wall with all the big rosettes completed and a few of the more complex rosettes also done.  I am getting to the point where I will be more selective in how I combine colors but first I had to free up my other design wall, finishing all the scrap quilts.

Here I have begun to postion and audition the rosettes I have done.  

I am also in the process of finally quilting the Great Blue Heron quilt which will definitely take me some time as it is pretty big!

While destashing, I came upon this long ago English paper piecing project.  I am not sure what I was thinking or what I planned to do with this.  Each of the petals is about half an inch.  I know I sewed them together by taping the new pieces in place on the front an then just sewing in the back so that no stitches show unlike my current project!  Of course I sewed each one of these petals down on plain paper using dissolvable thread.  Haven't decided whether I will do more with some of the pieces that are all prepared.


Friday, July 2, 2021

Moving Forward Still!

Got another of the big rosettes completed and relatively pleased.


This is the Passacaglia design wall as it now stands.  I am working on the fourth large rosette as well as several of the rosettes that have 8 stars around them.


After messing up the order of the hexagons a couple of times, I finally put them  into piles in the order that they are to be sewn.  This made life one heck off a lot easier!  I start by sewing the upper two on the right and add the bottom right; then i sew the two upper left together and add the bottom left.  You leave the two sides of the hexagons separate as they are sewed up in rows.


I have made it much scrappier than any other version I have seen.  I calmed it down a bit by moving some of the "sides" around so that the yellows came together as well as the beiges.  This helps the eye to rest a bit I think.  I like the optical illusion of big blocks and little blocks.


I turned it upside down and you get a bit of a different optical illusion but you have to look at the light areas more intently to get it to work.


It has been driving me a little crazy the past few days trying to figure out how to make this a little different and give your eye a bit more of a rest without making it boring.  I finally decided what to do this afternoon.  I will be taking out (maybe these blocks but who knows) a couple or few blocks and replace them with another hexagonal block.  You will have to come back to see what that is!  I also have decided yet how large to make the quilt.  I will probably trade out a couple more sides so that there are a few lights with peach on both sides.  I think keeping the same color (although not the same fabric) will help.  If I had the patience, I would probably also do this with the darks and medium but that will have to be the next quilt!  Trying to also decide whether this would be a decent baby quilt or not as it is blocks!

Finally finished and added the big blocks so your eye would have some place to rest.  Used less random placement in the following ones so didn't need this!


Monday, June 28, 2021

A Brief Update!

Well, this is the beginning of this new quilt which I was determined to make a little scrappier.  I must say that it was easier said than done!!  For this block to be successful, you really have to have a firm delineation of light, medium and dark.  Normally when doing a scrap quilt I play around with relativity and will use a medium as a dark or a light.  It just doesn't work with this block.  I used my phone to determine whether the cut strips were dark, medium or light by converting the colors to black and grays and whites.  Even doing that, I had to take apart two blocks as the contrast was not enough and fabrics picked as lights really worked better as mediums  Sewing them together in the right order requires me staring at the blocks on the wall to make sure I do them in the right order.  


You only sew three of the hexagons together as you eventually put them together in rows so there are no Y seams.  I am imagining other interpretations and mixing these hexagons with some stack and whacks.  We shall see.  I think I just like hexagons in any form!


I have updated two of the rosettes so still making progress on the Passacaglia!  Currently my approach is the same as I do with many scrap quilts.  I make a whole lot of individual pieces, finishing about 3/4 of the top, put them together on the design wall and then more carefully select what the remainder shhould be so that things look balanced.  It drives me crazy if there isn't some rhyme or reason to a top!  I can't imagine hand quilting this monster so will carefully machine quilt it if I ever get it done!!

I am still forcing myself to de-stash and am daily finding some surprises like large pieces of leather and suede I found today.  What was i thinking?  Also found a piece of 50 year old Marimekko fabric which is quite stunning. 


Thursday, June 24, 2021

Inspiration!

This is the box of fabrics that I am currently pulling from for the Passacaglia quilt.  I think I have the whole rainbow there!  Making progress but nothing new to put on the wall for awhile as I am doing the cutting, ironing, glueing steps right now!


This top is almost done.  I just need to add a yellow border and then a green/purple flower fabric border.  It will be about 40 x 90 when done, enough for a cot.  I didn't bother to try to find a specific arrangement or attempt to put colors next to each other but did twist the blocks around so they weren't all going in the same direction.  Just too lazy!!


I saw a quilt on Scrap Quilter Enthusiasts on Facebook and loved the look of it. It is a variation of the Tumbling Blocks quilt -- Ill call it a box in a box  It looked like she cut the individual pieces but looking at it, I decided you could do it in 2 color strips.  I grabbed a piece of paper and decided how each 60 degree triangle was made and saw that you could do three strips sets and then cut the triangles using a 60 degree ruler.

The hexagon triangles were:

1. medium/light,

 2. dark/light,

 3.dark/medium,

 4.light/medium,

 5. light/dark and

 6.medium dark

You could make these combinations with three sets of strips: 1 + 4, 2 + 5 and 3 + 6.  


These are the three strips:  dark/medium, light/medium and dark light.


These are the resultant triangles cut with a 60 degree ruler.

I used 2 1/2 inch strips which should result in blocks about nine inches across.  I have literally tons of 2 1/2 inch strips already cut at my other home and will for sure make some of these quilts as they are super easy to put together and have a stunning look I think!  

I spend at least an hour every day working or cleaning out my stash before I allow myself any playing with blocks or cutting the pieces for the Passacaglia quilt.

I want this quilt to look more scrappy so will use shorter strip sets -- 22  inches wide instead of the full width of the fabric as I do like variety and much prefer a scrappy look!

Like many, I look at Pinterest and Scrap Quilters on Facebook for inspiration and then I try to find an easy way to construct the quilts.  I have been collecting a lot of 4-patch designs and recently half square triangle designs.  So many make complicated looking blocks when they are easy.  I play around with Electric Quilt to figure out the block and piece sizes and occasionally a color arrangement.  The temptation is always to just figure I am finished when I get a decent design using the software!


Wednesday, June 9, 2021

Taking a Break from De-stashing


I was going through plastic bags of "stuff" during my clean up and found a bag with bunches of these pieces and two completed blocks.  I hadn't remembered making a quilt from these but looking through my quilts on Pinterest, I found the quilt and remember it now.  It was too  much temptation and so I made a few more blocks.  


An hour later, I had nine blocks!  But I decided I needed more variety so went through some of the boxes I had and found some more different purples, greens and orange/yellows.


So now I have 16 blocks which if I had a two inch border will make a baby sized quilt but I am contemplating doubling that for a cot sized quilt.  I, of course, have lots and lots of pieces left. 


Each block is made up of 1 2 1/2 inch x 9 1/2 in strip, 3 3 1/2 inch squares and 2 5 inch squares.  I will be moving these pieces around as it looks best when you have some of the fabrics butting up next to each other in side by side blocks.  Then the blocks disappear.  It makes up very fast!


I actually have at least one more of the  larger rosettes done since taking this picture.  You can see I am progressing on the Passacaglia quilt.


I am trying to spend 2 hours a day groing through my fabric and selecting those that I will keep and those that will be sold or given away.  I also spend about 2 hours a day doing the hand sewing on the Passacaglia while watching mindless television!