Saturday, May 13, 2023

Making Up For Lost Time -- But First the Houses and Some Current Stuff!

I finally finished the three Habitat for Humanity tops which I will quilt when I get back down south as the club provides me with batting.  These are the three.  The first two have 2 small trees and one wide one and the third ones has 2 wide ones and 1 small one in each row.  I randomly made trees until I ran out of fabric so wanted to use what I had.  I did have to make a couple of more trees to complete that quilt though.


In trying to destash, I came across a bunch of mandalas I did a few years ago.  I am planning to sell a bunch of my hand dyes and mandalas at our club garage sale in June -- I will be selling them super cheap and probably donating the rest that I don't sell.  These are all 45 x 45 inches.  These were some of the first ones I tried with ice dyeing quite a few years ago.


This afternoon I decided it was time to start putting together the Farmer's Wife blocks that I did.  I have two sets of close to 100 each.  I decided I would put half in point and half as is and started the process this afternoon.  There was A LOT of trial and error trying to decide what size to cut the half square triangles and then what size to make the borders on the regular blocks.  I guessed wrong a number of times.  The blocks will be 8 x 8 inches when finished.  Without the borders, they are 6 1/2 x 6 1/2.  The half squaree triangles were made from 5 1/2 in squares and the borders will need to be 1 in wide finished or 1 1/2 inch strips.  I can't begin to tell you how many times I did this simple task wrong.  Should have done it at the beginning of sewing, not at the end!

Tomorrow and the next couple of days will be pictures of quilts from my last Genesee Valley Quilt Club Meeting.

Sunday, May 7, 2023

`It's Been a While Since My Last Post!

It's been a tough month to say the least.  We had a bit of a health crisis in the family which caused us to leave our beach house in a hurry.  Things are returning to normal but I didn't have much time for doing much sewing, dyeing or bird watching!

I am very  much trying to get rid of a lot of fabric including batiks, hand dyes and just normal fabric and hopefully I will be able to sell a bunch of that in our June garage sale at quilt club.  The challenge is getting it out to the car!!  I am continuing to destash as much as I can.  I was hoping to make the move south permanently but doesn't look like that is in the cards for now but want to get rid of as much as possible to enable that!

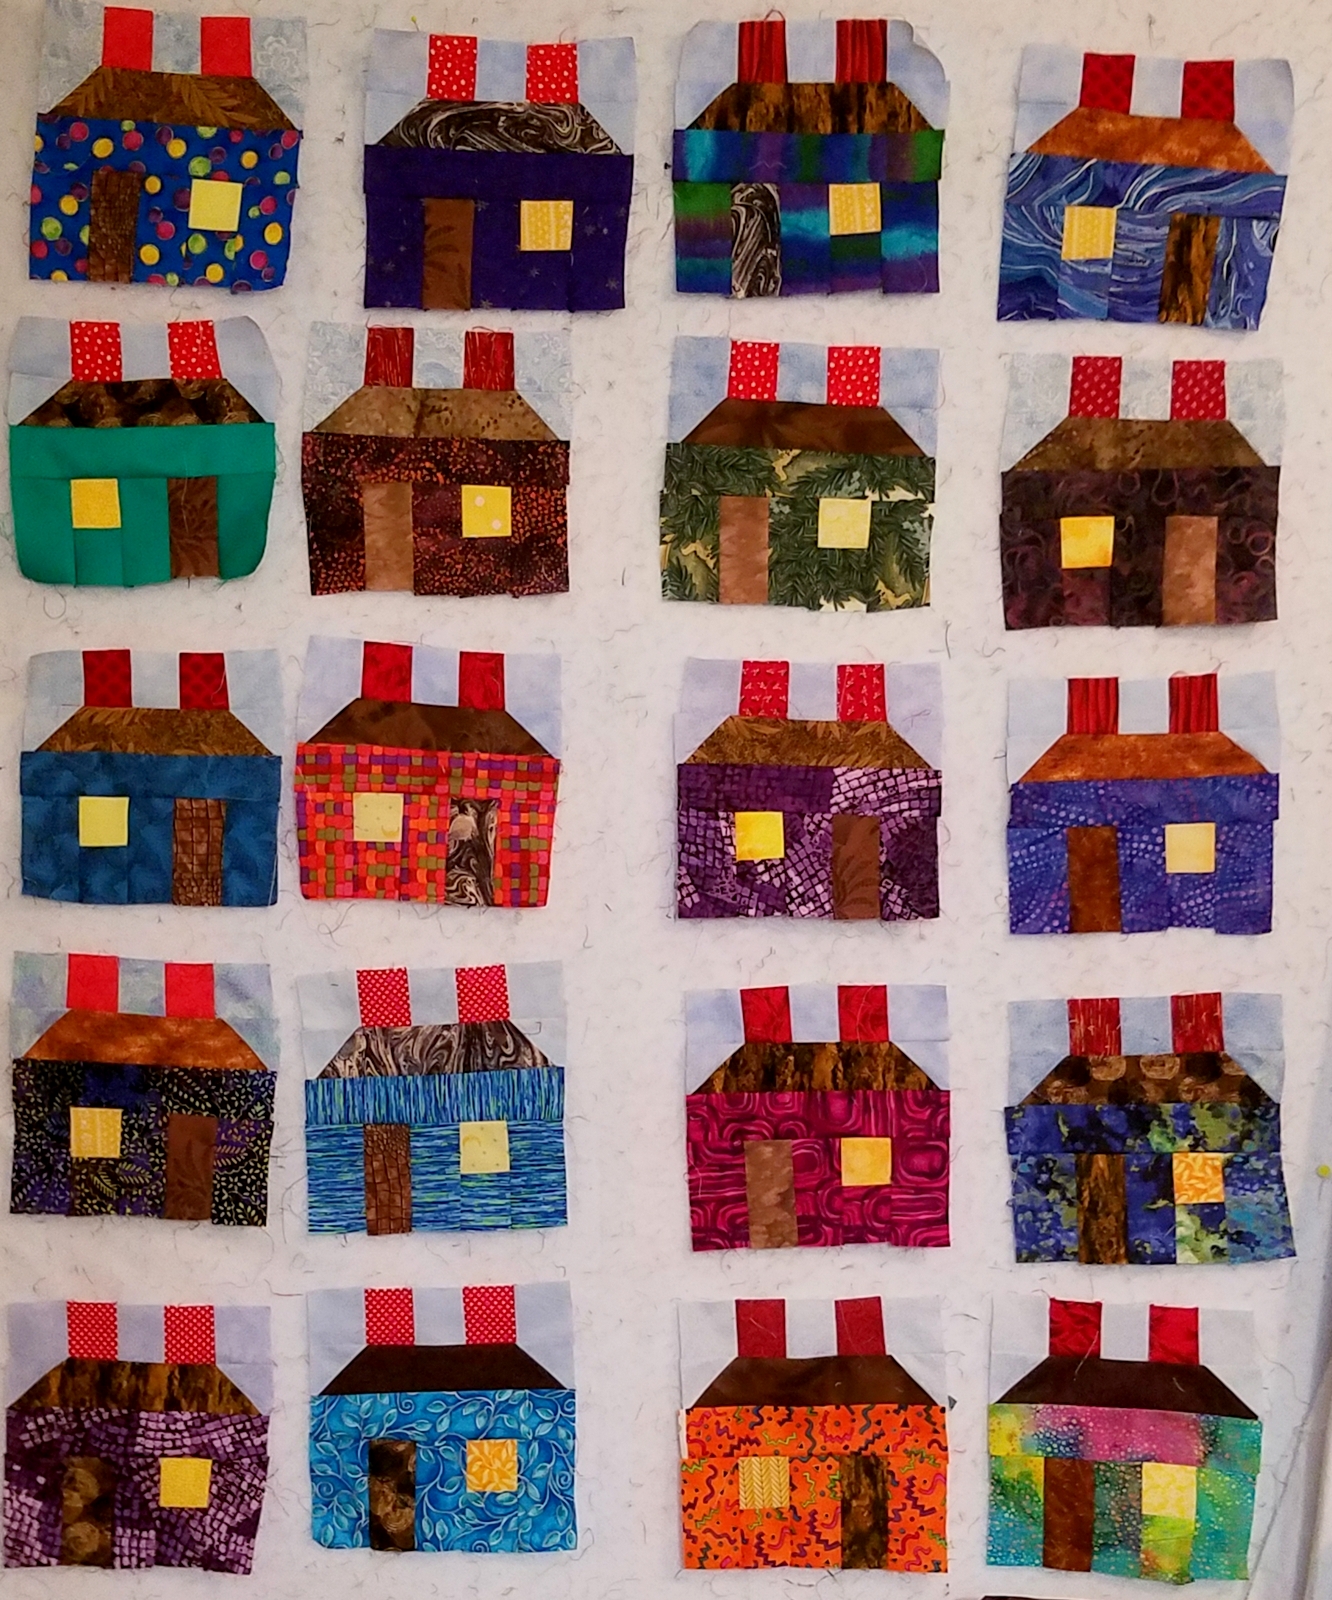
I have been making quilt blocks for "Habitat for Humanity" quilts which Quilters by the Sea supports in the Wilmington NC area.  I have enough houses now for three quilts and am diligently working on some trees.  I generally have 15 houses per quilt and they end up measuring about 40 x 50 which is a nice size.  I adapted the pattern from one that was posted on the Missouri Quilts site.  They had added some triangles around the ouside.


You can see here the two different tree sizes I put into these quilts.  The trick is to add the same number of bigger and smaller trees to each row.

 To make thsse 7 1/2 blocks (finished which uses 2 inch strips), you need the following:  Using 2 1/2 inch strips would result in a 10 in house but you would need to adjust all the sizes below.  I may do this at some point!

5 2 1/2 inch squares in blue for the sky

2 2 1/2 inch squares in red for the chimney

1 8 in strip incn brown for the roof

1 8 in strip inch in any color you want to use for the house

3 2 x 3 1/2  inch strips in the house color

1 2 in square for above the window in house color

1 2 x 3 1/2 inch strip in brown for the door

1 2 x 2 inch square in yellow or some light color for the window

The trees are done by sewing 4 2 inch strips together and then using either a 45 degree angle ruler for the larger trees or a 60 degree angle tool for the smaller trees.  I use these two rulers to also cut the sky background.  The trunk is another 2 inch square piece in brown.  I then cut 2 inch strips to fill in the sky  next to the trunk.  For the larger trees, I cut these 3 1/2 inch long and for the smaller trees, 3 inches long and then I trim.  

To finish them up I sew trees randomly between the houses making sure I always have two small and one big in each row and then I use green 2 inch strips for the sashing between the rows.  To make it longer, you could use strips of blue on the top if you want to.  I use all sorts of random scraps of the greens, browns and light blues.


Wednesday, April 5, 2023

Second Floral Challenge Entry - Clematis

My daughter took this picture last year of the clematis in her back yard and I really liked it.  I had already done one quilt for the floral challenge that our Guild proposed but have always wanted to do something with this picture.  Well, easier said than done!!  I had one heck of a time trying to use my usual "Ruth McDowell technique" which involves breaking the picture down.  I then tried sketching but that didn't work either.  I finally decided to do raw edge applique and luckily had a bunch of fusible stashed away as well as some fabric I dyed last fall that was close in color but not quite!


My first task was to assemble a background.  I did this by just sewing random green strips of different widths together until it reached about four feet long!  It was 45 inches wide.  This was my first iteration.  I cut the piece into 7 inch wide pieces and was planning on then sewing them together.  Of course I wasn't crazy about the arrangement.

So I again cut down the strips into smaller sections, again varying the widths.  I also turned them so that the stripes were going up and down instead of sideways!
Before I started fusing the flowers on the background, I quilted the backgroud using straight up and down lines about an inch apart.  I then fused all those flowers down and tried several methods for getting the white stripes down the middle -- first Inktense pencils, then permanent white marker and finally I went to acrylic paint.  First I watered that down but as in the other cases, it just didn't lighten up the middle of the flowers at all so I had to go with fairly thick acrylic paint -- white for the lighter flowers and a mix of white a purple for the darker ones.  It is okay.  The next challenge was machine attaching all those pieces.  If I had my Bernina 170 down here, I would have used my zig zag but my Juki only does straight stitches so first I just stitched the middle of the flowers intensely with yellow thread.  Despite my best efforts, you can only see that stitching from no further than 3 or 4 feet and I did a lot of stitching.  Then I stitched around the outside of the flowers with matching thread to secure them.  I then did a second row of stitching around the outside and did stitching surrounding the white as well.  It is okay and does show up a bit giving some dimension.  

Here it is, completely finished.  You might notice that I inverted it as my last step after viewing it upside down on my bed and liking it better than the way I had originally intended!!  It measures 24 x 24 inches which was the requirement and is faced rather than using binding.

This is the other piece I did which I called Camellias.  I don't think it is quilted in this picture.


Sunday, March 26, 2023

Whew -- It Has Been Some Time -- Baby Quilts

It's been a while since I have posted as I have been busy finishing up all those baby quilts.  I have pictured the final quilts with the backings (which are really as nice or nicer than the fronts!!}.  This one has cats on the back pictured up in the left hand corner.  I used up quite a few of my 5 in squares but still have bags of them!


This is the old faithful pattern that I have done before.  A couple days of my time was spent just cutting 6 1/2 in by 3 1/2 in rectangles of a lot of my black and white fabrics.  I already had all the four patches done from before!!  The backing has polar bears and penguins!


This and the above quilt are variations on the pattern and have really cute wildlife fabric on the back.  I still have enough of that fabric to back two more quilts.  I have done a couple of stack and whacks from the fabric too.  I decided it was better as backing for these baby quilts.
And who doesn't like dinosaur fabric which I used on the back of this one!


I already backed a couple of quilts that I donated already with this cute fabric with cows on it!


This is the last of the finished baby quilts which also used the dinosaur fabric on the back.  Altogether, I made 7 quilts with this pattern (3 have already been donated).  I probably won't do anymore of this particular configuration.


This top is finished, ready to be basted and machine quilted. As I have mentioned before, I don't add the borders until I have finished the machine quilting.  I have found it is much much easier to add them then and you don't have to measure anything to make them even.  You just need to remember to add a little backing and batting around the edges!


The blocks are done but not sewn together yet.  I have the pieces for one more and then I will probably cease baby quilts for awhile -- I will have run out of batting and need to get a little cleaned up as I leave for the north in a few weeks.
 

Sunday, March 5, 2023

Half Square Triangle Quilts Ad Nauseum!

Trying to use up some of the 5 in squares and the half square triangles that  I already had finished, I  have been forging forward on the same pattern but with different colorways obviously!

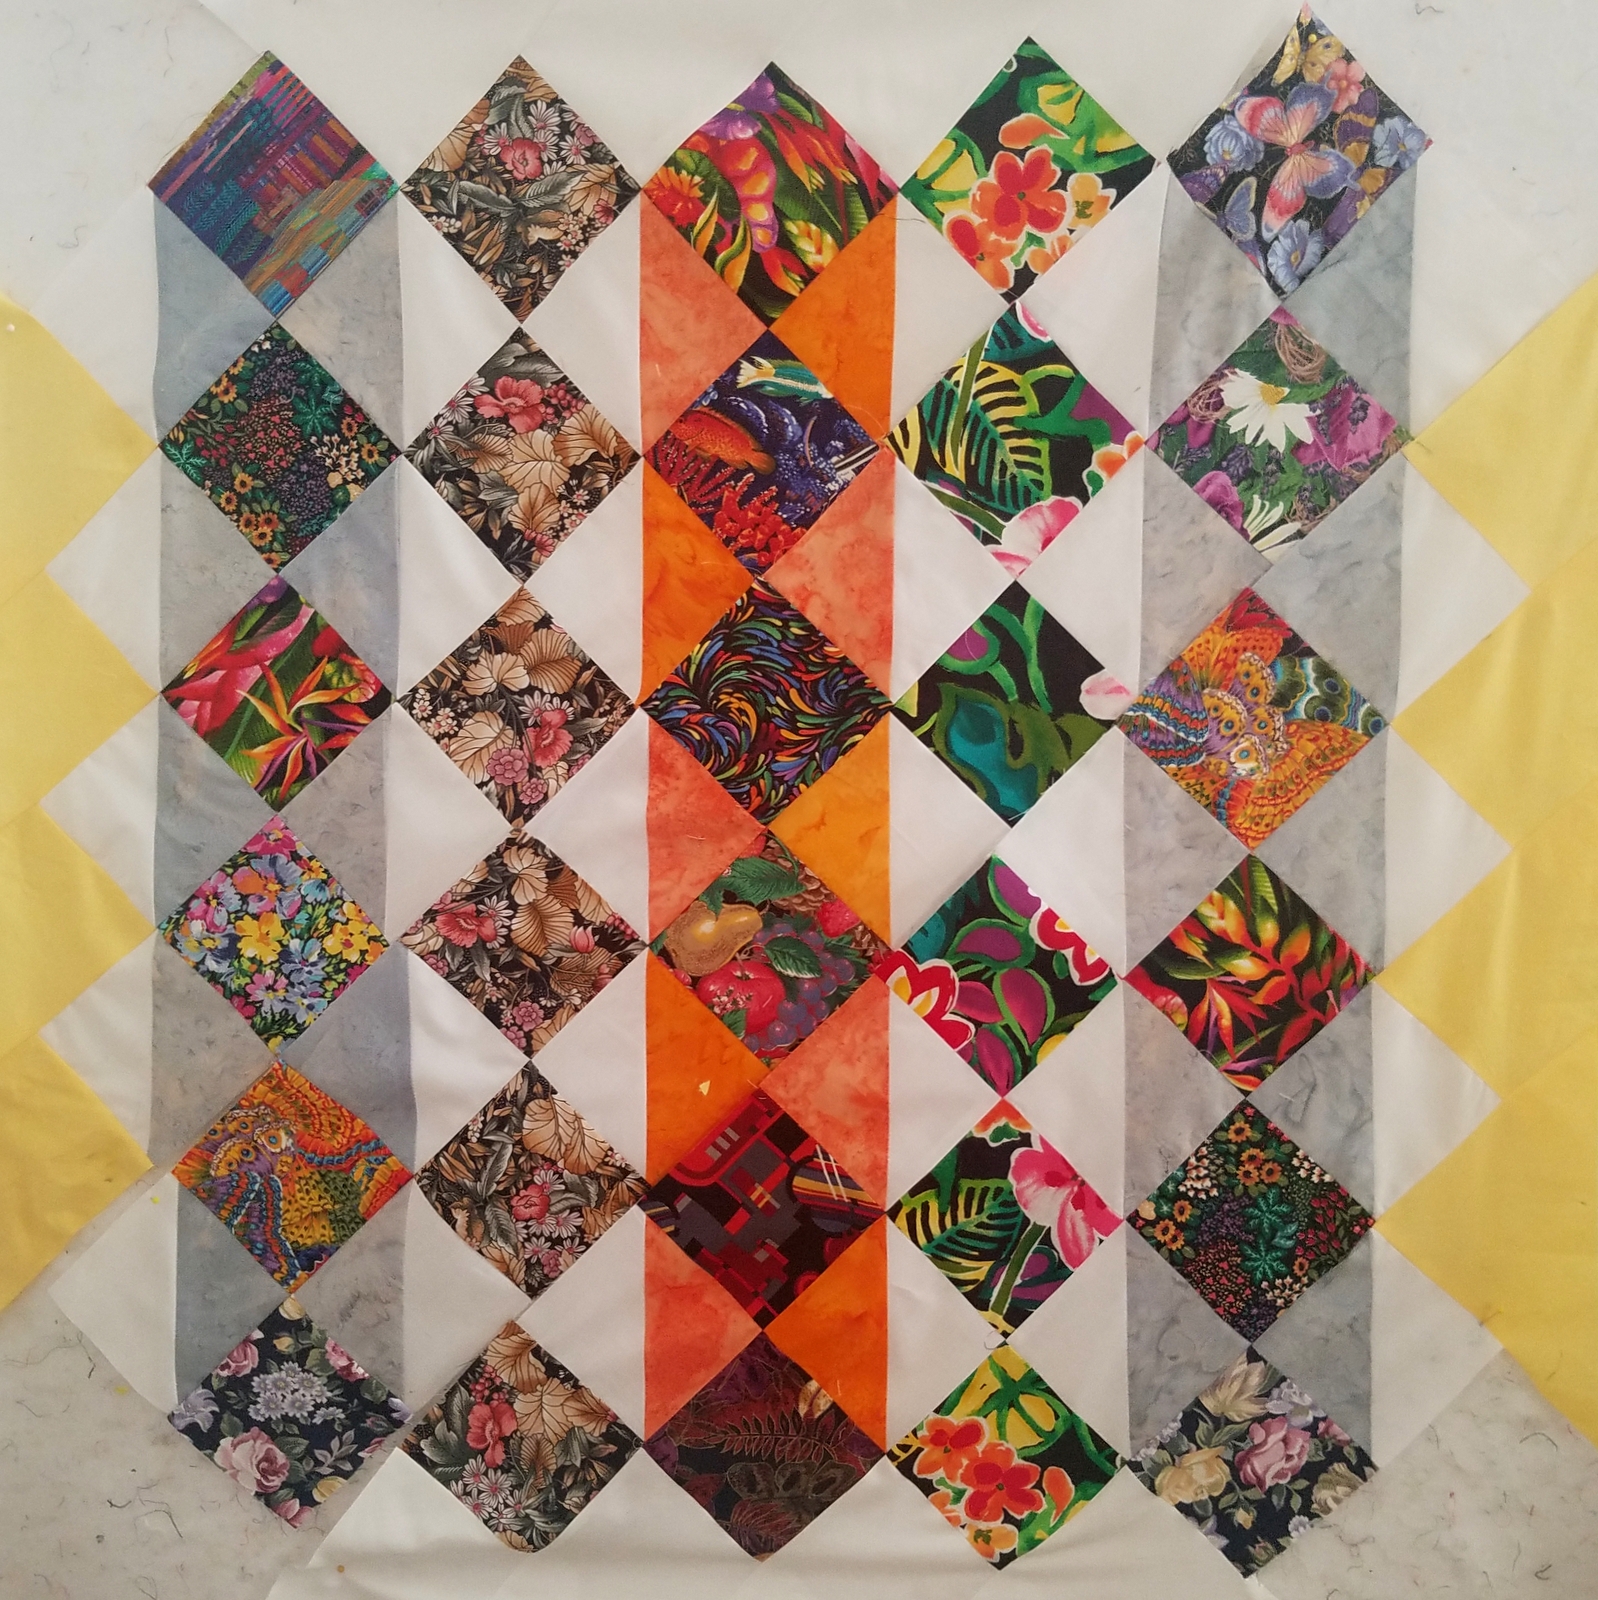
The ones where I  use the same block all the way down, I  use basically a white border and then some other color (to be added after basting and quilting) .  If I use a myriad of colors, I try to use a color in the filling triangles around the outside to pull it together.  I am up to six now and then I will pause for a bit.  I am finishing up the quilting on the large " squares"  charity quilt I made as I want to get rid of it tomorrow when the group meets.

I have barely made a dent in the 5 in  squares and the half square triangles -- sigh...


Saturday, February 25, 2023

Fun With a New Charity Quilt!

I finally finished basting the other two charity quilts I was working on and to do so, I had to finally clean up my work table!  

I sorted through all the 5 in squares into colors and types and found a huge plastic bag with a ton of half square triangles that I had cut some time ago and forgotten about.  I remembered a pattern I had seen on Pinterest using black and white half square triangles and decided "what the heck".  This was my first iteration on the design wall.


This was the second iteration and I liked it better.  I added white triangles around the outside but then I decided...


Just before I left for the afternoon, I decided I would like something other than the white in the finishing triangles so found some green.  It was going to be green on the sides and white on top and bottom with white on the corners (like on the right side here) but then...


I finally sewed everything together but those corners.  I decided that I would prefer a two color corner and now I am happier.  Still haven't sewn them on or trimmed around the outside.  I will probably make the binding green.

I have enough prepared fabrics to make four more of these quilts with varying coors in the half square triangles.  I put them together in little "kits".  The remaining 5 inch squares from this packet (and it was just one of the packets I put together) will be donated!  I really get sick of fabric when I have used it in  multiple quilts!  More to follow!


I realized I forgot to put a picture of the quilt I did with all the flying geese that I made!  I found another variation of this block  online which I may attempt at some point also.  There are 100 flying geese here!


Wednesday, February 15, 2023

Trying a New Technique for Making Flying Geese!

I forgot to take a picture of the first step in this process.  I learned this technique from a Youtube video -- I very rarely watch Youtube but this one intrigued me -- enough that I may purchase the formal directions (Kits by Carla.com).  The first step was to cut three strips of a background fabric (I chose white) and then two strips of the goose part.  The three strips of the background are 4 1/2 in, 4 1/2 in and 3 inches.  The goose fabric is 2 strips 3 3/4 inches wide.  She suggests you work with a 22 inch wide strip which I did.

  The order you sew them  in is 4 1/2 in background, 3 1/2 in goose, 4 1/2 in background, 3 1/2 in goose and then a 3 in strip of background.  After they are nicely sewn together (and I ironed the seams to the dark side which was contrary to her directions but worked out fine).  You then cut 3 3/4 in strips from this and then iron again (I did iron the seams open here).  You then sew them back together, twisting every second strip and lining up the goose blocks so that with every other set the corners are touching.  I found this to be the most difficult step as I kept putting them in the wrong order!  After you complete that you add a 3 in wide background strip to the top and the bottom of this reorganized set.

Then  you start slicing diagonally.  The first row is through the points of the square and the second is halfway through the white area.


You can see here the cuts.  You then just cut them apart..

They actually all came out just about perfectly the same size, required no trimming nor ironing and you get 20.

The pros of this is that compared even to the quick "four-at-a-time" way, this requires less drawing lines, pinning and trimming.

The cons of this are that you get bias flying geese which depending on how you sew can be a good or a bad thing.  As you don't have to iron anymore, it seems to be okay.  Another somewhat of a con is that you can only get 10 each of two color geese so if you are a fanatic scrapper like myself, this might be a little boring.  Also, there is quite a bit of excess fabric wastage in the background color.

These directions will only give you one size blocks and the pattern directions which give you multiple sizes are available at Kits by Carla.com for $9.

These blocks ended up being about 2" x 4" finished.