Friday, October 30, 2009

Doing, Doing, Almost Done...

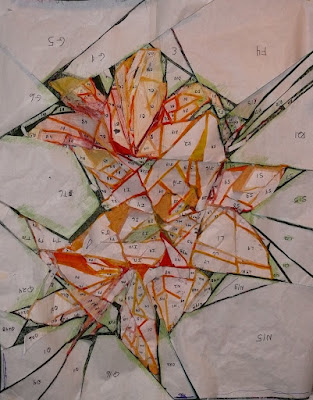
This is the back of the top with all the freezer paper templates still in place (almost). (Notice just as I like to confuse myself that I numbered them all upside down!)

The top is done and will be readying itself for quilting later today! It was clearly a learning experience in a number of ways! So now to go through 10,000 of my photographs on the computer to decide what else I want to convert into wall hangings (or maybe one of Lisa's photos). I still have one converted picture in the works -- a Great Blue Heron. It has been traced, converted to templates but will need some significant interference before it starts moving along -- the lines in it don't make a lot of sense in some places.
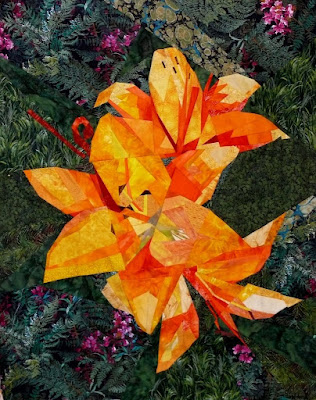

This is the top where it sits now but at the bottom of this note you will see what a little Photoshop will do and what I will probably try to do with the quilt top to make the middle flower stand out more.

However, I digress...


Things I have learned:
1. Focal point, focal point, focal point -- make sure that the area where you are drawing attention makes sense visually. Not sure I entirely did this on this piece. I think the focal point is the middle of the biggest flower.

2. Value is far more important than color -- I knew this but it was emphasized in this piece because yellow/orange was my main color family and there isn't a lot of value shift in these high value colors!
3. Fix your photograph eliminating extraneous stuff BEFORE you finish the quilt top (ask me how I know). That is why one takes 12 weeks of Photoshop class after all!

4. Forget the colors in the photograph - use the photo to set up where you want your lines and forms and use value to emphasize this -- again it has to make sense visually.


5. Don't try to copy the photo as you will only end up frustrated.

6. Try to ascertain where the light is coming from so you can make your decisions logically. Not sure I was successful here either.

7. Keep a roll of freezer paper next to you so that when you change the templates, you can easily create new ones.

8. After you have traced the templates onto the freezer paper from the tracing paper, back the tracing paper with freezer paper to stabilize it. This tracing paper image is where you will audition your fabrics.

9. Make at least two more copies of the whole template image . One is for working small sections at your sewing machine and one (which doesn't have to be full sized) is for general placement (so you don't have to keep unpinning your piece from the full sized image).

10. Avoid solid colored fabrics unless you really want to emphasize an area (if foreground).
I am sure there are a lot more lessons that I learned but those are just the ones that came quickly to me. Amazingly, I was not frustrated at all with this piece but really looked at it as a step forward and a challenge to make right.
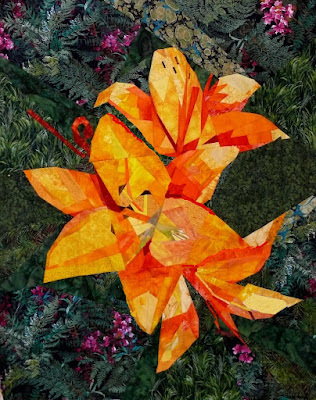
I just loosely played with Photoshop a little and added a little darker coloring around a couple of the middle petals and eliminated some background petals (one above the top petal on the middle flower and one on left hand side of the bottom petal). I filled in with background. I also darkened one of the yellows in the bottom flower.

Now to decide whether I unpiece or whether I applique on the revisions....

Wednesday, October 28, 2009

Slowly but Surely...

My fervor for finishing this quilt top is undiminished but it is taking a lot of time! We may have to chalk this one up to a significant learning experience. It is taking a lot longer to put together than the other two pieces that I have done. Working with yellow and orange is difficult as there is not much value variation and the color can be a bit overwhelming. Hopefully the deep green background will balance it enough so that you don't cringe when you look at it! Of course the sewing room is so full of unfurled fabric right now that even the cats are afraid to come in! At the rate I am going, it should be four or five more days before I have finished all the sections. Of course, then there will be a liberal dose of unpiecing, some of which I have already done! Right now there are large sections that are being held up with pins but which are not sewn into larger pieces. This is probably where I deviate the most from Ruth. I can't put up all the pieces individually and then decide which ones I don't like. I have to piece together sections before I can make those decisions which of course means I have to do some unsewing or secret applique to improve my decisions!

Speaking of cats, Warren built a very large cat tree for the kitties in hope that our furniture will be spared. He put some perches on it for them to sit on as well. Cheney has made himself very much at home as you can see, sitting on the very top perch in these two pictures-- his favorite place up high.


George, on the other hand won't stray very far from his human companions so has spent very little time inspecting the pole unless we are right there with him. He has delusions of doghood -- we keep telling him he is a cat though but to no avail.


Monday, October 26, 2009

Lily, Lily, No Rose...*

I have become a woman possessed! This process of finishing the lilies is like doing a jigsaw but making up the puzzle as you go along. I am moving to basically the focal point of the whole piece and it definitely requires the most attention to make sure there is a change in value or size or texture so that it is emphasized. Each piece must be pondered, accepted or thrown aside -- many times after being sewn together. Of course I have modified the pattern has I have progressed through each section and next time may just not even attempt to do the fine detail until I get to this stage of the project! As you get more familiar with your subject while working on it, you understand it better and therefore can make better line and color decisions than originally.


If you look at the picture above, you will see a small piece of fabric peaking out from under the lily piece. It is the bottom part of a piece of hand painted fabric I bought 10 years ago in the infancy of people doing hand painting on fabrics. I have never known what to do with it but it had the perfect colors in it for the greenish inner part of the lily so the former painted mountain scene is now just fabric with a couple of holes in it. I have NO problem cutting into any fabric!! I have used some of my hand dyes and one of my marbled pieces in this as well.
Now here is my guilty secret! This is how I work when in the midst of a project like this!! Fabric surrounds me -- this is on the floor next to me and I have to step over it to exit the room.


This is piled up next to me and this surface also doubles for trimming pieces and making new pieces if I have to. Usually there is a cat right in the middle of it which does inhibit the process at times as I don't want to rotary cut his big fluffy tail! But if I can machine quilt with a cat sitting on the quilt, having a cat in the middle of my fabric is no big deal!! At least he doesn't wrap himself around the machine like he used to!! Now that inhibited sewing....
*This is an allusion to the painting by the American painter John Singer Sargent a poster of which hangs on my stair landing. It is of two young girls with day lilies in the background. It is called Lily, Lily, Rose.

Friday, October 23, 2009

A Quilting Kind of Week!


We had to bring in the begonias as we have had a couple of frosty nights. We decided to see if we could get them to winter over inside in pots. Warren grew them from seed and they were spectacular with huge blooms. This one is about 5 inches across.

This is the famous kitchen jungle. Warren has now built a frame 4' x 6' where all the hibiscus and assorted house plants spend the winter months. This year he is going to put in an automatic watering system as well. These hibiscus were cut down quite a bit before he brought them inside but are still over five feet!

The Mola Challenge quilt is done which is why there hasn't been any posts as we can't let the other participants who might see my blog know what I have done. It was fun but I question why I take the long road and piece things rather than just fusing away which would have been easier probably in the short run (except that I am a terrible fuser and would have had to do more machine work probably). It is okay although technically, it could have been a whole lot better. When I get near the end of a project like this, I just want to be done, done, done. This was my inspirational mola which I got from Priscilla. It comes from Panama and she purchases them directly from the makers and many times still on the blouses. You can see the hint of my quilt in the background.

Ah, but the current project is a lot more fun for me -- it is another pieced nature inspired wall quilt taken from one of my photos at QBL two or three years ago. They had the most gorgeous day lilies everywhere that year and I took lots of pictures knowing they would end up in a quilt some day. Of course I am using the Ruth McD techniques and am getting more of a handle on it with each quilt.
You can see the beginnings of the background getting placed.


Of course, the trick is to be able to abstract the image so that it can be pieced. Taking those drawings and making them just the "right" level of abstraction is the trick -- too abstract and they look like cartoons, too detailed and they look like photos!

Practice, practice, practice....


The background has almost all been placed and a few of the lily petals are starting to take shape. I actually managed to get two corners sewn together.
The process involves first making your drawing, tracing it to freezer paper and then use the freezer paper as the templates. I finally ironed on freezer paper to the back of my tissue paper as well as it was just too flimsy to work on. The tissue paper is the master pattern. I seem to remember that I should have made another copy but have decided to make individual copies of each section instead -- it is pieced in sections. This is about 3 feet by four feet long -- the biggest size that Staples can copy to!! It would be great to be able to make major progress on this over the weekend.

Thursday, October 15, 2009

Gathering Up the Goodies....

Well, I finally had to make some headway into getting all my hand-dyed "solids" together as I had promised our guild that I would provide some fabrics for our Diamond Anniversary quilt -- yes, our quilt club will be celebrating 75 years of continuous meetings in 2011 and we want to make a special raffle quilt for that year. My hand dyeds were spread all over the place including hiding away in project boxes matched up to commercial fabric for some unknown quilt design! Janet G. picked up 27 yards from my stash with a promise that I would do some gradations of other colors if they need them as they get further along in design. It is going to be a Baltimore Album type of quilt designed by club members.

I must say that looking at the pictures, it looks like I have a relatively modest bunch of fabric but pictures do lie!! Besides this "solid" bunch, I have a couple of very large boxes of prima donnas (those ones that are shiboried, dye painted, snow dyed, salt dyed and sprinkled with colors). Even the boxes of solids look much larger in person and I swear it would be hard to find a color that I don't have at least a 1/4 yard of! I may have to go back to selling a bit of this but at least now I know where my future dyeing efforts should be made (I must add that I have a whole bunch of yellows and oranges already set aside for a lillies quilt I am working on so they don't even show up here!). Anyway for your viewing enjoyment!


This is the box of reds, purples and some oranges and yellows.

This was my blues and greens boxes. All those folded over pieces are full yards with 1/4's and halves hanging about on top. A lot of the greens are also in my lillies box right now meeting up with the yellows and oranges. (I can never have enough greens.)

This was my "neutrals" box. Each of those thin slivers is a full yard of fabric! Lots of grays and browns here. I get a kick out of the browns as they definitely change color dramatically when the light shining on them changes from daylight to incandescent light.


These are the ones I called my earthtones -- as you can see, they are a bit on the warm side. As before, each piece is a full yard at least.


I must say that looking at all this, I think I am going to concentrate on doing some simple brights the next time I do dyeing although I can't help mixing up some earthy greens as well. And here am I also hoping for a bit of snow (no stones thrown at me please) before we head south for awhile! I am anxious to get back to my snow dyeing!

Sunday, October 11, 2009

Old Forge - Oh My!

Looking out over the Middle Branch of the Moose River in Old Forge.


While hanging our show, we had the wonderful opportunity to not only do a little sightseeing in the area, but also to see the Northeast Quilt Show which was opening yesterday and goes through the first week in November. I was very impressed with the quality of the quilts. In addition to our own RAFA show and this NE show, there was also a show of New York Studio Art Quilters Association quilts (Priscilla and Marcia were represented here) and an embroiderers guild show so there was lots to see!

More fall scenery by the Moose River


This is a view looking down onto the show as was the picture.


This was a quilt by Mary Knapp which was inspired by Escher drawings. It is called Visual Perception and contains her hand dyed and overdyed fabrics. Fabulous!

This quilt was designed by Diane J. Evans by using a technique learned in a Ricky Tims class. It is called Color My World and is just stunning in person.


There are tons more quilts in the show and I highly recommend you visit if you can. Also make sure you visit the nice little Black Bear quilt shop in Inlet NY which is just ten miles north of the show!
From the embroidery show.


This is Marcia Decamp's SAQA piece.


I will put up a Picasa album after the show is over for those of you who missed it. It will contain some of my favorites.

Saturday, October 10, 2009

Old Forge Art Center RAFA Show!

One of my pieces -- Memories of California which was designed from several photos I took on one of our California visits. It is completely pieced and uses some of my hand dyed and hand marbled fabrics. It is about 32" x 40" in size and I am selling it for $900.


For the past two years, the nice folks at the Old Forge Art Center have invited us to use one of their galleries for a display (and possible sale) of quilts made by the members of our art quilt group Rochester Area Fiber Artists (RAFA). We were delighted to return and hang our 29 quilts again this year. Fourteen of our fifty members participated this year and we had a number of quilts that have not been seen before! We are a very eclectic group and the challenge was to pull all the diverse styles and colors of quilt art together into a cohesive exhibit! We think we did pretty good!


This is the view from the door looking in on the left hand side of the gallery.

This was what I called the blue corner. It contains my Pelican, a piece called African Splendor by Pat Berardi and a magnificent piece by Janet Root called Idania's Wheel.


This was the view of the right hand side of the gallery.


This is a piece by Val Schultz called Hints of Spring.


This is a piece by Mary Wieser called Disturbing Zebra.
This is a piece by Elaine Ross called Longwood Water Gardens and has a lot of dimension.


This was the black and white wall which has two pieces by Sarah Terry on top based on Zentangle drawings. The two pieces on the bottom are called Butterfly Flower by Elaine Ross and Blue Grandma by Brenda D'Angelo. You can't see from the picture, but grandma has blue eyes but this was about the only picture Brenda has seen where she looks happy.

October GVQC Meeting

It has been a regular frenzy of activity this week getting ready to hang quilts at the Old Forge NY Arts Center Gallery. Our RAFA group has been invited for the second year to have an exhibit up there so 30 quilts were documented, photo'ed and packed. Janet and I first attended the October meeting of the Genessee Valley Quilt Club. Our featured speaker was Mary Diamond who is from the Ithaca area of NY and makes wonderful unique art quilts. (She was in the Iron Quilter competition the week before!)
The above quilt was probably my favorite from "show and tell" as I just loved the colors!
This is Barb Brummond holding a quilt that is very unlike her usual pallette but isn't it nice! I think she said it came as a kit or she never would have done it!


These next three quilts were all the works of Mary Diamond who does a wonderful job of using representational images in a very unique style! She taught a one day class on faces on Friday and is teaching a class on thread painting today.


This quilt, also by Mary, is a three piece quilt and you can see the size!


Had to take a picture of this snowball "I Spy Quilt" as it was really lovely and may become my pattern of choice for baby quilts in the future.
This was a lovely very simple quilt by our master quilter Ann Nash. She said you could put anything together as long as you surrounded it with black sashing!
After our meeting, Janet and I headed to the "north country" hoping to see some autumn foliage along the way (we did).
A good night's sleep in a quaint Adirondack cottage prepared us for getting read to hang the show on Friday morning.

Sunday, October 4, 2009

The Tompkins County Quilt Guild Greater Ithaca 2009 Show

Along with the Iron Quilter competition, the Ithaca guild had a very nice quilt show. I took quite a few pictures of ones that are especially of interest to me which includes a wonderful assortment of scrap quilts and stack and whacks. I have ceased making the stack and whacks after getting totally addicted to them and making at least 25! I still like to look at some of the wonderful fabric choices that others make though. I do love symmetry. There were several other really spectacular quilts in the show but mine is but a small sampling and hopefully someone will tell me which ones win the Viewers Choice awards.


I thought this quilt was just spectacular and had my vote for the best large quilt!! It was based on a Kaffe Fassett Museum quilt and it was this lady's FIRST quilt! Oh My!

This was a beautiful medium sized contemporary quilt.

Again, this was a lovely scrap quilt and I thought the best of the scrap quilts in the show although I thought they were all very nice.


This last one was one of three "stack and whacks" that was in the show and it was inspired by molas. I thought it was a wonderful fabric to show off this pattern!!

I loved this one called Fireworks that was made as a gift to a couple.

The link below gives you a brief view of the quilts. If you double click on it, it will take you to my Picasa site where you can see all the quilts full sized!

The Iron Quilter Challenge at the Greater Ithaca Quilt Show in Ithaca

Well, it was up at the crack of dawn to meet two friends to make the journey to Ithaca to see the Iron Quilter Challenge as well as to visit the quilt show (and needless to say the vendors). It was a long drive but we got there in plenty of time to see the kickoff for the challenge. The ladies were already psyching each other out trying for the crowd and emotional advantage!


The Challenge rules were announced precisely at 11 and the ladies had three hours to come up with a finished quilt any size over a foot by a foot. They would have ten minutes to grab fabric from a table that had been covered. The challenge theme was announced "to curve and not to curve". The ladies had been allowed three fabrics of their own to bring as well as embellishments of any kind and thread of any kind.

While everyone was still relaxed and happy at the beginning!

Diving for the fabrics!

Pat psyching out the competitors! She wins the prize for being able to work the fastest while still maintaining the psychological edge -- a real crowd pleaser!! Her trash talk with Priscilla, Maureen and Mary Diamond really kept the mood fun!


The audience awaiting the results!


After grueling sessions with the judges questioning every aspect of their pieces, the winner of the judged part of the competetion was announced -- Susan Clark from Ontario Province in Canada! She also won the raves of the viewers who also picked her as the best (Viewer's Choice) so she went home with two -- yes, irons! Her quilt probably best embodied the spirit of the competition -- using the fabrics on the table. She had only brought some black fabric with her as her own fabric.
If you want to see a lot more pictures including pictures of all the quilts in the competition, go to my Picasa site -