skip to main |
skip to sidebar
This will be a blog post with very few pictures but just a reminder to myself so I won't forget how to get this done. This technique is one I saw on Youtube and really is very easy once you get things all in the proper place. It seemed so simple and yet later, I had a hard time visualizing what order things should be in so that it worked. So here goes....
The equipment needed is three of those pool noodles, some straight pins and nicely ironed quilt top, quilt back and batting.
First, you need to roll those three components on the pool noodles. This is done by (1) pinning the edge of the backing along the pool noodle in 4 or 5 places. The right side of the fabric should be on the outside of the pool noodle and then, (2) carefully roll the fabric snugly around the noodle. Do the same with the batting. Do the same with the top EXCEPT have the wrong side facing out.
Now for the basting part. Place the noodle with the backing in front of you and unroll it about 2 feet. Spray with a basting spray -- I use the 505 spray. I have used Sullivan's as well but that seems to put more mist in the air. Next take the tube with the batting and starting right in front of you, roll it over the sprayed part neatly making sure there are no wrinkles. I apply a little pressure, pulling it away from me once I have an edge basted down.
Next, spray the batting. I don't attempt to spray the whole batt but do lines about a hand width apart as you would do with pins if you were pin basting. Then take the roll with the quilt top and place it down over the batting. Then you can pull the basted part toward you and roll out more of the backing and keep repeating the process until you have everything basted.
Here are the three parts all lined up right in front of me. I actually did most of this sitting down as I am a bit mobility impaired right now. Hopefully this time next year, I will be in better shape after planned surgery!
I have managed to get 8 tops basted this way over the last couple of mornings. I now have batting to do several more. So it is 9 down (one was already pin basted) and 15 to go. This was a relatively painless way to go once I got the process down. I had tried short cuts using only two noodles but didn't work nearly as flawlessly.
In the process of getting things together for my winter in the south, I found this relatively ugly leaf print that I bought years ago. I thought it might work up nicely into a four patch stack and whack and I think I was right. This first set ended up being 6 1/2 inches finished (3 3/4 inch squares). I then proceeded to try some that finished at 6 inches (3 1/2 inch squares) and then proceeded to do some that finished to 4 1/2 inches (2 3/4 inch squares). I thought I would mingle them on point putting smaller finished squares between the big squares. However....
This is the fabric which, although the pattern is big, only had about a 12 1/2 inch repeat.
The first bunch of squares on point (I always like things on point as seems to convey movement to me).
This is the second bunch of squares which finish to 6 inches and a test to see if I like the intersection and also to see if I like back around the squares. No to the intersection and yes to the black. I have found I really prefer with these "posie" blocks to have them standing some distance apart and individually framed. I really do like radial symmetry!!
This is the third set of blocks which finish to 4 1/2 inches. I am happy that you can still see a radial pattern in these even with the large blocks of color.
These will not get finished for awhile while I decide what to do. These beg for some different settings which I always like to do.
I am heading down to winter home in a bit so unpacking my car will take a great deal of my attention for awhile!!
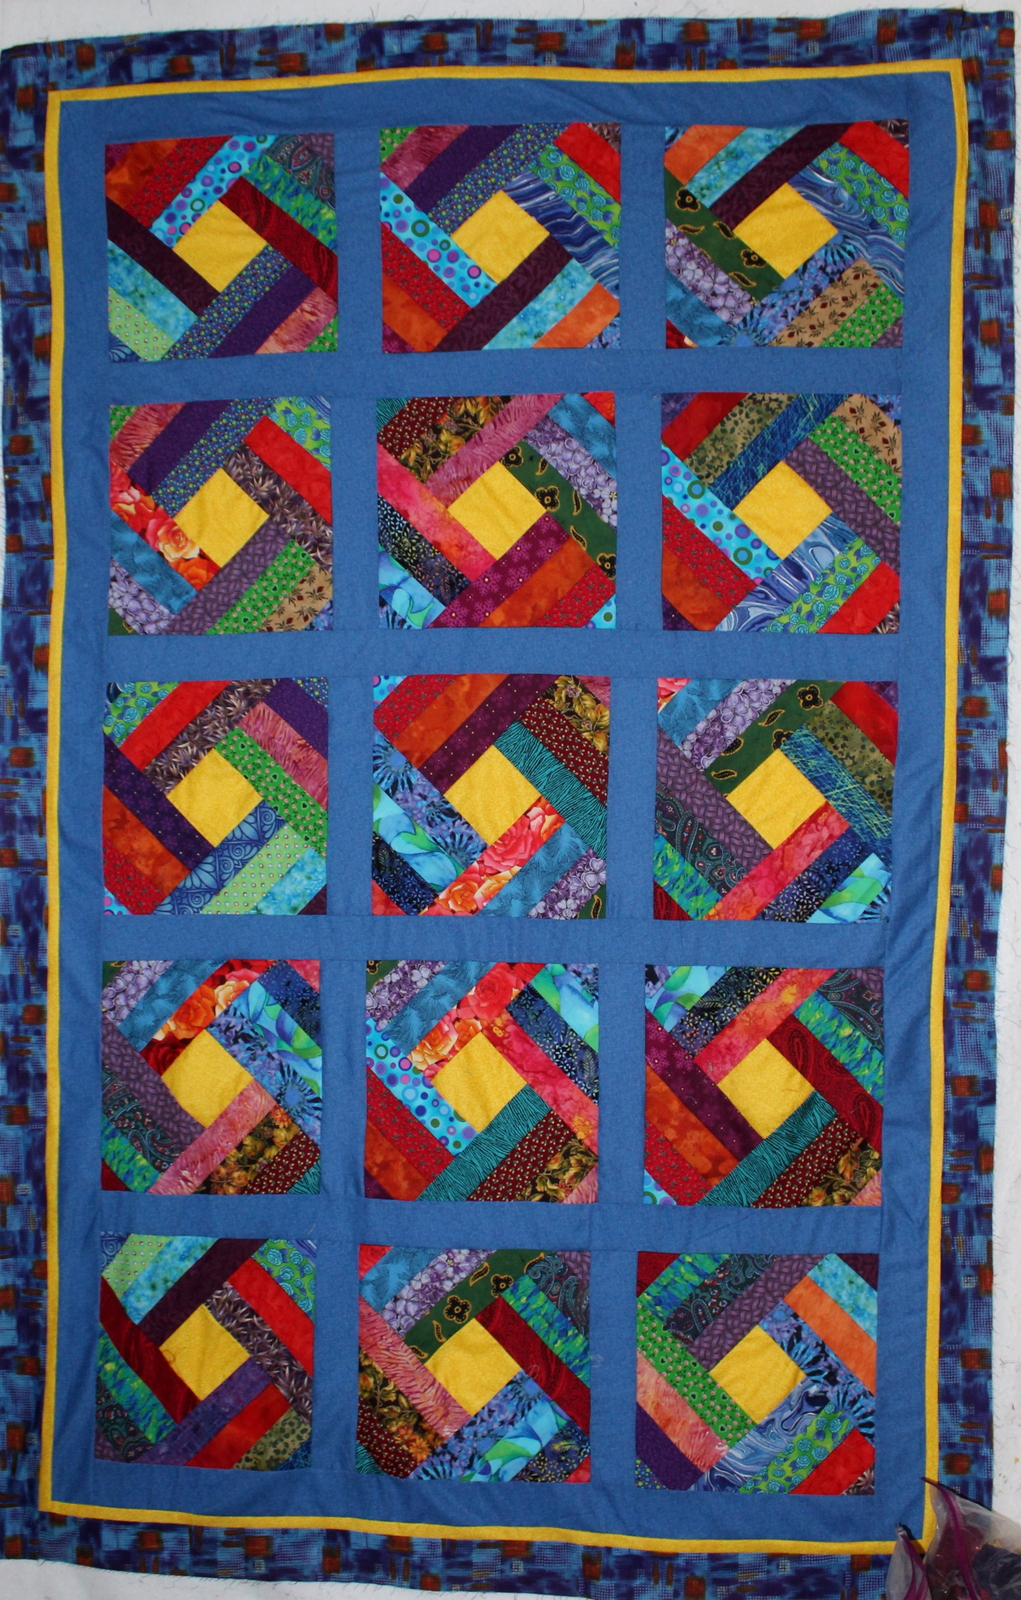
The blue worked out well for the sashing! I barely had enough to put a border around the outside and had to piece all four sides. Luckily this is a fabric that literally doesn't show a seam if you are more than a few inches away!
As I wanted it to be at least 40 inches wide (it is 38 right now), I figured I needed at least one more border. I tried several pieces of fabric that didn't work.
I finally decided to go with a very thin strip of the yellow from the centers and then found this piece in my stash which seemed to be perfect!!
And it's done!! I have to start getting stuff together to transport south so probably won't get too much more done. First, I have to get backings for all the quilts and match them up. I made progress on this earlier today so hopefully that will be done today. I have been gradually getting the strips downstairs -- they are really heavy as I compacted them in 2 1/2 gallon zip loc bags which probably weigh between 5 and 10 pounds each!! I did this with all the 2 1/2 and 2 inch strips. The smaller strips are just stuffed in baggies. Hopefully I will have enough room for everything.
Well as I said in my last post, I did make the two totes with the 16 squares I made with my new favorite block. I think there will be more quilts using these colors and this pattern in the future. Of course there will be variations as I get bored really easily!!
Another view of the totes, showing the lining fabrics. The sides and the bottoms of the two bags are the blue that is in the handles and was also used with the quilt top in the background. I think I will get through the whole two yards I had with these various projects.
This is the pile of 2 in scraps that is sitting next to the sewing machine waiting for a quilt!
Decided to do the "spin" block I had originally intended to do before I got side-tracked with the totes and the quilt!! I actually auditioned a duller yellow for the middle but it just didn't do it so went with this slight orange yellow. I would also see this as a red/blue/yellow palette which is an unusual combination for me. I tend to stick with the secondary colors. I really like this one though and it will be hard to give up!
All the blocks are done (although not in their final places yet) and am auditioning the blue as sashing and border and think it will be perfect. I am not going to do any cornerstones with this one. I may add another border or two but haven't decided yet. I am starting to get my stuff ready to head south in about three weeks so good part of my strips stash has already made the trip downstairs.
I do love this block and it is soooo easy, especially since I put the pattern on the back of one of my rulers which aids in the cutting of the blocks. Also, very happy I have a 10 1/2 square ruler so squaring up the blocks is a cinch!
This quilt will be about 40 x 65 when done.
Made lots and lots of trees in anticipation of making another house quilt from the little kits I had put together. I have enough trees now for three more quilts but probably will only do two more here.
Another one finished! I have actually made a sizable dent in the 2 inch green strips!!
Each house's colorful part uses about a strip 21" x 2" so a strip from a fat quarter works just fine. I literally have used scraps for these.
I had intended to do a "spin block" quilt but started sewing 2 inch strips together into groups of five which is what you would use for this block so decided to do a quilt using 2 inch strips instead of the 2 1/2 inch strips I had been using. I adjusted the length to 3 1/2 inches so the blocks finished to 9 inches instead of 12 inches. Therefore I needed 16 blocks instead of 9 to make the 40 inch quilt. I always like to finish a couple of blocks to see how it looks before I turn in for the day.
I finished the center of the quilt and am going to use a nice blue for a border.
The top is all finished now and I really like this one and the arrangement when you do the even number of blocks. I have enough for a second quilt but decided I would use the blocks to make a couple of totes rather than another quilt.
This will be the back and front of tote number 1. I will use the same blue I used on the borders for the sides and bottom of the bags. I have wild fabric for the inside of one of them (which I will keep). My older more conservative daughter will get one with a tamer inside! The bags will be 18 x 18 x 4. I have to wait now for the interfacing to arrive in the mail as I ran out before I finished interfacing the handles. I also didn't have enough for the second bag.
It was the first meeting of the 2019-2020 year of GVQC and the last meeting I will get to before spring. There was an incredible showing of our "comfort" quilts in this meeting. Altogether there were 50 quilts turned in (if you count the three shown during show and tell). This was probably my favorite of the bunch. I tried to pick out some of the unusual ones to show in the blog although I took pics of an awful lot of them!!
At the beginning of the parade, there were about 15 of this kind so I assume either one person did them or it was one of the "kits" that the group puts together to make these quilts.
This is a closeup of the above block! Forgive the slightly fuzzy pics as I was way back and couldn't get the light quite right.
These were a few more that caught my eye as possibilities for future baby quilts.
There were several that used all different size strips.
I liked the graphic quality of this one with the use of black and white. Another simple use of fabrics!
This picture and the next were three quilts shown during show and tell by our Margaret M. They are all the same simple block.
Nancy L showed this lovely quilt which is all machine appliqued.
These caught my eye but I don't know the quilter.
Pretty quilt in all neutrals.
A challenge made from a bag of brown scraps to which the quilter added orange for some color!
Last but not least is this year's raffle quilt which was made with blocks left over from last year's quilt which raised $5000 for the club. It is all hand quilted and stunning!! The Club members really outdid themselves!
The following pieces were done as part of a silk dyeing class in which many members participated. I thought about it but decided not to. The pieces were really pretty. This is Joyce's.
This is Barb's piece from the class.
This is Caren's.
These next pieces were done by Beth K! She is very active in the modern quilt group and her quilts are just stunning!!
This was done as part of a class Beth took at our quilt show.
Aren't these just beautiful!!
Started in a class with Jeanne Simpson.
Demaris is modeling gifts from Peru which her daughter recently visited.
Ann has become a big fan of crocheting and modeled a couple of her windowpane scarves. She regaled us with a lot of wisdom regarding the wearing of this type of scarf.
These next two pieces will be patterns that will be offered at the GVQC's annual Autumn Fanfare.
Gorgeous hand dyed yarn from one of our members!
Our very very talented Marcia B made this adorable felted dog figure. She taught herself just recently by looking at You Tube videos!!
I loved this simple quilt that Sarah did. Like myself, she is trying to use up scraps of fabric. This was a very simple but very effective use for sure!!!
After Sarah showed her quilt, I went out of order and showed 7 of the 11 quilts I have done since the last meeting!! All in the spirit of what you can do with strips! (and squares). I will probably cut up some of my more colorful and patterned fabric into large squares -- not strips.




 Posts


