Tuesday, September 30, 2008
Manic Material Marbling or Taking Textiles to Textured Treasures
These first two pieces are traditional stone patterns just whisking down layers of color. They both have a look of background to me with water or sky and trees. The first looks like water lillies from a distance (at least to me).
Ya gotta double click on these to see the detail and they aren't even ironed yet!
Well, fabric all ironed and ready to go for another day of marbling and experimenting. Of course, the first experiments were dead wrong but you often learn more from those than the ones that work. So the first couple of pieces are so-so, but oh so easy to cut up! For the past week or so, I have been concentrating on the compression technique for getting good organic looking pieces with lots of color. The compression technique I have been using is to take a piece of foam board the width of the tray (so you can fit it inside) and drag it across the size carefully starting at one edge. If it skips a bit, that just makes it more interesting. No rocket science here. I have also used a small piece of balsa wood as well.
So what I found out today was:
(1) you can get more color on top of the size by using the whisks than with the eye dropper no matter how careful you are,
(2) the more color the better for the compression technique as part of the fun is the blooming up of colors that had dropped to the bottom when squeezed out by the more aggressive later paints. When they are still attached by that thin thread, the colors will follow the thread up to the top again and you get great organic patterns.
(3) don't stroke across the colors more than once as mud ensues pretty quickly.
(4) make sure you have a good variety of values.
(5) if you have a surface that looks icky because of some of the colors dropping and being mishapen, you have the perfect surface for using the compression technique.
(6) if you have managed to get a lot of color on top of the size and you have used the compression technique, you can usually get at least two prints -- even got three from one. The prints look nothing alike!
These two prints were the first and second taken from one tray without adding any color in between.
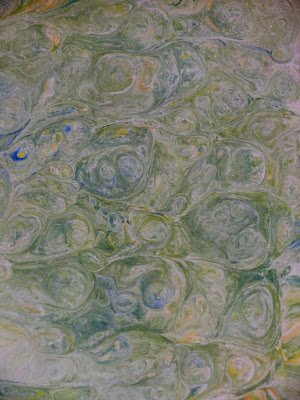
These two were also the result of taking two prints from the same tray without doing anything in between. Notice the second has a lot more red which has more room to spread now that the first print took up most of the blue and green.
Monday, September 29, 2008
Must Marble More
Just can't help myself -- every time I go downstairs to the basement to get something out of the freezer, I wander by the marbling set up!
Well, marbling is on hold for a day or so while my alum-ed fabric dries on the line (hopefully before it rains yet again). There was about a 1/4 of an inch left in the tray this morning, very mucky indeed. I was getting ready to dump it and as I tilted the tray, all sorts of stuff bloomed up from the bottom and I took a number of prints until it got too mixed to get any color separation merely dark green muck. I only had some pieces of yellow fabric lying around so used that and got some interesting prints. They are only good on part of the fabric but nice texture for what is there. I almost like these ones that bloom from the bottom the best as they are so very organic!
Because I have reached the state where I can't find things, it was time to do some picking up in my basement dye area! My biggest surprise was finding 5 lbs of methyl cellulose that I must have bought years ago when I was marbling in a more traditional way. It must have been a lot cheaper back then than it is now! I also found a pound of carageenan which is even more expensive these days! Wow -- who would have thought this stuff would have been an investment (the only ones I have these days that are increasing in value). So marbling will continue unabated!!
This is one of the prints that I took from the stuff that bloomed up from the bottom of the tray when I shifted it.
This was the first of the prints that I took from shifting the tray. You can see more separation and bright colors in this. The background fabric was a pale yellow but kind of got dyed almost a neutral because of the strong muck of the size at this point.
The pelican is progressing although a mini-disaster last night when I managed to transfer some red paint to the white area of the pelican -- wouldn't you know it would be the very small white area!! Haven't decided what to do yet to fix it, but it will be fixed!
Saturday, September 27, 2008
Another Day of Obsessive Marbling!
Well, don't know whether it is the phase of the moon or the humidity or magic but as bad as the size has been the last couple of days, today is a whole different story!!! I have done four prints already and haven't added even one drop of surfactant! I even did a double print from one surface and the second is DARKER than anything I did two days ago and of course totally different from the first taken from the same bath. I finally decided to go back to my "roots". I may waste a little more size in the short term but will save in the long run I think.
So, instead of pulling the size off the fabric I have just printed, I am moving it directly into the water after letting it drip just a bit on its own. I also have all the paints and the size at the same temp (doesn't seem to matter what the temp is as long as all are the same it seems). I suspect the latter is what caused some of my problems before. I read up extensively on the net about surface tension, temperature, viscosity and the interrelationships of all of these and I think there is more unknown than known. However, for specific mediums, there are relationships between two of the three, it seems to depend on the medium so we are back to being unscientific but trying our best to control some of the variables!
Because the weather is so nasty today (typical fall day of rain and gloom), I am resorting to hanging my pieces on lines in the basement! I do have to figure out a way to do this while sitting. I have my tables up on risers for dyeing and really need that at a lower level if I want to sit. I know I will be more productive then. Now, I work for about an hour and then go sit for a few minutes before I am driven to go back down and work some more!
I think this one will make good leaves for my Bird of Paradise!
This is actually the second print from one of the baths -- can't remember from which piece now!
This was my very first print today and I knew things were going to go better. Double click to see the detail. I started with a fuchsia that was the remainder in an old Createx bottle. Must remember to get some more. The colors were much more predictable today. I probably did a dozen 1/4 prints and am down to only 2 1/4 pieces left so will be washing and doing the alum bath again. I am having sooooo much fun!
Friday, September 26, 2008
Gourdgeous Day at Marcia's!
Above are many of the incredible gourds that Marcia and Bill have stashed around their house! The last one above is one of several that are hanging from the rafters in Marcia's fabulous studio! They remind me and Marcia also of Yellowstone so that probably explains my obsession with them as I still have not recovered from visiting that wonderful park. You can see the bountiful selection from which I got to pick in the last picture. I filled up a basket trying to get one of each of the various kinds. Bill and Marcia kept most of the ones we dubbed the "candle" gourds as they looked like a burning candle with the wax dripping down the side. For those of you who have not visited Yellowstone, so many places had that kind of configuration as well. White calcium carbonate (from geologic times when Yellowstone was at the bottom of shell/mollusk enriched sea - calcium carbonate is all that remains of those shells) laden springs covering greenery with the multi-colored bacteria providing the pastels.
I got to visit the gardens and spotted this beautiful flower called a Japanese anenome.
I loved this ornamental grass which was one of many displayed in Marcia and Bill's beautiful gardens.
This was a flower called statice which I had heard of and had seen but not growing in a garden! It caught my eye and of course lovely Marcia gifted me with a whole bouquet of all the different colors she had growing the last couple of years. I will have some in my garden next year.
This is my beautiful bouquet of statice which will grace the kitchen table this winter!
This is my basket of gourds that I got to take home for display! There are some of each variety! Don't they just look like a quilt should be made out of them -- the textures and colors......
I did manage to get my pelican quilt basted amid all the chatter and ooohing and ahhing over things. I even managed to get all my tick marks done for my next Ruth McDowell inspired quilt -- the Birds of Paradise. This will be curve pieced but first I want to get the pelican quilt to the sewing machine!!
Thursday, September 25, 2008
Sometimes You Eat the Bear....
And sometimes the bear eats you! That is how I feel about the marbling today! I was getting great results yesterday but the size was getting trashed and I was having to add more and more surfactant to get the paints to float (the surfactant decreases the surface tension of the paints). So I did one or two more prints today and then decided to use nice clean new size, new paints and new whisks!! Well nothing went right!! I couldn't get the paints to sit on the size for anything! I was adding almost the whole bottle of surfactant and still nothing. I managed to get two or three very pale prints that aren't very exciting but that was it!
All I did differently was warm up the size a little bit with some warm water which I think was a mistake. Add this to the fact that I kept adding surfactant to the paints which probably contaminated the size big time. I have now gotten rid of all the paints in the little cups that I was using and washed all my whisks (or really have them soaking right now). Very, very frustrating to say the least. Reading a book sounds like an appropriate counter measure to me (and not a book on marbling).
Elin always had us leave the size sit covered when we were through with it at lunch or the end of the day. The first thing after lunch or in the morning would be to take a print of what was there as you do get some amazing results from the paints frolicking while you aren't there!
This was my last print with the old size which was pretty cool (the picture is a little fuzzy).
This is the best I could do with the new size though. I wonder if the yellow was causing all the problems!
As you can see, something has trashed this size -- some wayward surfactant hiding somewhere!
Again, a pale sister to the prints from the previous days.
Tuesday, September 23, 2008
More Marbling to Share!
Just some flowers from our neighbor Joe and Sharon's garden. This is a mum which is almost identical to the wild purple asters that grow around here in the fall.
The fall roses are starting to come out. The hibiscus are out in full force. As the temps are cooler, the flowers last longer and so the plants are literally covered with flowers now.
Well, couldn't keep me down too long with cleaning and all those mundane tasks, so mixed up another batch of metylcellulose today and got some fabric prepared. Always a bit anxious to get started, I didn't even iron two pieces before I had them brightly colored and hanging on the line.
Luckily, the Kona plain white cloth (non pfd) which is not much good for dyeing (comes out a bit pale for my tastes) is great for marbling. Where optical brighteners bother the dyes, they seem to have no effect on the absorbtion with the paints. It soaks quickly in the alum and then picks up nice color with the marbling (both sides of the fabric are infused with color).
I am now trying to use up all the ancient paints that I have so will be having some fun the next few days. I am working with a slightly smaller tray (does a fat quarter 18" x 22" nicely and I don't need to use any kind of holder to get it into the bath). The surface tension of the size is quite a bit more than it was so don't know whether that is (1) temperature, (2) smaller container, (3) two week old size which might be thicker or (4) the colors I am using! I hate using a lot of surfactant when I start as it trashes the size (the methylcellulose) so quickly so may add some warm water to this tray as well as some newly made size to see what happens.
Of course I am having fun doing the push thing which is dropping a nice full tray of color and then taking a piece of cardboard and attempting to move the whole thing to one side and then the other. It is very cool and a follow on to what I was doing before the Ruth McDowell class. I have started with a mix of reds, oranges and yellows as that is the next piece I am doing and would like to use some of my marbled fabric in it as well (the bird of paradise plant). May have to do a bunch of greens and some browns as well.
I seem to do much better with these when I just let go and fling color! I started with oranges and reds and yellows and have some boring pieces (but usable ones). The colors were sinking like crazy so I mixed up some blues and they seemed to stay on top a little better, so I laid them down first and then started adding other colors until nothing would stay on top! I cut a piece of foam core board so that I could drag it across the marbling surface as I like the effects! The colors do all sorts of weird things then! I should add that I took these pictures while they were hanging on the line so they haven't been ironed yet which always improves their look.
This was the second using the above attempts. By this time I was using the uneven side (where I had hacked away) of the foam core board and that was even cooler as it didn't move everything uniformly. I do like organic.
This was back to my original red and yellow but adding in a little fuchsia and purple. The size is probably pretty much trashed by now. I did add some warm water to it earlier and that did some very weird things but did make things a bit better. I am slowly but surely using up all my old Createx paints. The Golden paints are awesome but I want to order a controlled pallette from them using the information I got at a presentation they made some time ago. The artist giving the presentation recommended some colors specifically and I have some but not all. They are wonderful for marbling (the Createx are too). I have been throwing in the ProChem color concentrates just for good luck!! I have quite a bit of those and they are OLD! I have been using the GAC900 with the Golden paints just because I have so much of it though I don't think you really need it!
Saturday, September 20, 2008
Grapes, Grapes, Gourds and the Pelican Top is Done!
Well, I have been on blogcation but work hasn't ceased! Yesterday and today, I washed, destemmed and made grape juice from 10 gallons of grapes given to me by my lovely friend Marcia!! Warren is looking over my shoulder and actually helping me get ready to make jelly from the second batch! I found all my old canning supplies, dusty but intact, in the basement so I am managed to finish!
But above-mentioned friend has an even better harvest of ornamental gourds! I saw several when I was there the other day and they were just beautiful. You MUST look at her blog and see what they harvested today (http://www.decampstudio.blogspot.com/) It is beyond incredible!! And she is going to let me have some!! I can't wait to get my handy dandy camera over to her house so that I can take pictures of so many of the beautiful ones -- they are really nature's works of art!! I am so excited!
In the meantime, I actually got down to business and finished the pelican top last night and am anxious to get started on the quilting!! I have already started the next top and have several other drawings ready to go when I get that one done.
When I took the Ruth McDowell class, several of the students were using copyright free photos that they found on the net and some of them were really nice, but.... I can't seem to get around to using other people's photos (except for Lisa's of course) as they just don't feel like they are my images. I guess that is why I got into dyeing and painting fabrics as well as making my own patterns. It just didn't seem all mine unless it was all mine! Does anyone else have that problem?
I also went back and looked at one of the many design books I have for some more of that analytical thought process. It is my secret vice! I like some hints as to why things aren't working or are working in artwork so going back to the basic understandings of all the design terms does seem to help me a bit. Unfortunately, there are no shortcuts in this process and the only way to really get it is to do it. But training my eyes to see beyond the obvious does seem to help! Looking at a painting that you like (and if in a museum like the Metropolitan obviously someone else thought it was worthy as well), breaking it down into what colors, where they are, what mood is the piece, where is the focal point, what are the unifying elements and what makes it interesting for me is a useful exercise if only to see which the "rules" are broken.
Monday, September 15, 2008
The Last Day of Class
Sunday was the last day of class and I worked furiously to try to get my pelican done but alas, it was not to be. I have found that working very fast I am making better decisions but it has also resulted in a few sewing errors which have had to be undone. Ruth looked on almost in horror as I took out stitches with my 58mm rotary cutter!! Phyllis was sure she would cut off a finger or at a minimum have many holes in her fabric! Ruth has converted me to tic marks though!! I will never be without them again even in straight seams! It just makes the sewing so much easier and less painful.
We worked pretty much through the day again and then had a review of all our pieces before we finished at 4 and started packing up. So I have pictures of many of the partially completed tops from the ladies who were kind enough to let me take pictures of them. We all shared email addresses so I look forward to seeing some of them done and will publish them if they allow that as well!
This is Cynthia's garlic flowers I believe. It was very abstract and had wonderful fabric choices. Double click to see better.
This is the landscape which has really taken shape. There are still leaves that have to be added in the foreground in the upper right hand corner. She has very successfully done the tree on the left side and Ruth suggested she extend the quilting lines out past the ends of the branches.
This is Norma's Dutchmen's Breeches (sp) which has wonderful intricate piecing and a subtle striped fabric which appears as kind of a border around the right hand side. Double click to see better.
This is Pam looking at the last day of the Himalayan flowers. Her choice of fabric is stunning. Can't wait to see this one done.
This is Phyllis, my tablemate, with her sacks of spices which you can see are shaping up nicely. It was a picture taken on her China trip and will be combined with several other quilts she plans to do from these pictures. Double click to see the original image more closely. She has done a superb job of getting this top to look like the picture!! Can't wait to see this one done and how she handles the man that is in the background.
This is the last day of the owls. One of my pieces of drapery fabric is the chest of the male owl to the left. I loved these owls!!
This is the pelican for as far as I got it. He is all finished and diagonally the right half is finished. I still have the lower left quadrant to finish up. I have decided to stray here in the piecing of the splashes and will be doing some intricate piecing of "fabric" to fit into the area. I have several ice blues which I will intermingle with the brighter blues. Again double click to see the closeup. I already know exactly how I will quilt him and I think it will pull all the background water together!
My dear friend and my daughter's MIL Ann invited me to stay at her house on the way home from class. She lives in the Albany area so it was an easy 2 hour drive from class and then it will be another four hours home. She has three wonderful and color coordinated cats. This is Iris who has rarely missed a meal. She looks a lot like our previous cat Tasha.
This is Rocky who is a beautiful Maine coon cat. He has white under his big fluffy tail and looks a bit like a skunk when he moves away from you. He tends to be a bit of a bad kitty too and has to be into everything. The other kitty was a little shy about having her picture taken but she is Buffy and is a beautiful part Siamese with the buffy coloring but a brown striped tail. She also has a more solid build than your average Siamese but she definitely has attitude!!
Saturday, September 13, 2008
Down the Home Stretch with Ruth!!
Peaking out from behind the vegetable quilt is our indefatigable teacher, Ruth. These are the vegetables that she has in her vegetable piecing book of patterns which is one of my favorites of her books.
Well, today was exhausting as I haven't been getting a good night's sleep and I was manic about trying to get my piece finished before I leave the workshop! It was a very full day of stitching and unstitching (seemed to do more of the latter today than the other days) and then an hour ride to an idyllic retreat in Vermont where we had dinner in this wonderful house nestled deep in the woods with windows everywhere to see these wonderful 360 degree views. It was a lovely evening with fellow class members and Ruth. I came back to the motel and am packing up so I can check out first thing in the morning and head back to class and FINISH my piece.
This is a piece that is being done by Pam and pictures a Himalayan flower that had a long name. She loves flowers and you can see her earlier quilts on previous blogs. This one is stunning and I would love to hang it in my house!! She is a second time student of Ruth's.
The landscape piece is making progress and the pieces are beginning to be sewn together and the leaves are present down in the foreground.
I am struggling a bit with the background but am quite pleased with how my pelican has turned out. Ruth seems to approve of my color choices for the most part but she doesn't volunteer opinions unless directly asked!!
Friday, September 12, 2008
Ruth McDowell Day 3
We have all made steady progress today. I am bound and determined to finish by the end of Sunday and just may achieve this goal but I won't sacrifice the quality. Our RAFA mentor Pat Pauly has had an effect on me as I am moving fast and not obsessing about fabric choices. Just jumbling the stuff up and moving forward. The design has changed on the fly as well and may change more. You can see from the picture that I almost have the two wings done and will start on the most difficult part tomorrow morning which is the face. There will be some tiny pieces in that. With some luck I will get the face done before I leave tomorrow and then can do the rest on Sunday.
The best part (for me) is that I am using many of my marbled fabrics and many of the weird monoprints that I did a couple of years ago. Each of the prints is probably 4" x 6" but plenty big enough to cut out a chunk for a piece of wing. I have definitely been using large chunks of the marbled fabric that I had made especially knowing that I would most like do this picture or another version of it for my class project. Oh well I will just have to do more marbling when I get home!!
Well the owl is definitely coming along (Ann Shaw)nicely and hopefully we will see her mate by the end of tomorrow!
This is Cynthia's flowers which were pictured being drawn on the first day. The high contrast is really making it work.
This is Pam's flower piece which is now vying for my favorite with the owls. I love the colors in this one. Don't feel too bad as she is a repeat student as well!
This is my tablemate Phyllis's baskets which are starting to shape up. The colors are wonderful. The sewing machine came out this afternoon!!
Theresa is making real progress with her landscape with the mountains as she has a lot of the scene at least auditioned. It will be outstanding when she is done!
Subscribe to:
Posts (Atom)