Saturday, July 30, 2011

The Butterfly Bush is in Bloom and the Butterflies are Back!

Warren's garden is really beautiful this year.  It seems to like all the sunshine we have had and the petunias and marigolds are extremely full and add lots of color to the yard.
This was one of the new additions to the garden this year -- a perennial hibiscus with blossoms that are at least 9 inches across.  We have them in this vibrant fuchsia and also a lovely  light pink.
This is a side view of a White Viceroy butterfly -- one I had seen before but hadn't gotten a picture.

This is the back view of the above Viceroy.  You can see the blue on the edges on the back and his prominent white stripes.
This is actually a Monarch and I believe it is the first one I have gotten a picture of!!  I have seen the Painted Ladies and lots of Gulf Fritteries.  This is the side view.
This was definitely a very hard picture to get as most of the time this butterfly had his wings folded up.  I must have just clicked in the split second he opened them up in this shot.  All the butterflies are sitting on my neighbor's butterfly bushes.
This is a butterfly called a Skipper (I don't know which one  yet as there are a lot of skipper varieties) but they are fast moving and only
about an inch long.

Thursday, July 28, 2011

When George Lets Me, I Do Some Piecing....

George was actually behaving in this shot and giving me a few inches to work.  The minute DH leaves the house, George bounds up to the sewing room and won't stop pestering me  until I pick him up and put him on my shoulder where he purrs and rubs and literally puts his paws around my neck.  He will keep this up for half an hour and won't hear of being put down.  Eventually he retires to a place near the sewing machine, cleans up and then goes to sleep.  The second Warren opens the door downstairs, he wakes up and heads out of the room -- very fickle.


This is the first of the quilt tops I made from the strips that I cut.  I decided that I would make a quilt for the beach house instead of comfort quilts with this bunch as I liked the colors and it was taking a bit more labor than I like to put into quilts to give away (like the disappearing 9-patches).  It is actually 72 inches by 81 inches so will fit on a queen sized bed or smaller.
This is the second top made out of the same pile of strips.  Basically five 2 1/2 strips were sewn together and then cut diagonally which produces two different types of triangles.  So each 10 1/2 inch square produces 2 of each type to triangle.  You can usually get 4 squares from each strip but not always.  I had a bunch that only got the three squares so I cut up the rest into 4 1/2 inch wide strips and that is what is between the triangles in this top which is going very fast as opposed to the top one.  This is about 1/4 of the finished size.  There will be the white strip in the middle gradating out to the dark yellow orange on either side.  It is a very graphic looking quilt and I should have enough blocks to make a couple which I can use in the room with the twin beds.  I do like to have nice quilts on all the beds ---- and there are a lot of beds in the beach house (7 at last count!).
The above is a collage of several fabrics I did with the leftover dyes.  I did add navy blue into the mix as well as I like mixing intense blue and navy blue with both fuchsia and yellow -- gives a little more variety to the surface.  Each piece is 1/4 of a 2 yard piece.


I also did an additional couple of long sleeved tshirts using just the navy and intense blue dyes.  I do like those two dyes mixed together.  IMHO, navy blue is a pretty "clear" color as is intense blue.


I think I may be done dyeing for a bit but still have a few tshirts left sitting sadly white so they may find themselves immersed before monthend.


I have to start thinking about what projects I am going to be taking down to NC.  As design is the most time consuming in the pictoral quilts that I do, that may be the direction I go in.  I will have to take some sewing to do as I rarely go through a week without sewing.

Monday, July 18, 2011

Still Using Up the Leftover Dyes...

It is amazing how long these dyes are lasting.  I basically made a quart ea. of 3 colors -- blue, yellow and fuchsia in a 10% (only 6% for the fuchsia) solution for the monoprinting demo 10 days ago. (Note:  I use 10% solutions as it makes the math so easy for determining depth of shade -- 10 ml of solution will contain 1 gm of dye powder)  In the past, it has become obvious that the higher concentrations do stay unbonded with the water a lot longer -- maybe because of the dye to water ratio.  Anyway, I have now done (in addition to what was used in class) 8 t-shirts, 6 yards of wide cotton knit and four yards of my Egyptian cotton.  I still have half a quart of the yellow and fuchsia left and about 1 1/2 cups of the blue.  Wow!  And the best part is that I really like the colors that these three dyes produce together (sun yellow, intense blue and fuchsia).  They are all the brighter of the pure dye colors (turquoise is probably the brightest though and I haven't used any of that this time). 


This particular combination  is not one of Carol Soderlund's trios of colors  that she uses in her Dye Mixing class (which I highly recommend to anyone who has a serious interest in  controlled dyeing) but I did do many other combinations after I left the class to see what I could come up with - and this was one that I really liked.  I found that using fuchsia and turquoise together in low water immersion in anything but very low concentrations yielded too much separation of color as fuchsia is the fastest bonding and turquoise the slowest.  Maybe I will scan in some of my other results and do a blog on that....


My technique for the last bunch of dyeing is a little different from what I usually do.  I have pre-soaked all the fabric or t-shirts in a warm soda ash solution (dyeing in my basement and even in the summer, this is a necessity).  I then use those plastic tubs used for washing dishes that you find at the dollar store and put two tshirts or four yards of fabrics spread out very evenly across the bottom of each. I then make up cup solutions of about 2% solutions (I know that 20 ml of dye solution will yield 2 gms of dye which will dye 100 gms of fabric to a depth of shade of 2% or medium and then I just add water up to the cup level) of each of the colors (or whichever of the colors I am using) and then I kind of pour them all over, one at a time, smashing the fabric after each addition so that I maximize the distribution of the dye immediately.  I have been really going very, very light on the fuchsia even in its reduced concentration probably never using even a 1% solution as it overpowers very quickly.  The fabrics aren't sitting in big puddles and I figured I would use the timing for dye painting (4-8 hours) rather than the usual low water immersion time (1 hour).  So far, I have been spectacularly pleased with the results.  Some are almost as nice as my snow dyed fabrics.  With consistent 90 degree temps around here, we won't be seeing much of that for a while!  I may play a bit with salt dyeing though and try something a little different -- we shall see.... Turquoise, however,  is the best for this!


This was my very favorite of the fabrics I dyed although I don't think the subtlety can be seen in this image of the two yard piece.  It will be enough for a tshirt for me!
Last but not least are the socks.  I am getting smarter and dyeing them in batches so that I have many of the same colorway so that matching and losing socks is not such a problem!!  They will match my t-shirts as well.  These brightly colored socks even get a laugh from my daughters (after the eye roll of course).

Thursday, July 14, 2011

Scraps and More Scraps....

Well, although I didn't like this configuration the other day, it grew on me today with this orientation.  Amazingly I am using up a lot of those strips.
This is basically the same as above, only the orientation is different.  These two are utilizing the top and bottom from the four way cut on the strips.
This is the zig zag that I showed the other day only utilizing all the blocks that I had done.  I thought it might be interesting to use different colors between the scrappy fabrics and found this whole assortment of yellows.
I have been using up some of the leftover dyes from the monoprinting day on my neverending supply of tshirts from KMart!  I basically just made up enough sun yellow and intense blue to make a 3 % solution on the tshirt.  Then I decided to squirt a little of the fuchsia but only about a 1% solution of that.  I had soda soaked these tshirts and left them wet and just put on about 3 cups of dyes altogether.
This was just a mixture of the blue and yellow dyes in the 3% solution.  These dyes were a few days old at this point but I liked the lighter colors I got.  I did four tshirts altogether.  Still having tons of dye, socks will be next.

I have also found quite a few dye "dogs" that I am going to discharge soon!
This is a small (24" x 24") piece that was started in the Cynthia Corbin class I took a  year ago in June at the NC Consortium show.  I had never been quite sure what to do with the four blocks but decided to put them together today.  They are totally pieced and improvisational and use my hand dyes -- I only took a few fabrics to the class.  Not perfect, but done!
This is a wall quilt that Marcia is entering into a quilt show and had to get quick pictures of!  This was originally a three panel piece, but she added a fourth panel and made it one piece.
Priscilla was getting this piece ready for showing at Quilting by the Lake which starts on Sunday of this week.  Because of their highly restrictive rules, I don't even go to see what they are doing anymore -- they have forbidden photos anywhere but don't get me started....

Tuesday, July 12, 2011

Lots of Lilies - Pittsford Garden Tour

Well this is a collage of many of the different kinds of day lilies that I photographed on the tour.  The weather could not have been nicer although there was so much sunshine a few of the shots were just plain overexposed!

As you can see, there was a very wide variety of day lilies which are some of my favorite flowers and I am sure there is a second lily quilt in here somewhere!
I thought this was one of the more unusual colors.  Just looks like someone took a watercolor brush to it!  These lilies were mostly in one of the participant's gardens although almost every one of the 9 gardens had one or two varieties.
I particularly liked the orange and yellow varieties of this double lily.
I loved the lines on these leaves.  At another house, they had the same type but it had green, purple and pink veins.  Unfortunately the lighting wasn't good enough for a great picture of those.
Two of the gardens had small ponds with water lilies, another of my favorites.
This was an acantha which I was not familiar with but really liked!

I think I finally have the space problem licked (until Blogger engineers in their infinite wisdom install another update without telling anyone and without any testing....).  I use Chrome  but this time with the Updated Blogger Editor (check on Settings in Blogger) and I always put a carriage return after I do the text next to the picture.  If you don't add this carriage return, things become all flummoxed again.  This one went rather smoothly!  Also you have to remember to add all your pictures at once using the Upload feature on pictures but deselect all the pictures you don't want immediately.  I add the pictures to the blog one at a time after they have been uploaded and it has gone smoothly....  I will have to see if I can do this in IE8 as well....I found that I could use the "new editor" with IE8 while the old editor does not work at all with that version of Explorer.

Monday, July 11, 2011

Stripping....

Many of you may remember that I cut mounds and mounds of 2 1/2 inch strips from scraps I had accumulated from various and sundry projects over the years.  Anything that was the full width of the fabric was game!  I decided Friday at Marcia's was the place to try some different configurations to find a scrap quilt that I liked.  I decided I would work with 10 inch blocks which meant sewing five strips together into a set.  In most cases I just had one or two strips of the same color.  This configuration works well if you can make a whole bunch of strips sets.  You make the components by dividing the strip into 10 1/2 in segments and then chopping those segments up by diagonally cutting.  You get two different kinds of pieces resulting.  I had first cut them just diagonally once but didn't like them at all and couldn't seem to do anything interesting with them.
This is one of the iterations using the 1/4 blocks that would be on the top and bottom of the strips.


This uses the top and bottom 1/4 square triangles sewn together along the longest seam.  The blocks are surrounded by black triangles on the right and white on the left (hard to see).
Here is another iteration.  This became my favorite.  It uses the side 1/4 block cuts.  It is hard to see but there is white triangles between the pieces on the right and of course black on the left.  I thought perhaps I would try some other colors as well.  I will be able to put together the strips and then do a quilt as  you go technique to put together the final pieces.  These will all be donated eventually as comfort quilts although I may make a couple of the beach house.
I didn't like this iteration at all as I thought it made the white triangles look too dominant.
This is the latest version of Priscilla's second leaf piece.  You will note that she has added some "after the fact" coloring to some of the fabrics -- this definitely takes courage!  She has begun the machine quilting and it is looking quite dazzling.

Marcia, on the other hand, was taking her pieces off the wall so frequently to sew them together that I didn't get a picture yet of her latest jet trails!

Sunday, July 10, 2011

July RAFA Meeting

This was a piece done improvisationally by Sharon. She just started with an idea and built on it. This will be a graduation gift (when finally done.)


This is a piece that Glynnis created using the technique that Diane had talked about at an earlier meeting. It is basically a collage technique using one piece of fabric. Glynnis used her own hand dyeds and it is really a nice piece.


This is another of Liz's Halloween jackets. She seemed to think she had enough fabric for several more!!


This was a jacket that Liz made using her snow dyed fabric. She only used black when creating this piece.


Caris shared another of her elegant jackets with a lot of fancy stitching on it.


This is a piece that Caren is using for her new landscape class that she will be teaching soon.
Well, I don't know about many of you out there but I have been having big problems with the editor on Blogger these days!! When my computer crashed a few weeks ago under the weight of several viruses, the vendor uploaded the newest version of Internet Explorer. Well, Blogger doesn't work with that so I upload Google's Chrome which I figured should work just fine. Wrong.... The spacing has continued to be a problem and takes lots of fiddling to get anything approaching nice. Many people have to use an alignment tool in their Internet Explorer to get the pictures and text to align. So this morning I discovered that there was a new editor which Blogger recommends you use. I played for over an hour with it and found that although there were some neat features (like uploading multiple pictures at one time and be able to move them around), the spacing problem was even worse than with the old editor!. Sometimes the text would appear next to the pictures and sometimes below and nothing I do will change it. So back to the old editor for me. I even tried different templates!

Thursday, July 7, 2011

Monoprinting with Thickened MX Fiber Reactive Dyes at RAFA

Part of our day long monthly meetings is a short program to expose members to some process or technique with which they may not be familiar. These are not intended to be full blown classes but are usually longer than just a demo. Different members of the group are called upon to share a sample of what they may be teaching professionally or just something they like to do. This ranges through all types of surface design as well as felting or working with beads or even finger weaving.

The above is purple brushed on new heavy weight plastic on the left and purple smeared onto a sheet of the play foam for kids as well as some stamping with painted blocks.


Today I volunteered to do something related to dye painting and chose something relatively simple which was monoprinting. In various classes I have been in, we have done an assortment of techniques and I tried to share as much as time would allow.

Here, someone dropped some colors onto the foam or plastic, put the fabric on top of and then brayered the fabric causing the dye to spread out. I love the effects you get doing this.

I asked everyone to bring pfd fabric that was prepared by soaking in soda ash water (1/2 cup soda ash to 1 gal of water) and then drying on a line. I suggested fat quarters. I also asked they bring small cups for their dyes and foam brushes and white trash bags for transport and for their workspace. A brayer or roller foam brush was optional. I also sold some prepared fabric for those who were new to dyeing (we had two in the class that had never used MX dyes before) and several that were pretty expert.

I provided 2 ft x 2 ft masonite boards (I get the 4 x 8 ones cut down at Lowes and they are cheap). I also provided some heavy plastic pieces (about fat quarter's worth) and pieces of skinny foam (the kinds kids use and which I get in 3 ft x 5 ft pieces at Joanns). In addition, I had one large sheet of acrylic as well as several small pieces of that and foam. I also made up liquid dyes (sun yellow, fuchsia and intense blue) and print paste (1 cup powder to 3 cups water). I had some miscellaneous sticks and whisks for stirring. I used squeeze bottles for the dyes as that was the most effective for mixing it with the print paste with 10 people. I used up almost all the print paste I brought (6 cups) but had lots of dye left over (I made a quart of 10% solution for the three colors).

The techniques included:

1. slathering with brushes or sprinkling dyes on either plastic, masonite, foam or acrylic until you got colors and a pattern you liked. Then place the fabric on the surface and use a brayer to insure nice even coverage. As the surfaces are used more and more, there is less puddling of the dyes. Of course you can do the same piece over and over again too.

2. slathering dyes on a small piece of foam and then using some sort of pointed object to put lines on the foam and then using it as you would a rubber stamp on the fabric. I also had various different kinds of tile group spreaders with different patterns to use.

Unfortunately, it was a very humid day so the print paste was not as thick as I would have liked. I would do it thicker the next time. People in the class were incredibly creative including one person who brought a toy truck in and use it to march across the surface.

Here someone painted colors onto the foam and then ran the toy truck all over the surface and then printed the fabric!!


Here Donna is working on a piece.


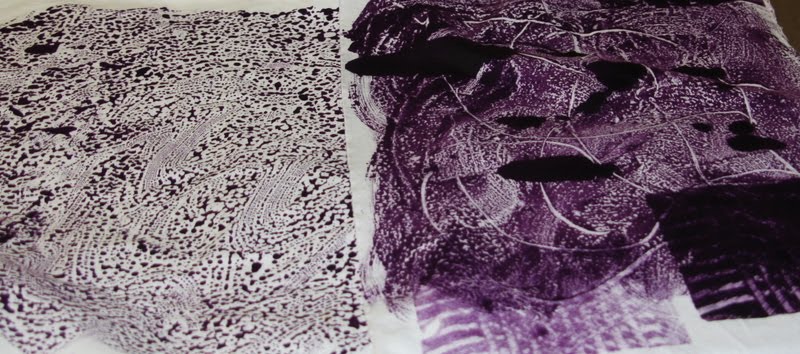
Joyce decided to do some direct dyeing by painting directly onto the fabric. Joyce had done monoprinting before but not with fabric and really enjoyed it.


Here Val took some already dyed fabric and monoprinted on top.


Julie brought in a tshirt that had been ruined by some stains. She splashed some thickened dyes onto a piece of plastic and then pressed the tshirt onto it to give this Jackson Pollack like result. She was thrilled as the stains no longer showed and the tshirt was retrieved!

Friday, July 1, 2011

Most of the Machine Quilting is FINALLY Done -- Lions Emerge

Well, I finally finished most of the machine quilting on the whole piece. It has taken more time than any other quilt that I have ever made and I am not totally satisfied with it. I still want to do a little more dense stitching in some places to add a little more definition but I am not going to go crazy. I may also add a bit more of the light green along the top but this cropped version doesn't look bad even cutting off some of the male lion's head, so may not after all.


This is a little bit of a closeup so you can see the stitching a bit better. Oops, see a thread that needs to be cut. Trimming the threads on the back took three hours the other night and now there is a bunch more to do! And I only have one more Midsomer Murders dvd to watch.. Oh dear....

This was a bug in the garden and right off hand can't identify him but looks like it should be pretty easy with a little detective work - six legs so he must be an insect.

Now I just have to do some work to get all three of my projects fully complete.

Next Thursday, I am doing a demonstration at RAFA and leading a small group in doing some monoprinting with thickened MX dyes so have to get prepared for that. Bought some new dyes for the first time in a long time this week and prep'ed the fabric today. So maybe there will be some dyeing to report on soon! The nice thing about the techniques is that they are just as applicable for paints!